
Demystifying Apple Development: What It Actually Takes to Ship an App

This post grew out of a talk I gave for Moms in Tech in April 2026. I figured if it was worth saying out loud, it was worth writing down and sharing with all of you too. Plus... curating this was a "productive" way to procrastinate the talk.
Background
I didn't grow up knowing I wanted to go into software development. I loved science and math in school so I chose a general science degree at the local college and randomly chose a Java class to break up the organic chemistry and genetics I thought would be needed for whatever I chose... and thus, almost by accident, I found out computing science was an option and ended up with a university degree in bioinformatics that I promptly never used the biology half of. My internship and then first official job was building enterprise software in VB.NET and SQL and I loved being able to work on everything from the front end all the way to the back.
Then I had kids... two of them 22 months apart with a move from Canada to the U.S. right in the middle so, for a while, that was the whole job. Once I surfaced from the newborn fog I started finding my way back to myself. A blog I'd always meant to start. Sewing. Fitness. And then an ad for a reMarkable, an e-paper tablet, that pulled me back into tech before the device had even arrived.

The full story of how Simply Customize It started is here if you want it.
While waiting for the reMarkable to arrive I browsed Facebook user groups, discovered you could switch out the sleep screen image to something else, and that became the first thing, after onboarding the new device, that I wanted to do. Naturally, with my website started, I wrote first one, then two, and finally three posts.... and people started reaching out. One person paid me $50 for a Zoom walkthrough. Someone else wanted me to just do it for them entirely despite the fact they were hours away from me.
And I thought... what if I could make this simpler for them...
I dove into learning Apple development, built the app through several complete restarts (thanks WWDC and updates), and eventually... when I felt it was ready created an LLC and shipped it. My mindset going in:
Let's see how it goes. At worst it's a portfolio and I learned something.
And that's how I got here... with that app, then two games (a minesweeper and matching one), and finally with Simply Remember It. And the whole time I kept the idea of helping and simplifying at the core along with at worst it's a portfolio as a fallback plan.
What Nobody Tells You About Building Apps
There are a lot of tutorials out there. There are also AI tools now that will spin up a starting project for you in minutes. And thus also tutorials on how to use the AI tools to create the project.
What's harder is finding someone to show you what happens after that. The configuration, signing, permissions, and the part where you try to upload your first build and have absolutely no idea where it goes or why it's mad at you.
That's what I want to walk through here. Not syntax and not how to write a SwiftUI view. But what the whole thing actually looks like so if you're curious about building an app, or you've started and hit a wall you didn't expect, this might help.
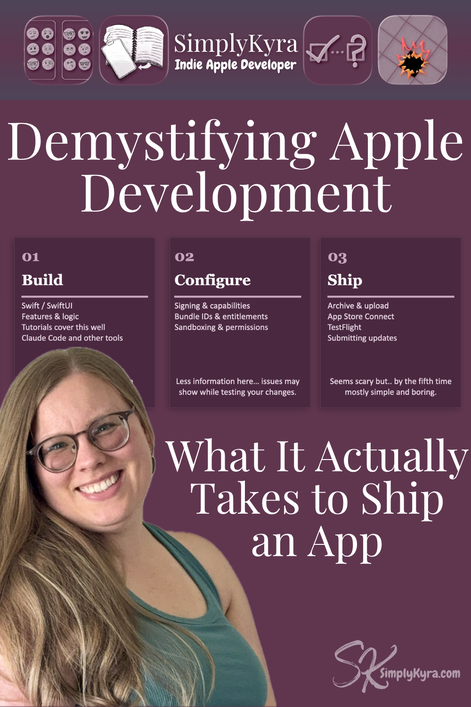
I think it's easiest to think about Apple development in three layers:
Layer 1: Build
This is the part tutorials cover well. Writing the app itself, Swift and SwiftUI, features and logic. There's a lot of great material out there for this part so I'm not going to attempt to reinvent it.
Instead I'm going to recommend Paul Hudson at Hacking with Swift. His free 100 Days of Swift is a genuinely good starting point. If you decide to go deeper his membership includes monthly livestreams where he builds something from scratch in real time and you try to keep up. There's something satisfying about solving a bug in your own version of the project while still keeping up with the livestream he's still working through. That said, he also shares the text version after the fact if you do get lost. There was also a free session he did on YouTube that's great if you're interested in AI tools.
The number one thing about this I've learned:
Your own project, regardless what it is, will teach you way more than any tutorial could.
When you're following a tutorial there's steps, trust, and if something is outdated and hard it's easy to walk away... I did several times. When it's your own project it's yours so you care way more about it and if something breaks it's on you to figure it out... and that process (through similar tutorial, breaking it down, asking questions, and even getting angry) makes it so much more exhilarating when it's solved. That's the part of coding I truly love.
There's always the choice to walk away but that friction of it being yours is where the real learning lives.
When I get stuck on something (and I definitely still do) I find the best way to solve it is to create a small separate project just to reproduce the bug. This isn't in my main app. Instead it's a tiny, isolated project that has just enough to recreate the problem. Sometimes I solve it in the process of setting it up and then I simply delete the project. If I don't I have something clean and contained to work on that's quicker to iterate on and, worst case, is easier to share and ask for help with.
If you see people online ask for the mvp (minimal viable project) this is what they're asking for so they can see the problem and what might be causing the issue without the excess stuff.
I've done this with navigation issues, a multi-choice picker, and most recently a CloudKit sharing problem I couldn't crack until I pulled it out into its own project and really looked at it. AI tools, in the last project, have made spinning up these minimal sample projects so much faster which has made the whole debugging process less painful.
Layer 2: Configure
This section is more an aside in tutorials and can be the most annoying part of the process too. I've split it up below but for a brief overview when you open a project in Xcode the left side panel is your navigator. At the very top is your project file. Click that and you get a settings editor and from there can see your package dependencies. Beyond that you'll need to click on your target (for the actual app and not the overall project) for the target-specific stuff. When I first started macOS and iOS were separate targets but now it's all in one. That said when adding widgets, watchOS, or tests you'll need to add a new target.
Package Dependencies
Let's start out on the main project and check out the package dependencies. If you're creating a simple app this might not matter but it's where you go if you want some other code used in your app. This can be someone else's (make sure you trust it) or your own that you separated out.
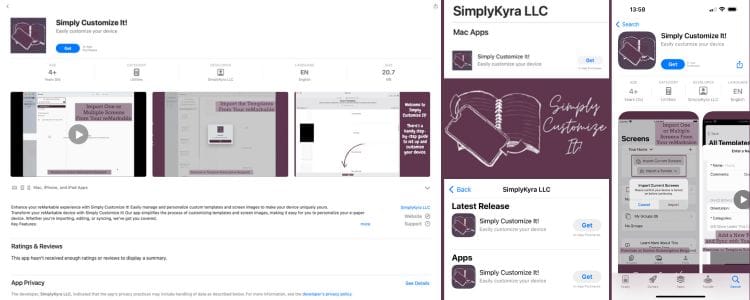
For my first published app, Simply Customize It, I needed to be able to use SSH and SCP with my reMarkable and rather than code the logic from scratch I chose to use Citadel. As such I needed to add it as a package dependency to my app.
Later, after having started and stopped a couple more projects (let me know if you want to hear about them!), I decided to streamline the start process by learning how to make my own packages to store shared base views, simple standalone views, and user settings.
To import these you'll need to click on your project and go to Package Dependencies and, for me, I used GitHub to grab the code... then in your target (for each target you want to use it in) you'll find each individual one under Frameworks, Libraries, and Embedded Content. You can add and remove individually from here.
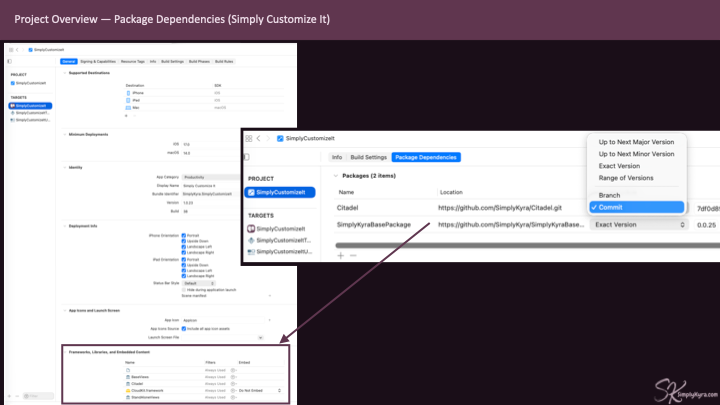
And be warned if you removed your derived data you may need to reattach the dependency to your project which (sarcastically) is always fun.
Signing
At the top of the target's Signing & Capabilities tab you'll see your bundle identifier... something like AccountName.AppName. It's just a unique string, usually your domain name backwards and then your app name. I wanted to mention it as it isn't a secret but simply an identifier for your app.
Additionally, in this section, I always use automatic signing by keeping it checked off which means Xcode handles the provisioning certificates for me.
If you have multiple targets (say an app, a widget, and an extension) each one needs its own unique bundle ID and its own signing configuration. They're each on their own island.
App Sandbox
Essentially Apple sandboxes everything. This is done for your own safety in case an app wants to access something you don't want it to have. But when developing this can be frustrating.
Sandboxing means your app lives on its own island. If it needs to reach outside that island whether it's to access photos, make a network connection, or talk to another target like a widget you have to explicitly say so.
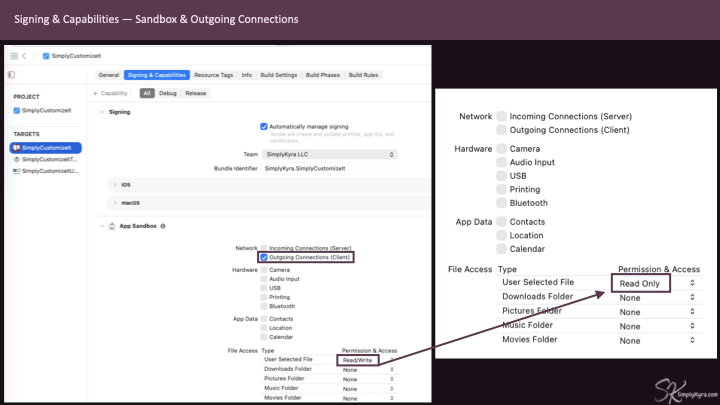
In the above examples, with Simply Customize It, I need outgoing network connections because the app makes SSH connections to the reMarkable. I also need access to the user's photo library so they can pick an image to upload (read access) and when I later added the ability to download the images I needed to switch it to both read and write access.
When asking for permission you'll need to write a reason on why you need it. If it's vague or missing Apple will reject your app. On my first app I was rejected as I said why I wanted it (to read and write photos) and was told you need to say why your users would want to give you permission.... so what's in it for them.
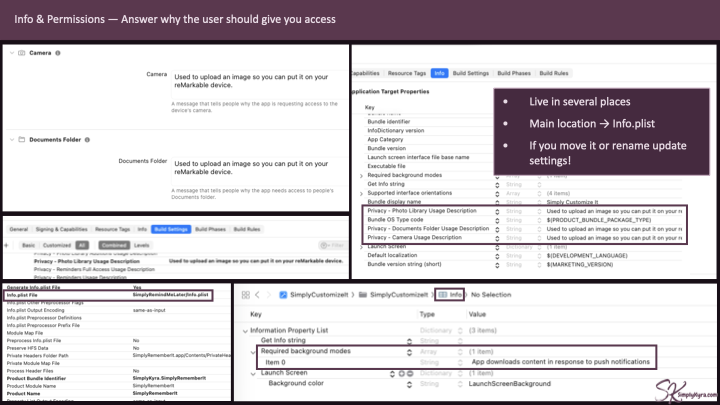
Whether you're using your Info.plist explicitly or using one of the other ways instead you should still be aware of the plist. If you move the file elsewhere and/or rename it Xcode will freak out until you update the Target's Build Settings, under Packaging, so it knows where to find it. This is shown in the bottom left of the above image.
Capabilities
Staying in Signing & Capabilities, at the very top, you can see a plus next to Capability. Here is where you add the capabilities (the app services) you want your app to have. Most are good as is but some, like purchases, will need additional setup using App Store Connect.
In my case, since my apps are Multiplatform with both iOS and macOS support I always make sure to add iCloud as my capability from the get go so I can get CloudKit syncing between my devices. To handle the syncing I need to check off Remote notifications so their app can be notified when the synced data changes.
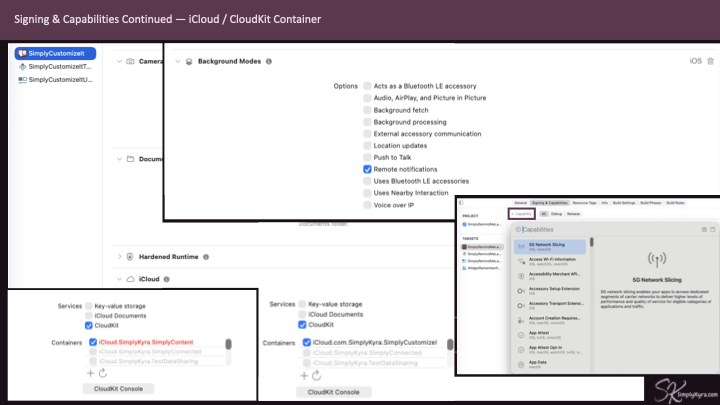
I also wanted to mention App Group capabilities. Recently, when adding widgets to Simply Remember It, I realized that a widget can't directly read your app's iCloud or CloudKit data. To have it use your app's data you will need to create an App Group, another shared container both the main app and the widget target can access, with its own identifier (usually group.com.yourcompany.yourapp). Instead of reading from CloudKit directly, the widget reads from the shared App Group container, and your main app is responsible for keeping the data between the two synced and current.

CKSharingSupported to true in your Info.plist. For Simply Remember It it wasn't added automatically and it took me some time to realize that was missing. StoreKit Configuration
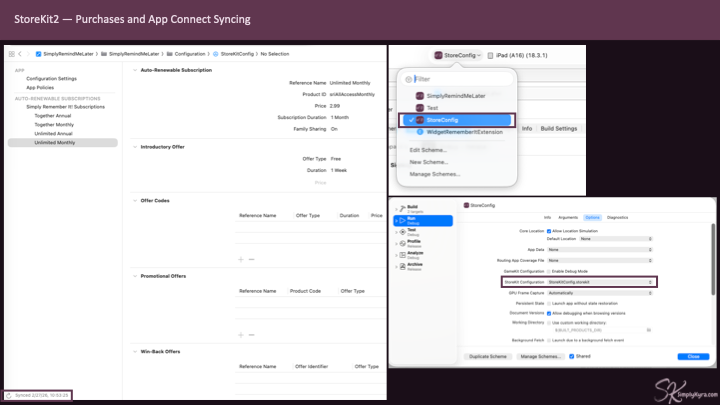
I want to take a brief foray into a helpful way to test your purchases when you choose to add them. Beyond the added In-App Purchase capability and App Store Connect setup (will touch on that below), you can right click your project and add a template for StoreKit Configuration File that allows you to use local data rather than calling the StoreKit APIs.
Rather than filling the file out I instead create the subscriptions in App Store Connect first, since that's where it'll be anyway, and then use the sync button in the StoreKit config file to populate the file. This way, through Xcode, I can confirm what Apple sees and if I missed something. It's a good sanity check to make sure everything is wired up correctly before you submit.
Layer 3: Ship
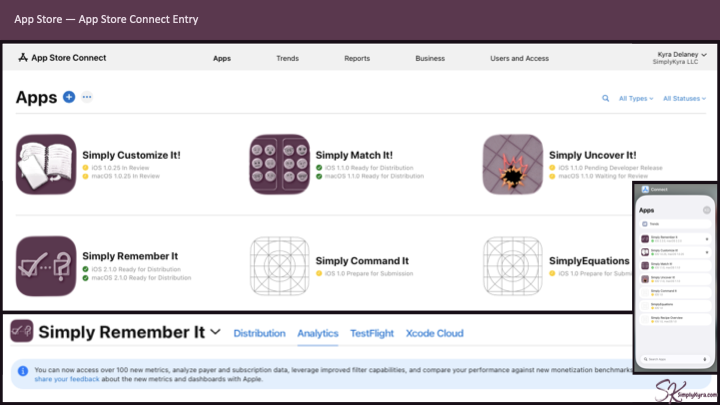
At some point in this process you will need to log into App Store Connect. If doing a free app this can be later on but I do an upload when I'm ready to start working on purchases so I can set it up online.
This is where you can see all your uploaded apps and can be accessed from the website or an app though the app has limited functionality but keeps you logged in for longer. I love how with the app, if out and about, I can push an approved build to the App Store but, if your app is rejected, you do need to go through the website to access the messages to find out why it was rejected.
Upload to Apple
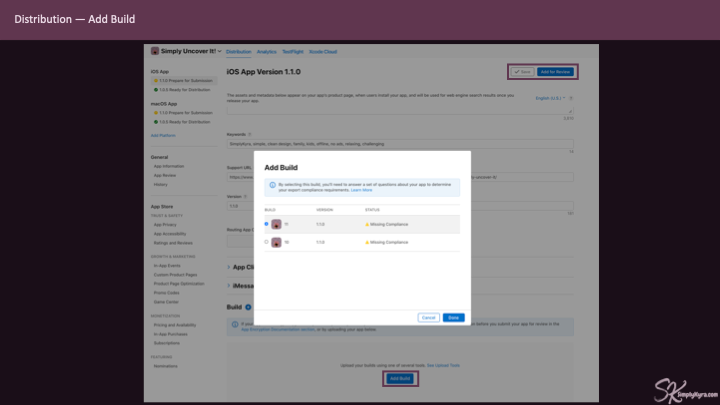
Before your app shows up in App Store Connect you'll need to upload it to Apple. To do this, in the Xcode menu, go to Product > Archive. This builds your app, in whichever selected run destination you have, and adds it to your Archives list. From there you click Distribute App and it uploads to App Store Connect.
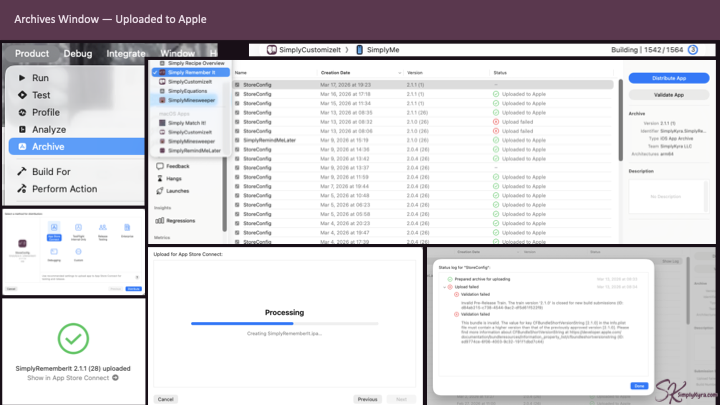
Normally, if my upload fails, it's because the version or build number hadn't been increased. To update them go under your target's General tab under Identity. And when you do get a failed upload make sure to read it before closing it out... a couple times I closed the alert and then couldn't remember which build number it actually wanted.
TestFlight
TestFlight is less onerous and you may want to test your app with friends and family before releasing so let's go over that area first.
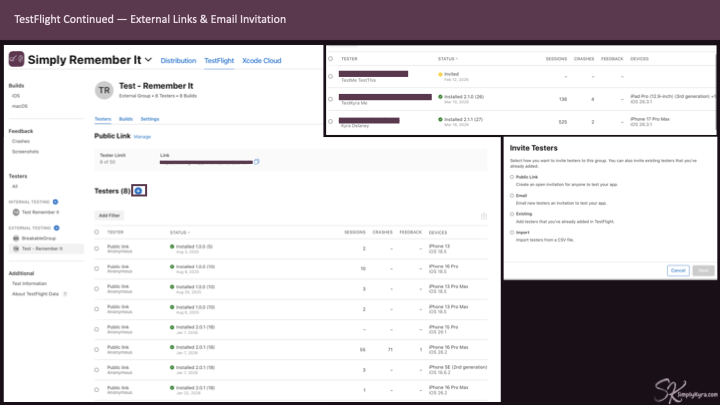
Here you can set up internal groups for your team (I hear no review is required) or external groups (which is what I use). The external group allows for more open testing and you can easily add to you group with public links. I've heard online with Android there's specific test requirements (both in number and amount) before a build can go into the Play Store. Regardless, with Apple there's no such requirements to use TestFlight at all.
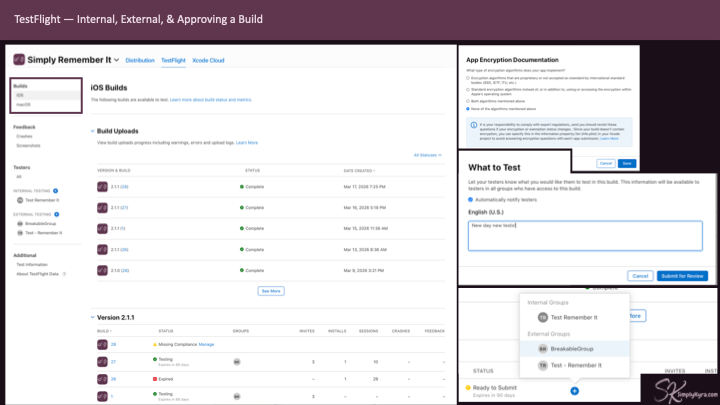
From the left side you can switch between your targets, create new testing groups, or click an already created group to see information about who's in the group or use one of the methods included to add more people. In the past I just use the copied public link to share with others.
Your First Submission
When you go to Distribution for your first time it may seem like a lot... just take it in pieces if you feel overwhelmed. Further down in this post you can see there's way less stuff you'll need to fill in when submitting updates... unless you want to change something.
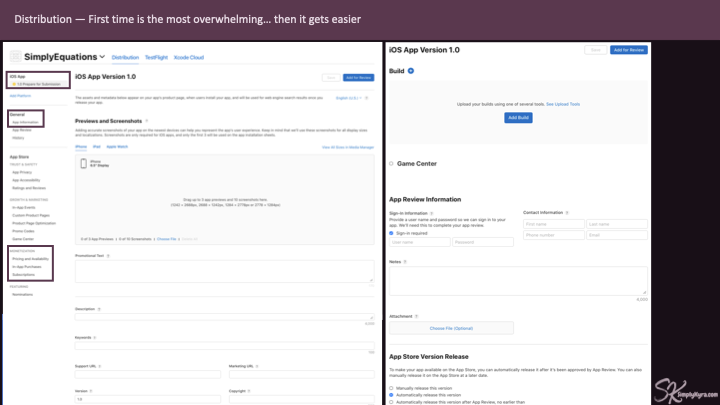
Target Specific Information
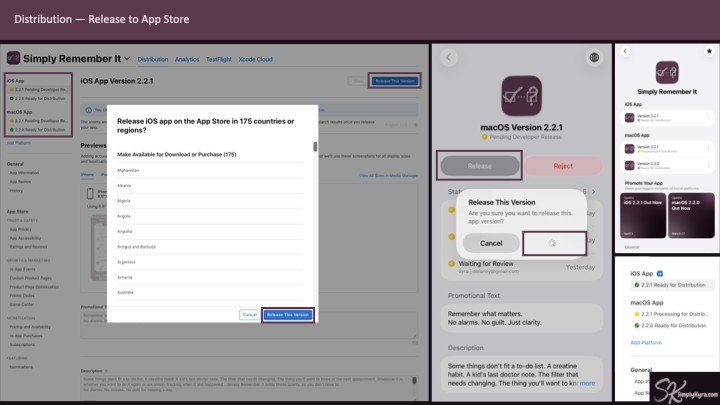
Each target (iOS, macOS, etc) can have a build submitted individually and has information specific to that build. If you scroll to the bottom, when reviewed and approved, you can choose when the build will be released (manually, right away, or after a specific date).
At the top of this section you can add your App Store images and Preview videos. For each device type (iPad and iPhone for iOS) there are several devices sizes shown but you only need to submit one set for each device type. The other sizes automatically use the main one. My first time I uploaded to one of the sizes I didn't need and then had to resize for the main. Just glad I realized before making all the other sizes. Just a warning to check what you need first.
Also, when uploading the image or video, it will tell you if it isn't right size or right in other ways... that said, some errors are a bit obscure and the keep the app preview under 30 seconds got me both times I attempted to upload a video.
I started noticing what I had trouble with the first time I did this process and once the app went live I wrote out this post.
Later on, I had my app rejected as I showed footage that didn't include my app for a bit of the video. That time I switched out that section and it was good to go.
After the media section you'll need the promotional text, app description, keywords, support URL, marketing URL, version, copyright, build, and app review information. Most of these fields have a max character limit.
For the App Review information it asks for any sign-in information the reviewer may need to review your app... I don't have a required sign in so I've started using that field for additional information that I needed to provide in the last to pass reviews like sharing where my privacy policy and terms of service links are located.
Although you can make these fields unique to each build I find I keep the same information between both my iOS and macOS app.
App Information
The app information is in the next section under General. Here you set the information that's shared between each of your app's target. Again, once filled in you don't need to change it, unless you want to. This includes the app's name, subtitle, category, and, if applicable, documentation, regulation, and permits.
Monetization
If you jump further down you'll find Monetization.
The first section here is called Pricing and Availability. This goes beyond just the prices and also dictates where people can download your app. If your app is free or freemium you'll simply choose $0.
Below that is In-App Purchases where you can add consumables (think tokens to pass levels or coins to purchase things... I haven't used these) or non-consumables (that don't disappear like lifetime subscription access).
After that is Subscriptions for reoccurring purchases. This area has a subscription group lets you set tiers or alternate subscriptions by using numbered levels. The subscription group is handy as it stops your users from mistakenly signing up for two levels at once and allows for upgrades or downgrades if they move up or down the tiered rungs.
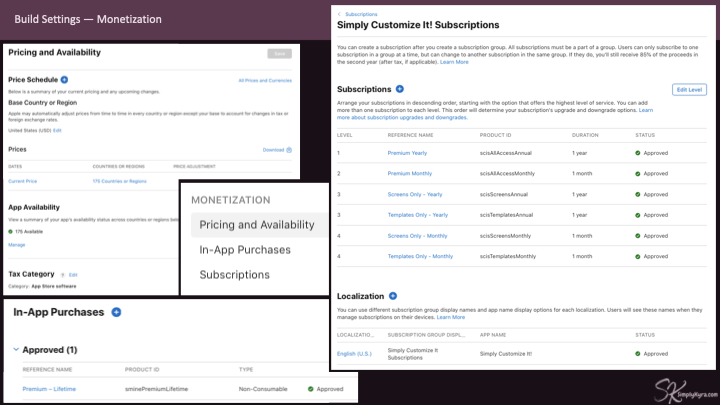
For all of these when you set the price for one country Apple can set the comparable price for the others... and if you want you can go in and override it. Additionally, if you go into the subscription pricing, you can set free trials.
As mentioned in the StoreKit Configuration section above I sync my configuration file with this so I can test what Apple will show when my app is live.
Submit For Review
During the above process every time you made a change a little save button in the top right enables allowing you to save as you go. When you're ready to submit your build hit the button next to it, it will think (checking if anything obvious is missing), and ask you to confirm. Lately this shows in a pane on the right side but previously it was an alert. This needs to be done for each target and then you wait for review and approval for each.
I've noticed sometimes approval and rejections can change based on the reviewer. For Simply Remember It I somehow forgot the privacy policy and terms of service links in the app description when I redid it's App Store meta data and both builds passed... then a later update was rejected for one target until I fixed it while the other target was still approved.
Also if and when rejected you can always reply to clarify or ask for more information. The worst they can say is no. Additionally, my first app was going through the review process during WWDC and kept being rejected. I ended up booking a one-on-one with an Apple developer through their events page and although he flagged me for something else (the permission text) he passed me for whatever I was held up for. Since then I've seen more App Store reviews listed between WWDC events and, with your developer account, there's also 2 free technical reviews you can use each year too.
Submitting Updates
Once an app is distributed to the App Store you won't be able to make changes to any of the App Store information unless you press the plus sign next to the target and add a new app version. Like before this has to be done with each version.
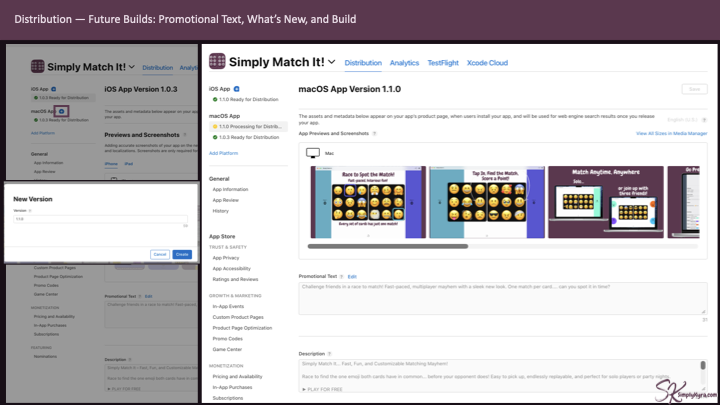
When the new version is created most of the information from before is copied over letting you keep it or updated it. That said the promotional text is kept blank (I normally copy and paste it from an earlier build) and you'll see a new section called What's New in this Version where you can put your version update message. Everything else stays the same unless you choose to change it and, over time, it all starts to feel easier and even mundane.
Where To Start
If you want to get into Apple development simply start.
Download Xcode... it's completely free. You don't need a paid developer account to start. There is a Apple Developer account that costs $99 a year which does give you longer-lasting builds on your own device and access to App Store Connect when you're ready to ship, but you can still get surprisingly far without it.
Play around. If it looks too complicated there is a Swift Playground app that you can do entire builds on or start with tutorials. I tried to get my kids interested in Swift development a couple years ago and found an adorable how to code section with a monster that needed to be told how to get the gems.
You can start with a tutorial online if you want a bit of hand holding. I've recently started doing Android development as I want to port an app over and ended up finding an Android tutorial so I'd start understanding how the files were structure Android Studio along with how to build the project and and setup the emulator. When the tutorial got to a part that used to be free and now I found was paid I paused for a bit and instead, later, jumped back in with my own project and Claude to ask questions.
On that note you can now use an AI, whether ChatGPT or Claude or something else, to help you understand what you're doing. If I come across something I don't understand I can take a screenshot of it (ctrl+shift+F4 to lasso it), drag it over to the app, and ask it my how or why or what's next question.
That said, if you have a project idea go for it! Jump in. I find I learn way more that way... and if you don't know find a tutorial that sound interesting. You can stick it out and find another after or drop it when you have an idea.
On that note... find resources you trust. For me that's Hacking with Swift. I started on his free 100 Days of Swift and when Unwrapped came around (full day livestream) I realized his membership was only twice the cost of the event and jumped it. I find it's genuinely a good starting point and wish I knew a comparable person for Android development (let me know if you know!)
As mentioned above, when you do hit a bug you can't seem to solve, spin up a small separate project to isolate and reproduce. Lately for help getting unstuck quickly I use Claude Code with the Cupertino MCP which gives Claude better access to Apple's documentation. I shared how I currently use AI here and this has saved me more hours than I can count.
And join something. I found a monthly iOS Dev Happy Hour group that has a two hour virtual session most months that includes a presentation (maybe) and always has breakout rooms to chat. It's a good place to ask questions, commiserate, and remember you're not alone in the weeds.
Essentially the thing I want you to take away from all of this: it's more learnable than it looks. The configuration stuff is confusing the first time you hit it, but once you know where things live it stops being mysterious and simply becomes that thing you do before you ship... unless Apple changes it up.
I'm Kyra. An indie Apple developer and founder of SimplyKyra where I build calm tools that reduce mental load. If you’d like to keep up with future posts like this, I usually share them on my Facebook page and Instagram account. If you become a free member on the site you can sign up for my newsletters and join the conversation on any of my posts.
Did this save you time?