
Custom Sheets For Your Travel Cot

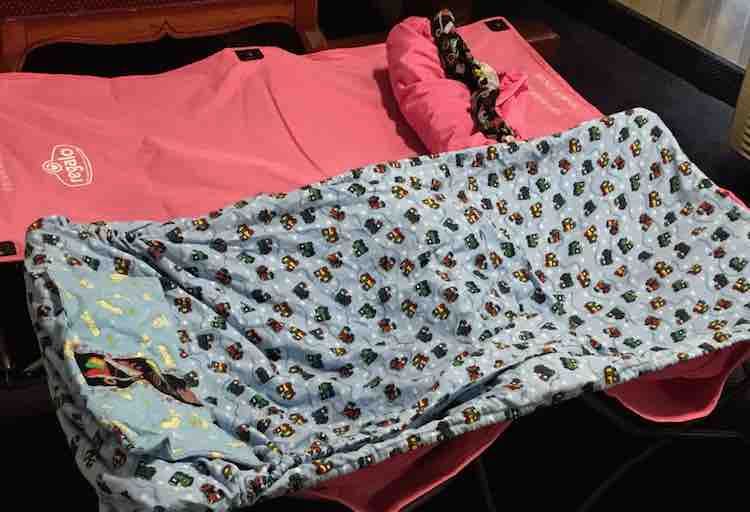
When planning our road trip over the summer we knew we needed a comfortable spot for the kids to sleep. While staying in hotels on the way to and from our Canadian destinations we couldn’t guarantee that there would be a pull out couch and figured Zoey wouldn’t accept sleeping in our travel playard like she had the previous time we stayed in a hotel. Looking into products online we decided to buy the girls each their own portable toddler bed. Some of the online reviews on Amazon complained about the horizontal bar in the center of the bed but neither kid noticed this before or during our trip. Each cot came with a single fitted canvas sheet for when the bed is setup along with a bag to hold the collapsed cot and sling it over your shoulder. I had sewn up two different sets of sheets for Ada’s toddler bed at this point (later sewed two more for Zoey) and since I wanted to make the cots more home-like decided to sew up travel sheets for the girls.

Before sewing the sheets I had each girl choose their own fabric at the local Joann’s. I knew I succeeded when I put the first fitted sheet on the cot to check the tightness of the elastic and Ada immediately tested it out saying “this is super duper comfy with no pillow and no anything attached to it”. Later when on our trip I was able to roll up the sheets and store them between the legs of the collapsed cot to include in the cot’s carrying bag for ease in transporting, I then stored the kids’ quilts (thanks for making them Anna!) so they’d be easy to find in the car, easy to carry, quick to unpack in the hotels, and be their own little piece of home while we traveled.
Materials
- Regalo My Cot Portable Toddler Bed; includes a fitted sheet and travel case that I bought through Amazon.com and later found on their website.
- Used the same materials as my toddler fitted sheets post with slightly less fabric and elastic used.
- Under 4 yards of fabric if making the fitted sheet and half fitted top sheet
- 1/4″ elastic for the fitted sheet and the bottom section of the top sheet
- sewing machine, rotary cutter and cutting mat, thread, ruler
- (optional) decorative or special colored thread for top-stitching details.
Overview or TL;DR
Fitted Sheet
- Cut fabric to size. I did 27.5 by 50 inches.
- Cut out 2.5 inch squares from all four corners.
- Right sides together sew the corners closed.
- Create a channel for the elastic by folding up all sides (small fold then a larger fold to hide the raw edge) and sew along the edge of the fold to create a channel.
- Thread the elastic through. I cut mine to 57 inches long.
- Test it out to see if it’s too big or small. You could also keep the elastic on the roll until you know the length for sure.
- Sew the two ends of the elastic together with a stretch stitch, hide it inside the channeling, and sew the hole closed.
Half-fitted Top Sheet
- Cut fabric to size. I cut it to the same size as the fitted sheet (27.5 by 50 inches), but looking back I should have either cut it longer or folded the top down less at the end.
- Cut out 2.5 inch squares from the bottom two corners.
- Sew those two corners closed so the corners fold down.
- Starting a quarter to a half way from the sewn corners create an elastic channel from the one side to the other (step 4 above but leaving out the top).
- Thread the elastic in, check how long it should be, and sew it down on either side.
- Fold over the remainder of the sides, the same way as before, and sew it down so the sides are finished.
- Finish the top of the sheet with your preference. I folded it over a tad and then folded it over a larger amount before sewing along the edge and then adding decorative top stitching.
I have more detailed directions below but if you want a different take I also blogged about my first fitted sheet, top sheet, and pillowcase set I made for my daughter’s toddler bed (with a crib/toddler sized mattress). I followed similar steps her just making the dimensions smaller to fit the cot instead of a mattress. I also left out the pillowcase as that’s one less thing we needed to keep track of in our travels.
First Fitted Sheet
The cot came with a fitted sheet already but I wasn’t sure how comfortable it would be. I decided to continue using their fitted sheet and put my sheets over top for extra layers and cushioning.

Before continuing I decided to take one of my extra crib sheets just to triple check it was in fact bigger than the cot. I figured if it fit I could use the same measurements as before.

I measured the width and length of the surface of the cot along with the dimensions (including depth from the elastic) of the fitted sheet that came with the cot. I took the width and length measurements and added the depth of the fitted sheet twice to get the final cutting measurements. I rounded up slightly as I figured since the fitted sheet has elastic it didn’t matter if my sheet is slightly too big as the elastic can cinch it in further. I started by sewing the one fitted sheet, confirmed it worked, and then went on to sew the other fitted sheet and two top sheets at the same time.
When cutting I folded the fabric in half so it would fit on my cutting mat better and made sure to square up the end before measuring and cutting the length of the fitted sheet. After cutting it out I stacked up the corners and cut a 2.5 inch square out of all the corners.

Next I sewed my corners closed by putting the two edges of the squares I cut right sides together and sewed them. I then went on to create a tunnel for the elastic by flipping the raw edges over slightly (to hide the raw edge) and then a second time, wide enough for the elastic to fit. Next I sewed along the inner fold. Don’t forget to leave an opening to get your elastic in.


After creating the channel I cut my 1/4″ elastic to size by using the same length (57″) I measured from the cot’s fitted sheet. Remember you’ll need to add a bit to the length if you want to overlap the ends of the elastic more when you sew the loop closed later. If you wanted you could also leave it on the roll instead of cutting it to size but I didn’t want to worry about the kids unrolling it when I tried it on the cot later. I used a sewing clip to attach the one end to the sheets so it wouldn’t disappear inside while I was threading it then I used a safety pin on the other end to thread the elastic through the channeling. Once done I clipped either end of the elastic together and tested the fit on the cot before sewing the elastic together. Next I finished by sewing the hole closed.


Other Bottom Sheet and Top Sheets
Once my first fitted sheet was done and I knew it worked I went on to create the other fitted sheet and both of the top half fitted sheets. Again I folded over my fabric and marked the measurements before cutting it.

For the other bottom sheet I lined up all four corners before cutting a 2.5 inch square. For the top half-fitted sheets I lined up the two bottom corners to cut out the 2.5 inch square and left the top corners alone.


After sewing the corners closed I then folded over the edges twice and then sewed along the edge creating a channel for the elastic to go through. Again, you’ll need a space to thread the elastic through.


When threading the bottom fitted sheet I used my sewing clips to attach the end of the elastic so it wouldn’t disappear inside of the sheet. I then pulled the beginning of the elastic, using a safety pin, through until it reached the other end of the opening. I then overlapped the two ends of the elastic, pinned it in place, and tested it out on the cot. Once I was sure I had the proper length I sewed the two ends together, hid it inside the channel, and sewed up the hole.

For the top half fitted sheets the elastic doesn’t go all the way around. I started the channeling about a third to a halfway up the sheets from the bottom. I then started threading the elastic from the one end to the other. Once you have the right length (I made sure it look just as cinched as the bottom sheets) I trimmed the excess elastic and sewed either end to the sheets.


I hemmed the rest of either side by folding over the rest of the sides of the sheet like before and top stitching it down. When I got near to the corners I attempted to fold in the corner a bit so it wouldn’t stick out when I flipped the whole top over later.


An alternative to sewing the elastic and then the rest of the sides of the top sheet would be if you sewed it more similarly to the bottom fitted sheet. In this case you’d want to sew the channeling/hem starting from the top corner down the sheet, along the bottom, and up the side to the other top corner. You’d have to leave two gaps to thread the elastic through afterwards and then sew them closed after you thread the elastic.


Top Of The Top Sheets
Once you’re done sewing the sides and elastic you’re ready for the top of the half-fitted sheet. After figuring out how tall I wanted the folded section to be I measured and marked along the top. Once I was ready I flipped the top over a bit to hide the raw edge and then flipped it again to meet the mark I made. I then sewed along the folded edge.


If you have a corner that might stick out you can try to stick it in as you sew that section.


I used a variegated thread I had to topstitch the top sheet as I wanted to add something else to the sheets.

And you’re done. I later added little sleeping bags for their crocheted dolls. I love how simple these were to set up and take down. I rolled up the sheets and sleeping bag and tucked it between the legs of the cot when it was collapsed. Then the dolls and blanket came along in a separate bag but everything was readily available when we checked in at a hotel late at night.


On The Road
And then we tested them out and the kids loved them! I love how when we rolled into a hotel at midnight (once with fast food we grabbed on the way for a late night snack) we were able to quickly set up beds the kids were comfortable with, brush their teeth, and get them into bed… as quickly as possible. They had the comfort of home and we, the parents, didn’t have to worry about them rolling out of bed or hating the change of bed every night. The odd time on our trip the kids slept in other beds but it was by their choice and was more for fun which made a big difference.


I hope this helps you if you’re looking for a travel cot for your toddler. I don’t know how much longer it will work for us (up to 75 lbs but aged at 2-5 years old), but I’m so glad we bought them. Feel free to reach out through the comments below, on my Facebook page, or through Instagram. Hope you have a great day and hopefully an awesome vacation if you’re reading this post.
Did this save you time?