
Simply Customize It! FAQs

💡 Tip: Use the table of contents or search for the keywords you're interested in by using Ctrl + F (Windows), ⌘ + F (Mac), or Find on Page
Quick Links
- 🛒 App Store
- 🌐 Website
- 💬 FAQs
- 🛠 Version History
- ⭐ Leave a Review
Need Help or Want Updates?
Developer Mode Requirements
💡 Note: Both the reMarkable Paper Pro and reMarkable Paper Pro Move require Developer Mode to stay on while connected. You, and thus Simply Customize It, can’t access your device’s SSH credentials otherwise.

I haven't switched off developer mode yet but shared in this post how I turned it on in for my Paper Pro (same for the Move) in case you're interested in the steps before choosing whether you want to go ahead with it or not.
Getting Started
What is Simply Customize It?
Simply Customize It is a friendly Mac and iOS app that helps you personalize your reMarkable... no coding, SSH, or command-line steps required. Whether you want to create custom templates, update your sleep screen, or sync your favorite changes after an update the app makes it easy.
Supported Devices
- Apple: iPhone · iPad · Mac
- Subscription works across iPhone, iPad, and Mac as long as you’re signed into the same Apple ID.
- Your library syncs between your devices through iCloud.
- Family Sharing Enabled: If you’re using Apple Family Sharing your Apple Family members can use your active subscription too.
- reMarkable:
- reMarkable 1 (rm1)
- reMarkable 2 (rm2)
- reMarkable Paper Pro (rmPP)
- reMarkable Paper Pro Move (rmPPM)
I currently own and test the app with all models except the original reMarkable 1, but it’s understood to work the same way as the reMarkable 2.
If you notice anything unexpected on your device please reach out! I’d love to know!
Key Features
- Template Management: Import, edit, and sync custom templates with ease.
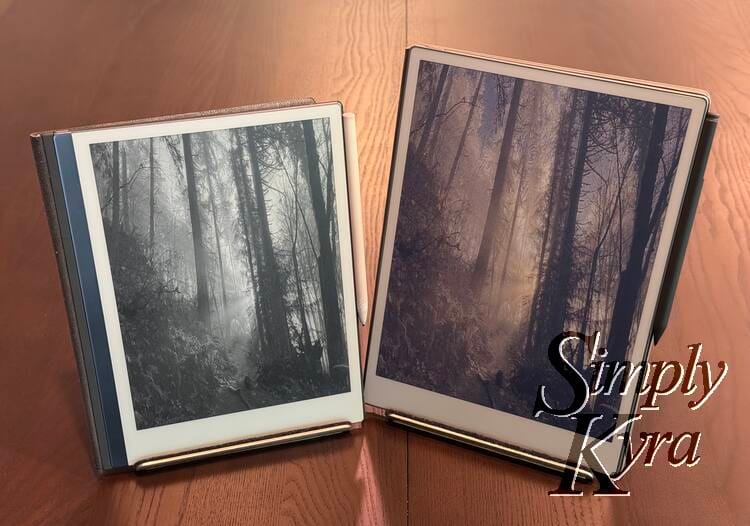
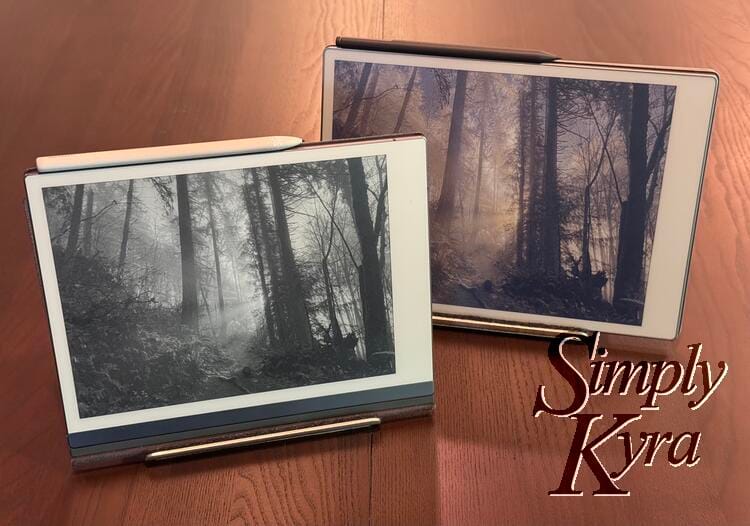
- Screen Image Customization: Update reMarkable’s sleep (and other) screens with personal visuals.
- Multi-Device Support: Manage multiple reMarkables with their own settings.
- User-Friendly Interface: Designed to feel intuitive and fully native on macOS, iPhone, and iPad.
- Secure Connection: Connects only when you request it. Nothing runs in the background.
- In-App Guidance: Built-in walkthroughs and growing FAQs (like this one!) for easy setup and troubleshooting.
Will This App Work For Me?
Yes! As long as you can see your login credentials on your reMarkable Simply Customize It can connect.
If you have a Paper Pro or Move model you’ll need to enable Developer Mode first to access these credentials. You can find them on your reMarkable under:
Settings → About → Copyrights and Licenses.

Check out this post for more information about turning on Developer Mode. Ignore anything with the terminal (SSH, WLAN) as that can be done with the app... see next section.
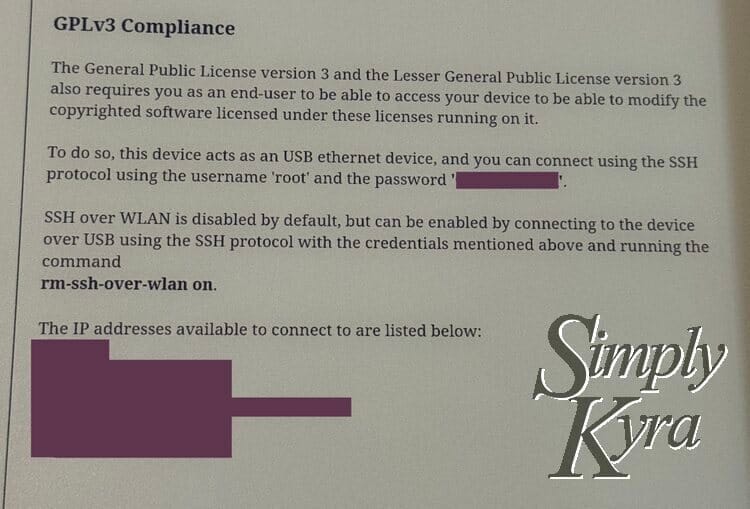
root beside it. Below that, you’ll see a list of IP addresses and, if you’re connected by cable, a new local IP will appear for that connection.Device Dimensions
Each reMarkable model uses a slightly different screen resolution. If your image looks stretched, cropped, or misaligned, double-check the size you’re targeting:
- reMarkable 1 & 2: 1872 × 1404 px (226 DPI)
- reMarkable Paper Pro: 2160 × 1620 px
- reMarkable Paper Pro Move: officially 954 × 1696 px but recently realized templates (not screens) fit best at 814 × 1454 px
App Versions (Change Log)
The version list has grown quite long! You can now find it on a dedicated page here:

Legal
Simply Customize It was built to make my own reMarkable easier to personalize and was then expanded to help others do the same.
I've posted both a privacy policy and a terms of user agreement for transparency.
Customizations Void Warranty?
I can’t make warranty guarantees because reMarkable doesn’t officially support custom templates/screens.
From community experience, simply enabling Developer Mode is generally not treated as “warranty void,” but reMarkable support may ask you to return the device to a default state when troubleshooting.
Note
I’m not associated with reMarkable and I don’t control future software updates. If a new reMarkable version changes how templates or screens work I’ll do my best to adapt the app quickly.
If you want to see how I've adjust in the past you can check out the version history here.
A Quick Note Before Connecting
What Simply Customize It Changes (and What It Doesn’t)
Simply Customize It focuses only on customization for custom notebook templates and sleep screen images.
It does not manage, modify, or back up:
- your handwritten notes
- your notebooks
- your PDFs or documents
Those are handled by reMarkable itself.
If reMarkable updates its software, custom templates and screen images will be reset to the defaults. When that happens, your writing is still there.... and Simply Customize It makes it easy to reapply your customizations.
Connecting to Your reMarkable
Connecting the First Time
Both the rmPP and rmPPM require you to turn on developer mode (see directly above). Additionally both the Paper Pro and the rm2 (version 3.22 onward) has WLAN turned off by default so you will need to connect via cable the first time.
USB Connection
When WLAN is turned off you will need to connect your reMarkable to your Apple device with a USB cable. Once connected a local IP address (10.x...) will pop up. With that you can connect to the app and turn on WLAN.
For more information scroll down in the app to troubleshooting or check out this update for more information.
Wi-Fi Connection
If both devices share Wi-Fi use your reMarkable’s main IP address.
Switching Between Wi-Fi & USB
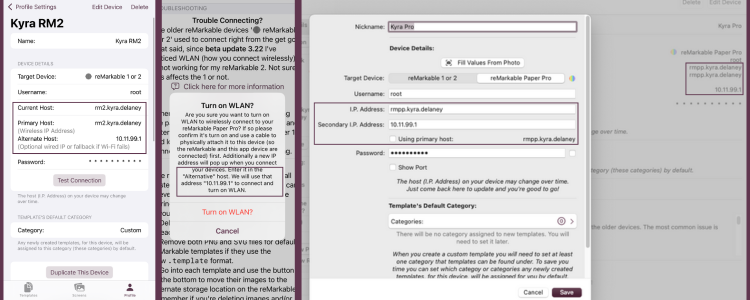
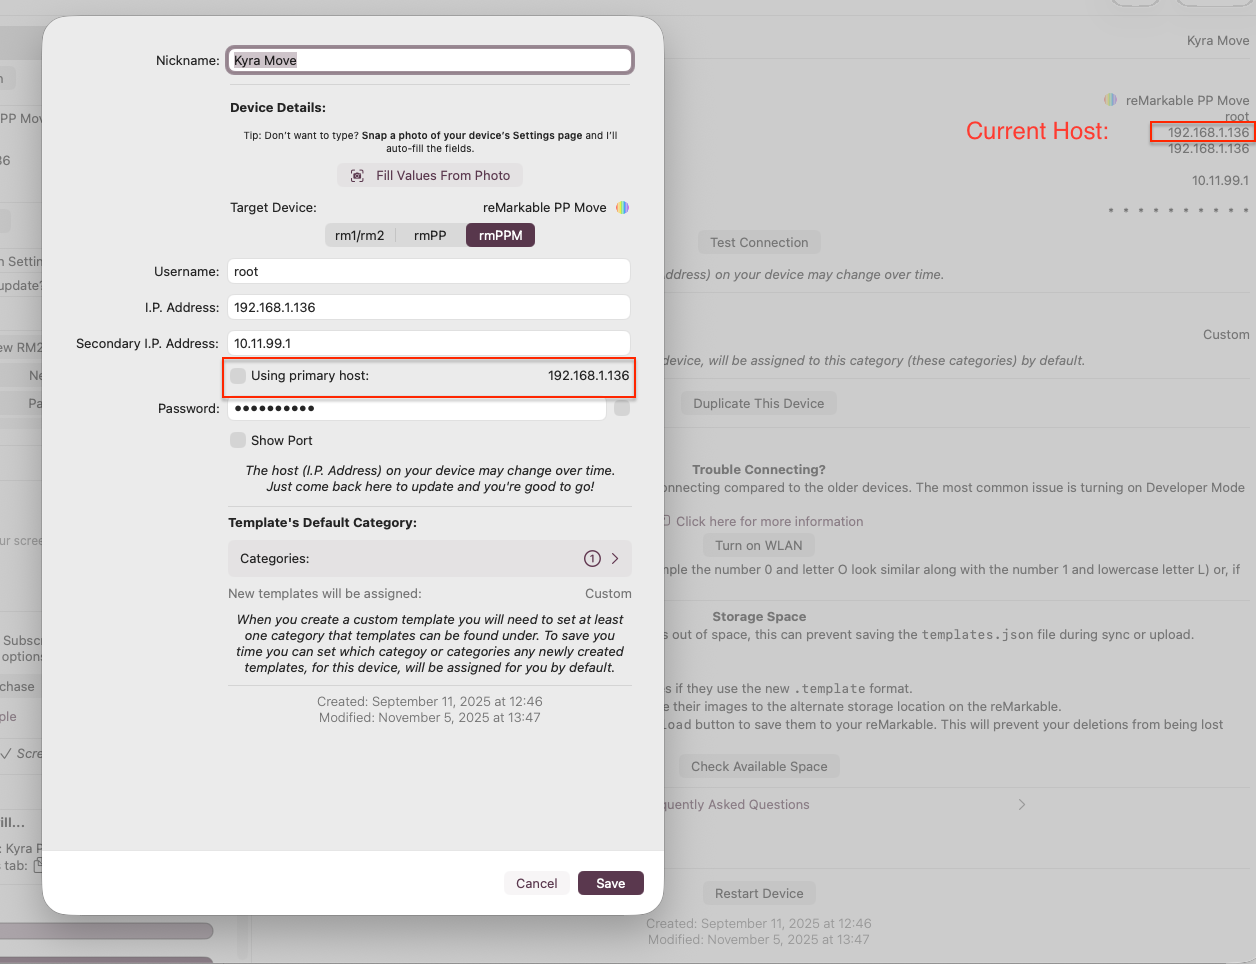
I've updated the app to store both a primary host and secondary with toggle to default to either. If your app isn't on the same WiFi for whatever reason and you want to switch between being wired in or WiFi you can toggle between these IP addresses at will. Or if you're switching between work and home wifi you can use the alternative for that... I won't judge 😄
Some actions like Test Connection, Upload Template, and Sync Screens will use whichever host you’ve selected whether that's the primary or secondary one. The WLAN toggle, meanwhile, always attempts to use the secondary (USB) address.
If you’re having trouble connecting, make sure the app is using the correct one. You can check which is currently active in the Device screen:
General Issues
The most common problems include
- Is your reMarkable turned on? Sometimes if you just turned it on it’ll need a minute or two before the connection works.
- Is the host (IP address), username, and password entered correctly? If you used my Fill in the Values button it can sometimes confuse a number or letter especially with the more complicated password. I've had passwords that contained both zeros 0 and the letter o O. Next to each other they were obvious but if I had only one I would've second guessed it. Additionally, once my password had an l (L) that looks just like a 1 when out of context.
- Is your computer/phone/iPad on the same Wi-Fi as your reMarkable device?
- Was it able to connect before and can't now? There are many reasons your IP address can change such as if your network is updated or if you moved to another network... maybe go into your reMarkable and check if it's now different.
- If you're a bit more Mac savvy you may have a previous created network configuration in your macOS preferences. Confirm there isn't anything getting in the way.
Error Messages & Connection Help
If Simply Customize It can’t connect to your reMarkable the app analyzes the technical error returned by the attempted SSH connection and translates it into a more human-readable message.
| Message | What It Means | What To Do |
|---|---|---|
| Unable to authenticate | Your username or password didn’t match your reMarkable’s credentials. | Double-check your credentials under Settings → About → Copyrights and Licenses on your reMarkable. |
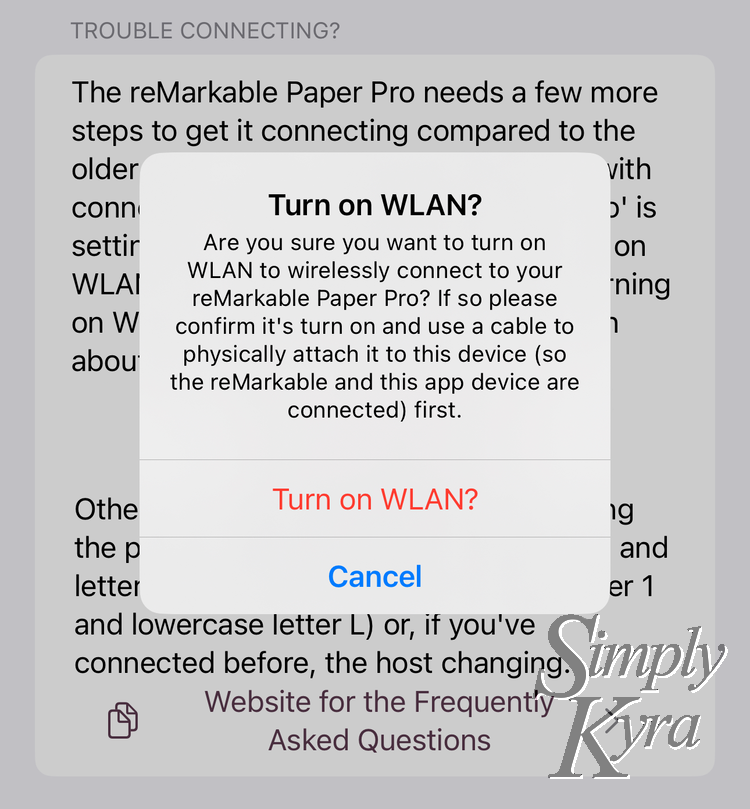
| There was no connection made | The app couldn’t reach your reMarkable at all. | Ensure the device is powered on, WLAN is enabled, and both are on the same Wi-Fi network. If not, connect by cable and tap Turn on WLAN in the app before retrying. |
| Unable to connect to your device… | A general fallback message for less common connection issues. | Retry with the correct IP address and credentials. If the message includes a long error description, copy or screenshot it and email mail@simplykyra.com so I can investigate and improve the message in a future update. |
💡 Tip: If you continue to see connection errors, try connecting over USB first then press Turn on WLAN in the app to re-enable wireless access.
Want to dig deeper?
If you’re comfortable with the command line, you can test your connection manually:
❯ ssh -v root@192.168.1.xxxIf you see Connection refused your reMarkable likely has WLAN turned off or isn’t on the same local network. Again, if connected by cable, use the local IP shown on your reMarkable’s screen instead. Mine starts with 10.xxx.
Updated reMarkable...
Where Did My Changes Go?
Custom templates and changed out screens are not officially supported by reMarkable. This means whenever there is a software update the custom templates will disappear and the changed screens will revert back to the reMarkable ones. For the notebooks this means that any page that used a custom templates will still be set to it but since it no longer exists the page will show your writing with a blank background.
Upside?
This also means if you deleted a default template by mistake an update will give it back to you! It also means they may update the default templates to be a different format and/or take up less space.
Bring Back Your Screens
Simply go back to your favorite screen or group and upload it to get it back!
Bring Back Custom Templates
If you upload the template with the same filename the notebooks that used your custom template will be reconnected without any more steps. This app remembers your current templates (and warns you if renaming the filename) so you can easily fix the templates simply by Syncing after this happens.
What's Your Process?
I created a video showing my process when my reMarkable updates. I also wrote it up in a blog post. I love how much easier this is than my process back in 2021! Anyway here's both versions!
Customizing Screens
Change Your Screen
Go to Screens > My Screens > + Add Screen. Set the name (just for you it won't be used on the reMarkable) and add the image. If this is your first time you may need to give the app permission for the images.
Once saved you can go back into the screen image and use the buttons to edit (change it out or rotate), download, or crop. On iOS theres two cropping options. Center Crop will cut off the excess while Resize to Fit squishes the image if it doesn't fit the right image ratio.
Once set, while in the screen image, you can use the Upload Screen as... to open the dropdown and choose which image type you want to overwrite on your reMarkable.
Groups vs Single Screens
You can use the Groups to remember a set of images. When developing the app people were creating adorable screen sets including the sleep screen, power off, etc. As such you can Import Current Screens to backup all screens (under My Screens) currently on your reMarkable and save them to a group. If you go into a group you can set the pre-created screen you want to use (one per each of the possible screen types) and then upload them all in one batch.
Return to Factory Screens
If you used Import Current Screens you can easily go into that group to upload them back to your reMarkable overwriting any changes you made. If not they'll be reset on the next reMarkable update.
I often use the Import Current Screens button after an update to see if anything changed.
Rotating Sleep Screen Overlay
(Paper Pro & Paper Pro Move / 3.25+)
Recently I noticed Paper Pro devices running reMarkable 3.25+ may show a rotating system illustration when you lock the device.
⚠️ This is new system behavior and may change (or reset) after reMarkable updates.
These illustrations appear on top of your sleep screen. If you use the default sleep screen image the overlay blends in and feels like it’s switching images. With a custom sleep screen this overlay is more obvious.
In Simply Customize It I've added the ability for you to control only the overlay (it does not replace or reset your sleep screen image):
- Disable Overlay → hides the rotating overlay
- Restore Overlay → brings the overlay back (if supported)
- Check Status → shows whether the overlay is currently disabled or not (no changes made)
If this stops working after an update please contact me and let me know.
Specific Image Questions
The screens use PNG images (or for iOS your photo library converting them to PNG images) which are shared with the below templates. Please see the general image section below for more information.
Managing Templates
Add a Custom Template
Go to Templates > My Templates > + Add Template. Set the name, choose one or more categories (required to find on the reMarkable) and add what you want to show (PNG, SVG, or templating file). If this is your first time you may need to give the app permission to access your images.
Lost Default Templates
If you've uploaded your templates without first syncing or importing you may overwrite your templates. As reMarkable owns these images I don't email them out that said some solutions are:
- System Restore: Some people have been able to recover all default templates by doing a full system restore on the reMarkable (go to Settings › Storage & Reset › Erase Device). This restores the device to factory defaults including all built-in templates.
⚠️ Note: I’m on the Connect plan so if I were to do this my files would automatically re-download afterward... if you’re not, be sure to back up anything important first since this will erase local content.
- Wait for a Firmware Update: Major reMarkable updates loose your custom changes but also reinstalls the default templates automatically.
- Join the Beta: Joining the beta may speed up a firmware update thus re-installing the default templates as above.
⚠️ Note: I’ve joined the beta but haven’t un-enrolled so not sure how long you need to wait to return to the next stable release.
- Community Backup: Awhile back I noticed there was a community-maintained GitHub repository with the original
PNGandSVGtemplates you can re-import while waiting for an update... that said while redoing my FAQs I realize the link no longer works. Keeping it here just in case and please let me know if you find an up to date source: https://github.com/rlc4dro/Remarkable2/tree/main/original/templates
⚠️ Note: If you want your existing notebooks to recognize them, the filenames will need to match exactly. You can see this in the app when you edit a template.
Backup Your Changes
Whether you're worried about the above happening or planning ahead you can create a second device profile (there's no limits) in Simply Customize It with the same connection information and import all the current default templatesthere first as a backup. That way you can always switch profiles back to this backup device and restore your originals if something goes wrong.
Templates JSON Explained
The reMarkable uses a file called templates.json to list all available templates and link them to their images. When you import templates in Simply Customize It, the app reads this file to check for any new or missing templates. When you upload custom ones, the app safely rewrites the file (creating a backup first) so your new templates are recognized by the device.
If the JSON File Is Missing
If you see an error saying the JSON file wasn’t found while importing or syncing, don’t worry... it can usually be fixed easily:
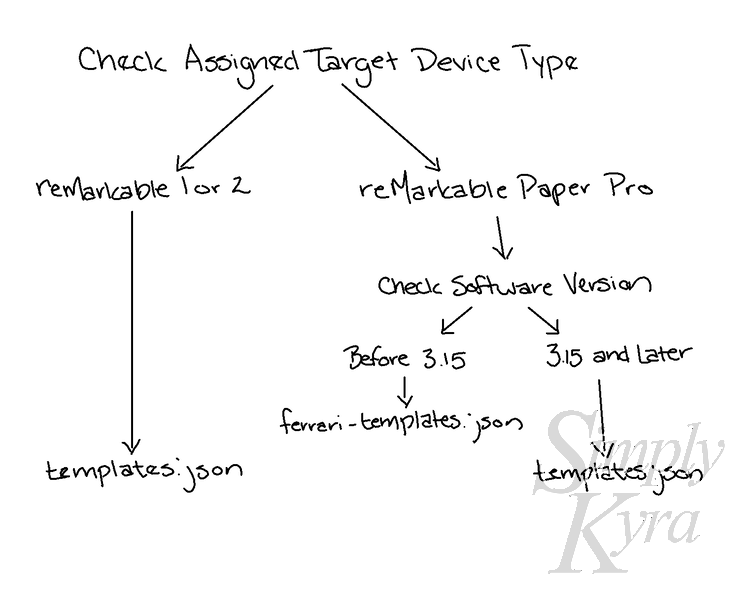
- First, confirm that your device type is set correctly under Profile → Device Details. The Paper Pro briefly used a different filename (
ferrari-templates.json) before switching back totemplates.jsonin version 3.15.
- If the file is truly missing press Upload in the app to recreate it. This restores template functionality instantly.
Note: Recreating the file only includes templates currently in the app. Any templates that exist only on your reMarkable will be lost unless you’ve backed them up first.
- If you’ve created multiple devices in the app, you can switch to another one, update its login details, and use its Upload button to regenerate the file.
- Use a backup you may have created and upload them through the command line using
scp. Here is a post I created about manually uploading custom templates to my reMarkable 2 in case that can help you.
Templates Missing in the Desktop App
If your custom templates appear blank or missing in the reMarkable desktop app, that’s normal as custom templates are stored only on the physical reMarkable and not synced to the desktop. You can get around this by exporting pages or entire notebooks from your reMarkable as PDFs to view them on your computer.
![The top of the image says "Recipes". Below it is a rectangle, cut off, showing the document page. In the center, lower in the image, it says "Unable to load document background[. ]Try restarting your application or contact support if the problem persists." To the side you can see the changes I made, in a different layer, over top.](https://www.simplykyra.com/content/images/wordpress/2021/02/compressed_IMG_0982.png?resize=750%2C623&ssl=1)
Blank Image Icon
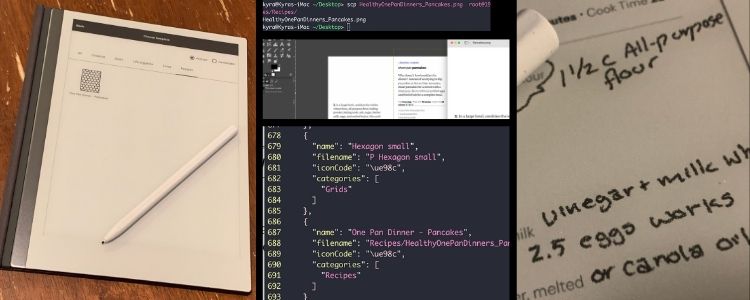
If your custom template shows a blank icon on your reMarkable that’s by design. The reMarkable devices store their icons inside its system font and each template’s entry in templates.json links to a Unicode value from that font.
templates.json code snippet on the right.Advanced: Customizing Icons Yourself
I don’t modify the system font itself for safety reasons. That said, some advanced users on Reddit have experimented with extracting or editing the icon font (embedded in the Xochitl binary). This involves modifying the device’s internal files and is not recommended unless you’re comfortable with disassembly and firmware patching. For background reading and community posts, see the linked discussions in:
- Custom Template Icons?
- rm2 custom template icon?
- A slightly extended icon set for custom notebooks [Remarkable 2.5]
Template Files Explained
Supported File Types
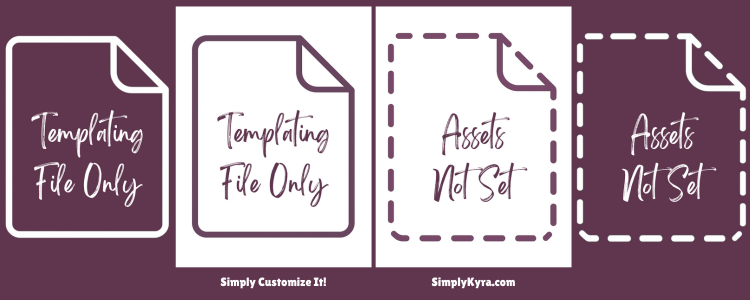
When Simply Customize It was first released reMarkable only used PNG images for the templates. Since then I've added support for SVG images (November 2024) and the newer .template files (September 2025). I cannot preview the templating image so I created a placeholder stand-in Templating File Only when just that is set.
No Assets Set?
Sometime around the time the new Methods was announced I noticed some templates, after a reMarkable update, were imported with no assets attached. They still worked; however, suggesting that there's an internal mechanism at play. I added a new placeholder image if there are no assets so it doesn't look as broken.
Which to Use
Currently reMarkable seems to have a hierarchy on what it prefers to show for the template. As such if two or more file types are set you see whichever one is higher on the list:
- Internal rendering: undocumented method
.templatefilesSVGimagesPNGimages: used only if no other assets are available
As a quick aside: Simply Customize It mirrors this behavior but attempts to keep each template unique so in app the preference goes:
SVGimagesPNGimages.templatefile placeholder- No Assets Set placeholder image
This ensures consistency between your device and the app.
More Information About Templating Files
I haven't looked too much into the new .template files but they are JSON files that are interpreted by reMarkable to make a template. I started dabbling in a template builder on my website that's live if you choose to use it BUT is still in beta.

Template Browse View
Filtering Templates
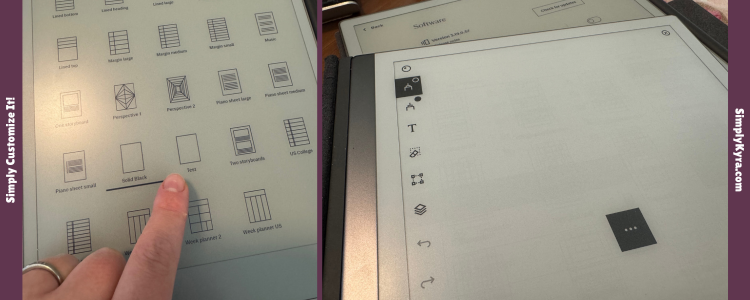
Starting in version 1.0.10, the Template Browse includes built-in filters to help you quickly find and manage templates. You can filter by:
- Asset count: see templates with one or more files (PNG, SVG, .template).
- Category count: see how many categories each template belongs to.
- Storage location: find templates in the default directory or an alternate folder.
- Template type: distinguish default reMarkable templates from your custom ones (updated when you run
Clean Up).
💡 Tip: Combine filters to spot duplicates, missing assets, or templates stored in alternate paths after a reMarkable update.
Template Troubleshooting
My PNG-Only Template Looks Blank
If a PNG-only template appears blank after a firmware update (notably 3.19 beta), simply close and reopen your notebook and it will display correctly once reloaded.
Here's a post with more details about what happened to me,
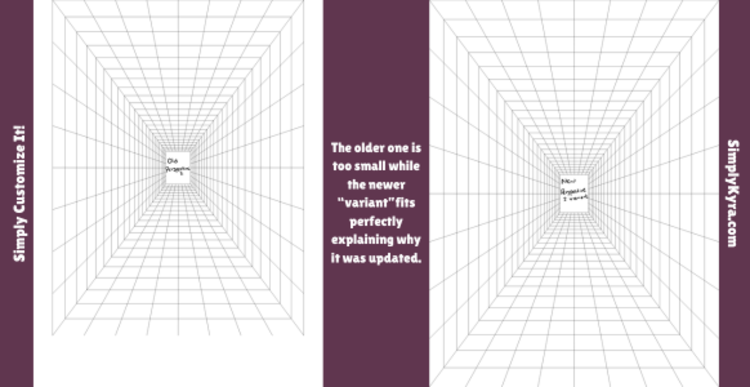
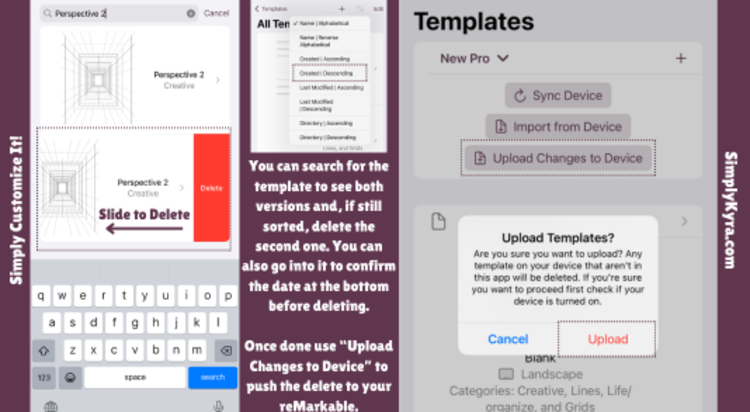
Duplicate Templates After Update and Import
This can happen when reMarkable changes its default templates' filenames or category names (noticed this on my Paper Pro on the 3.17 beta). To fix it:
- Open All Templates and sort by Created → Descending to spot newly imported copies.
- Delete the older duplicates (in my case they also had smaller dimensions matching the reMarkable 2).
- Tap Upload to sync the correct set back to your reMarkable.
- Optional: Right after an update (before you hit upload or sync) run Clean Up (added in 1.0.10) to tidy up unused assets. See next section for more information.
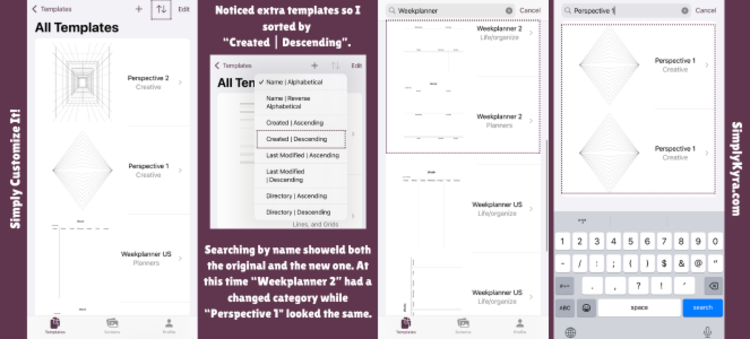
Created | Descending. This meant all the newly created templates were at the top. I then chose a couple I saw and used the text search to find them realizing there were two copies of either: the old and the new. 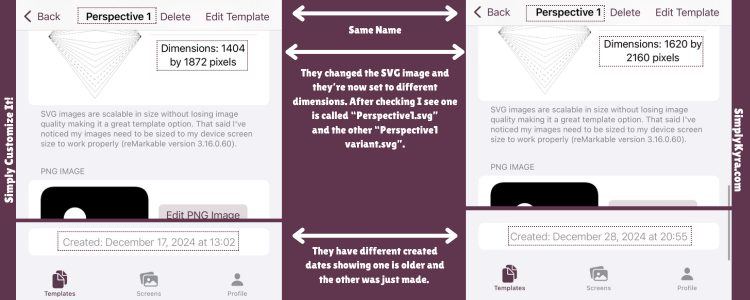
Just so you're aware: for the sake of future cases where this may come up, if I were to remove the newer one and upload so my reMarkable deletes the new one too that would only show the old templates on my reMarkable, fix the duplicate problem for now, and I'd be in the same boat in the next update. Just so you're aware.
Low Storage
If you’re running out of space and/or see leftover PNG, SVG, or .template files you can now:
- Go to Profile, Device Details, and scroll down to press Check Available Space on your reMarkable
- To free up space you can go to an individual template, scroll to the bottom, and
- Move the files outside the templates directory
- Remove extra unneeded files if you have several set

Just Updated. Let's Start Fresh
If your reMarkable just updated you can hit Clean Up on the templates area. It will use the filename to see remove any unused or outdated files on the default templates. It only check the templates on the reMarkable against yours and since the reMarkable reset and doesn't have them it will leave your custom templates safe and untouched.

Tip: It’s recommended to run the Clean Up tool after your reMarkable updates and before syncing to maintain an organized template library.
Image/File Support
Simply Customize It supports the following image formats:
- PNG: Add, rotate, remove, download, and crop. Can add from files, photo library, and (on iOS) the camera. Used for templates and screen images.
- SVG: Add from files or download (rotation not supported). Used only for templates.
- .template: Add, edit, and download. Used only for reMarkable’s newer templates.
PNG Troubleshooting
Image doesn’t fit or looks off
Use Resize to Fit (or Center Crop on iOS) in the image view to automatically adjust the image.
Landscape image looks cut off
- For templates set orientation to landscape mode inside the app.
- For screens rotate the image so it’s portrait before uploading then simply turn your reMarkable sideways to view it in landscape.
Still doesn’t fit right?
Check your device type under Profile → Device Details. If it’s set to the wrong model your image will resize incorrectly.
SVG Tips
SVG files give sharper results but need precise dimensions and structure. They can’t be rotated or resized in the app and must be created correctly before upload.
- Ensure your SVG uses correct
width,height, andviewBoxvalues matching your target reMarkable. - Base64-encoded or improperly exported SVGs may appear blank so it helps to validate them with an online SVG validator.
Example: Black Template SVGs
Here are the SVG structures I use for solid black templates:
<svg xmlns="http://www.w3.org/2000/svg" xmlns:xlink="http://www.w3.org/1999/xlink" zoomAndPan="magnify" viewBox="0 0 1620 2160" preserveAspectRatio="xMidYMid meet" version="1.0"><rect x="0" width="1620" fill="#000000" y="0" height="2160" fill-opacity="1"/></svg>
The black template image for the reMarkable Paper Pro.
<svg xmlns="http://www.w3.org/2000/svg" xmlns:xlink="http://www.w3.org/1999/xlink" zoomAndPan="magnify" viewBox="0 0 1404 1872" preserveAspectRatio="xMidYMid meet" version="1.0"><rect x="0" width="1404" fill="#000000" y="0" height="1872" fill-opacity="1"/></svg>
The black template image for the reMarkable 1 or 2.
Helpful Websites
Some helpful websites I used when making the black templates were:


Templating Files
What Is a .template File?
Starting with reMarkable version 3.18 some built-in templates now use a new .template format instead of standard PNG or SVG images. These files are JSON-based and describe the layout using vector paths, text, and grid structures. The new format is lighter, scalable, and easier for reMarkable to update than static image templates.
How Does Simply Customize It Handle Them?
Simply Customize It can import, display, and download .template files alongside PNG or SVG assets. You can view the contents, make edits if need be, and upload new files. I haven't a bit of time on them then
If you upload a .template file the app will automatically include it when syncing with your reMarkable no extra setup needed. That said it's still time consuming to upload and see
Do You Create/Convert/etc?
No. That said, I spent a bit of time on figuring out the templating files before I set it aside. It's in beta but I did create a Template Builder if you want to play around with them.
Writing Errors
Simply Customize It uses Citadel for secure SSH connections when uploading or syncing files to your reMarkable. If a file fails to write, you may see one of the following error codes:
| Error Code | Meaning |
|---|---|
SSH_FX_OK | Success. |
SSH_FX_NO_SUCH_FILE | File not found — make sure it exists before retrying. |
SSH_FX_PERMISSION_DENIED | The app couldn’t modify the file — check permissions. |
SSH_FX_FAILURE | General failure, often caused by low storage or a full template directory. |
SSH_FX_NO_CONNECTION | No connection — check that your reMarkable is powered on and WLAN is enabled. |
SSH_FX_CONNECTION_LOST | The connection to your reMarkable dropped during upload. |
SSH_FX_OP_UNSUPPORTED | The reMarkable’s file system doesn’t support this operation. |
SSH_FX_X | An unknown or uncommon error occurred. |
Case Study: Troubleshooting SSH_FX_FAILURE
A while back someone reached out to me as they were getting SSH_FX_FAILURE which usually means your reMarkable’s /usr/share/remarkable/templates directory is full. This lead to:
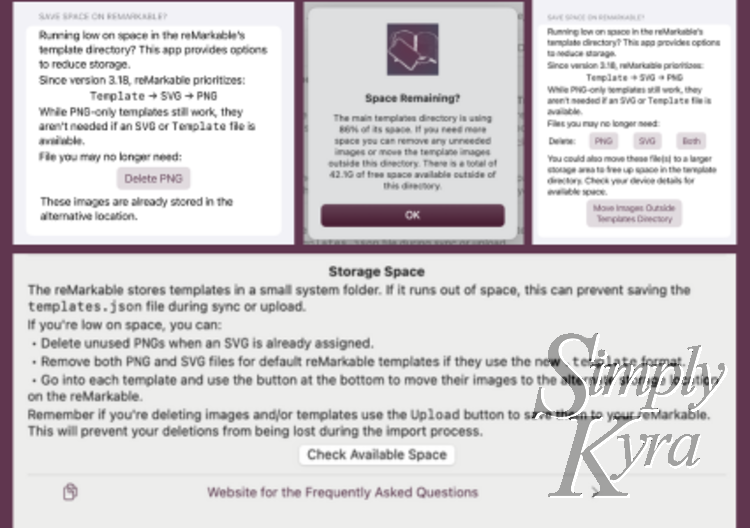
The ability to see how much space remained and move your templates' assets out of the smaller directory into the larger space.
Then I added a clean up button, to run after an update, to remove the unneeded assets as the reMarkable switched to templating and internal templates. No point keeping the older models.
Subscriptions
Choose the plan that best fits your needs. I use an Apple subscription group with Family Sharing enabled, so you can upgrade, downgrade, or switch plans anytime under Profile > Subscriptions or, if active, check out your subscriptions through Apple.
| Plan | What’s Included |
|---|---|
| 💎 Premium (Monthly / Yearly) |
Get full access to everything: manage both templates and screen images. • Unlimited syncing, importing, and uploading with your reMarkable • Simple button restore after firmware updates Best for users who customize both templates and screens. |
| 🖼️ Screen Only (Monthly / Yearly) |
For customizing screen images only. • Full access to all screen-image features • Store and manage your screen images • Import and upload screens to your reMarkable • Make groups of images for simple upload • Simple button restore after updates 🚫 Does not include template customization I love being able to set a photo as my sleep screen and use my reMarkable as a picture frame when not actively being used. |
| 🗂️ Template Only (Monthly / Yearly) |
Focused on template customization. • Full access to all template features • Store and manage custom templates • Sync, import, and upload templates to your reMarkable • Simple button restore after updates 🚫 Does not include screen image support With the walkthrough (accessible without a subscription) you can have a black custom template too! |
Multiple Devices
Your subscription works across iPhone, iPad, and Mac as long as you’re signed into the same Apple ID. Your library syncs through iCloud.
Family Sharing
If you’re using Apple Family Sharing your Apple Family members can use it too.
💡 Once downloaded you have full access to the Profile tab (with unlimited device creation) and onboarding (without a plan) so you can preview how customization works before subscribing.
Trial Periods
- Yearly plans include a 1-month free trial
- Monthly plans include a 1-week free trial
Restore a purchase
Go to Profile, Subscriptions, and find the button Restore Previous Purchase
Contact & Updates
- 💌 Subscribe for App Updates
- ✉️ Questions? Email mail@simplykyra.com
- 🛒 Download from the App Store
- 🌐 See the Main Page
- 🛠 Check out the Version History
- ⭐ Leave a App Store Review
- 💻 Browse more reMarkable Posts
📅 Last Updated: January 2026
Feel free to comment below if you have any additional questions or reach out through mail@simplykyra.com. And if you want feel free to...
Did this save you time?