
Quickly Create App Icons by Resizing Your Main Image With a Bash Script

While developing iPhone apps I realized the apps themselves look so much better with a custom app icon which led to me realizing just how cumbersome resizing an image multiple times can be. In case you're having a similar issue I had to share my script which made my process so much simpler and may help you too.
TLDR: In case you want to skip directly to the code itself you can find it embedded near the bottom of this post or through the GitHub Gist here.
Background
I'm currently developing Apple applications using XCode. In the process I quickly realized just how many differently sized images XCode needs when setting a simple app icon. The first couple times I did this manually by opening my image in Apple Preview and repeatedly resizing and exporting it for each required size. This took awhile and became especially onerous when I needed to make a minor change to the image thus requiring me to go through the entire process again to update all of the image versions. I realized this process needed to be automated and thus created a Bash script to speed it up.
XCode and App Icons
In XCode, running Version 14.1, I can access the app icon by going to the Project Navigator, on the left sidebar, and looking for the Assets file. Once I click on Assets XCode will open an inner menu on the left, directly to the right of the current list I was on, showing AccentColor and AppIcon. As a quick aside here is where you add any other assets you want to include in your app like branding colors or images. Anyway, once I clicked on AppIcon the main view is opened showing where I can set each individual icon that the application needs for it's app icon.
Your view, if you follow along, may look something like this:
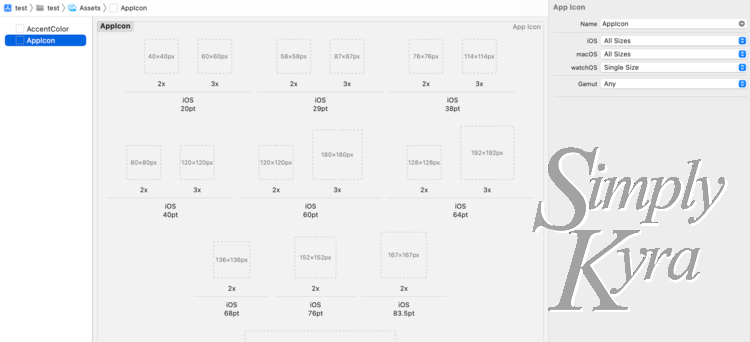
All Sizes. Not shown are all the other sizes for the other devices if I scroll down in the center window.On the right property menu I can change each drop down to specify which sizes I want to include in my app. Changing these selections affect the sizes shown in the main window. Each one of these shown squares will need an image, of the specified size, dragged onto it for import. This large number of required images is exactly why resizing my main app icon was so cumbersome and needed a script made.
If you want more information about Apple's app icons you can check out their developer or their designer documentation.
My Script
Requirements
My script uses ImageMagick (version 7.1.0-57) to resize the given main image and output seven specifically sized images. I created and ran this script exclusively on my Mac computer using iTerm2 (Build 3.4.19) so yours may look a bit different. I'm also not quite sure how the script would perform on a different device. If you don't have ImageMagick I installed mine by using Homebrew and typing the following into my terminal:
brew install imagemagickOptional Global Execution
Before we begin I wanted to let you know that I placed my script in my bin directory so I could execute it from anywhere on my machine. This means when I want a newly created image resized I can simply open my terminal where the image is and run the script directly from that location. If you want to do the same but are unsure how you can check out my previous post How to Run a Bash Script From Anywhere on Your Apple Computer.
Running My Script in the Terminal
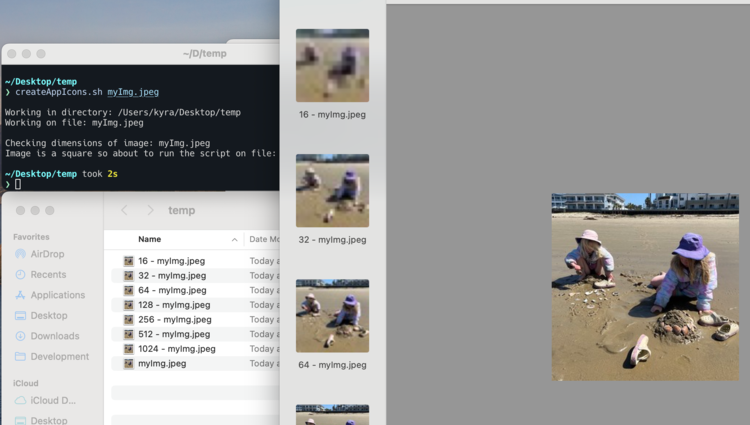
To show how to run this script in the terminal I wanted to share an example of running it. For this example I created a temp directory on my Desktop and moved an image in called myImg.jpeg. To run the script I called the script's name createAppIcons.sh and followed that with the name of my image myImg.jpeg. If you hadn't moved your script into your bin directory you may need to start it with ./ so it knows that it's executing a file. In either case, with or without the ./, you'd type in:
./createAppIcons.sh myImg.jpegOnce I press enter the script runs, outputs messages so I know where it's at, and, if successful, outputs seven images in the same directory all labeled with it's size followed by the original image name. In this example the 1024 pixel-squared image is outputted as 1024 - myImg.jpeg.
Since Apple wants square app icons my script first checks to make sure the image you passed in is square before it resizes the image. If it isn't squre it let's you know it can't continue and outputs the exact pixel width and height of your image. This is great if you mistakenly mis-cropped your image as you now know exactly how you'll need to fix it. In the following example I passed in a regular image I had taken recently on my phone so of course it wasn't square yet and, as you can see, it outputted a message to me and exited:
❯ createAppIcons.sh myImg.jpeg

Working in directory: /Users/kyra/Desktop/temp
Working on file: myImg.jpeg

Checking dimensions of image: myImg.jpeg
Image is not a square! It's height is 3024 and width is 4032.
Exiting program. Please fix and run this again.
With that error demoed I next opened myImg.jpeg in Preview and carefully cropped it so it would in fact be a square. With the altered image saved I, again, ran the script. This time I wasn't given the error, the script continued until the end, and seven new images were outputted ranging from a 16 pixel square, labelled 16 - myImg.jpeg, to a 1024 pixel square labelled 1024 - myImg.jpeg. This is what I saw in the terminal when I successfully ran my script:
❯ createAppIcons.sh myImg.jpeg

Working in directory: /Users/kyra/Desktop/temp
Working on file: myImg.jpeg

Checking dimensions of image: myImg.jpeg
Image is a square so about to run the script on file: myImg.jpeg
With the images outputted I next brought the folder closer to my XCode window and began the slow process of dragging each one over to it's assigned slot.
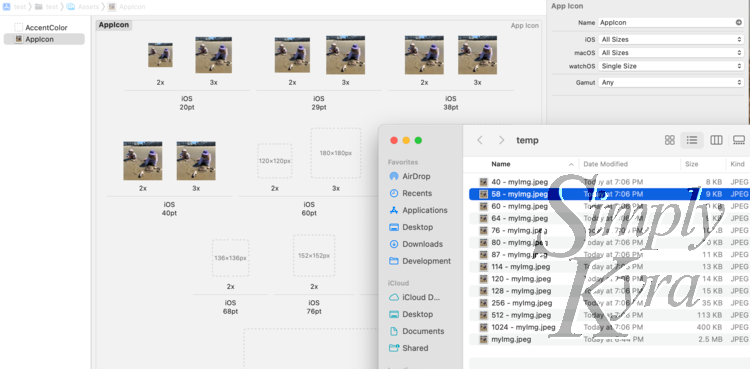
And with that my test app had an assigned app icon!
In Depth Look
And without any further ado here’s the code with each line, or section, explained:
#!/bin/bashLike with all of my Bash scripts I started my script by using the shebang #! characters followed by the interpreter it needs to execute the rest of the script. So in this case I used the shebang, or bang line, and followed it up with the /bin/bash as Bash, the interpreter I need to use, is installed in my /bin directory. If you want to explore this more you can check out the Shebang wiki on the Linux Shell Scripting Tutorial page or read the three minute Bash Shebang article on Linuxize.
# Run as: ./createAppIcons.sh filename
# Assumes you are running the script where you want it to execute.
# If you want a different size you just need to add a line, or edit one, at the bottom of the file.
I then follow it up with comments to you, the user of the script, so you know how to run it (script name followed by the image name) and to run it in the same directory (also called folder) as your main app icon that you want to resize. It also reminds you that you can add, or change, any outputted image size by going to the end of the script.
if [ $# -ne 1 ]; then
    echo "Please call this script with one argument - the image file you want to resize."
    exit 1
fi
I next make sure an argument was passed in. Right now it just checks that one argument was passed in, not zero or two, and doesn't check what the argument itself is. If you prefer you can add more checks to your script.
echo "Checking dimensions of image: $1"I next echo, output, a line to you, the user running the script, letting it be known I'm next checking the dimensions of the image followed by the argument name that was passed in. This does two things. One it lets you know what's happening in the script while also outputting the name of the file in case it was entered incorrectly. In this line $1 represents the name of the file passed in.
width=$(identify -format '%w' "$1" )
height=$(identify -format '%h' "$1")
if [ $width -ne $height ]; then
    echo "Image is not a square! It's height is $height and width is $width."
    echo "Exiting program. Please fix and run this again."
    exit 1
fi
And then a sanity check. Since Apple wants the app icon to be square I decided to check that the image passed in is in fact a square too. This way the script realizes and exits before doing any more work and allowing you to fix it before running the script again.
To do this, specifically, I grab both the width and height of the image passed in using the $1 variable again. Once I have the values I make sure the height and weight are the same number. I don't care how large or small the image is just that it's square and if not it outputs the issue to the user, includes the height and width in pixels, and exits. In the future, if it might be an issue, I could see making sure the dimensions are larger than the largest needed app icon, thus making sure the larger resizes don't get too blurry, but for now this is the last sanity check before the main body of the script.
echo "Image is a square so about to run the script on file: $1"Since the sanity checks are now done I next output another sentence to the user letting them know that the main part of the script is about to be run.
# This currently outputs seven square files. If you want to add another size
# to the output copy and paste one of the below lines and edit it to the size.
# For example in the line: magick "$1" -resize 16x16 "16 - $1"
#   16x16 specifies the size of the new file
#   "16 - $1" specifies the name of the file where $1 is the original filename
# So if your input is a file name myImg adding a line saying
#   magick "$1" -resize 10x10 "OTHER - $1"
# Would output a file of size 10 by 10 pixels whose name is OTHER - myImg
Before the main code I added some more comments explaining that there's seven lines coming below this section and each of these lines result in a single image outputted coorelating to it's specified size. If you want to remove or change one of these outputted images you just need to find the coorelating line and either delete or edit it. If you want it to output a new size you just need to add another line making sure to use your dimensional requirements. These, final, lines are:
magick "$1" -resize 1024x1024 "1024 - $1"
magick "$1" -resize 512x512 "512 - $1"
magick "$1" -resize 256x256 "256 - $1"
magick "$1" -resize 128x128 "128 - $1"
magick "$1" -resize 64x64 "64 - $1"
magick "$1" -resize 32x32 "32 - $1"
magick "$1" -resize 16x16 "16 - $1"
To explain these more in depth I'll take the top line:
magick "$1" -resize 1024x1024 "1024 - $1"This line first calls magick for the ImageMagick program and then passes in the following arguments:
"$1": This is a String, as told by the quotes, with the name of the original image that needs to be resized. As the image's filename was passed in and stored in the variable one this is shown with the variable$named1.-resize 1024x1024: Next we say we want the final image to be resized to be a 1,024 pixels wide and 1,024 pixels tall. For more information you can check out this legacy documents from version 6 talking about resizing and scaling."1024 - $1": And finally the new name of the file. I chose to use the original name of the file for the new image file but altered it slightly by adding the new size and a dash beforehand. This way each new image file outputted is obviously linked with the original image and by its size.
Continuing from the example in the commented script if you call the script and pass in your image file called myImg.png and you added a line saying:
magick "$1" -resize 10x10 "OTHER - $1"Then the script would output an image of size 10 by 10 pixels named OTHER - myImg.png.
The Script Itself
And without further ado here's the script in it's entirety.
If you’re interested in getting any of my future blog updates I share them to Facebook and Instagram. You’re also more than welcome to join my email list by subscribing through the header, footer, or under member discussion at the bottom of this post.
Did this save you time?