
Use a Simple Bash Script to Resize Your Images Quickly and Easily

Several months ago I realized the process I use to resize and compress the images I want to upload to my blog was broken. This lead me to learning about ImageMagick® so I could easily do the same tasks through the terminal. Earlier I posted my process on learning which commands I should use to resize and compress my images along with sharing several other points I came across along the way. I’ve since decided to create a bash script to make it easier to run multiple commands at once along with also renaming the newly resized and compressed image files. I decided to share it with you through this post, and through GitHub, in case you also want to use a similar script. You’re welcome to copy it at the bottom of my post or clone it through GitHub and alter it to fit your specific needs.

If you want more information about ImageMagick® and how to run commands to resize, compress, or collage images together feel free to check out my previous post about this.
In this post I wanted to share the simple bash script I put together to allow myself to quickly resize, compress, and rename a copy of each image I want to upload to my blog. This saves so much time compared to when I used to do each image individually through the Preview app on my Mac. Below I’ll start off by doing a quick overview followed by an in depth look at the script section by section so you understand what I did and why thus making it easier for you to alter the script for it to do what you need it to do. Finally, at the bottom, I’ll post my bash script in it’s entirety, all in one piece, so it’s easier for you to look over or copy, if needed, if you don’t want to use the GitHub version.
Overview of the Bash Script
Requirements
This bash script uses the program ImageMagick® so you’ll need to first install that before running the script. I installed it on my computer using Homebrew through the terminal.
Input
This script, as is, only needs one argument passed in. This argument is the pathway to the directory, or folder, you want to run the script against. I chose to start out by doing it this way as the directory I’m working in for my blog changes with each individual post. One thing I need to point out about this input is that bash sees a space as the beginning of a new argument so if your pathway includes one or more spaces you’ll need to enclose it with a set of double (") or single (') quotes.
If you want to be able to run this program from anywhere on your computer you can set a symbolic link. This means you can run it from the specific directory you want the program to execute on and thus you can remove the cd command, and related checks, in the script or just pass in . as your pathway since it means current directory. To create the symbolic link I went to the directory my program was stored in and entered two lines. The first copies the current pathway to my clipboard while the second, including the pasted pathway, creates the symbolic link:
pwd | pbcopy
ln -s /Users/kyra/Development/SimplyKyraBlog/compress_my_images.sh ~/bin/
I then attempted to run the program from a different directory and it didn’t work so I had to edit my config.fish file in my .config/fish/ directory.
vim ~/.config/fish/config.fishI opened up the file in vim, although you could use a different editor, and at the bottom of my file I added one line of text:
set PATH $HOME/bin $PATHOnce I saved and exited I was able to go to a random directory of images and run my bash script. Since my script still expects a pathway I passed in . to give it the current directory I was in:
~/D/r/P/Meal-Workout-Plans> compress_my_images.sh .

Working in directory: .
All done.
Completed successfully. Have a great day!
What it does
This script will go through the directory, that you passed in, and takes in all of the files ending with the following extensions: jpeg, JPEG, jpg, JPG, png, and PNG. If you have another directory within this one the script will not check inside of it for images. The script will then create a temporary directory, called output, which it will then use to save a copy of each image it resized, to 750 pixels wide, and compressed, to just under 70 KB (kilobytes). It will then delete any newly created file containing the text interest (for P/pinterest) or nstagram (for I/instagram) in it’s name as I don’t need either of those images resized to 750 pixels. All of these newly created images will then have the text compressed_ added to the beginning of each filename before then being moved up a directory, out of output, and then the script will delete the now empty output directory. Finally, before ending, any image containing interest (for P/pinterest) will be resized to 471 pixels wide so I have a properly resized Pinnable image.
Running the script
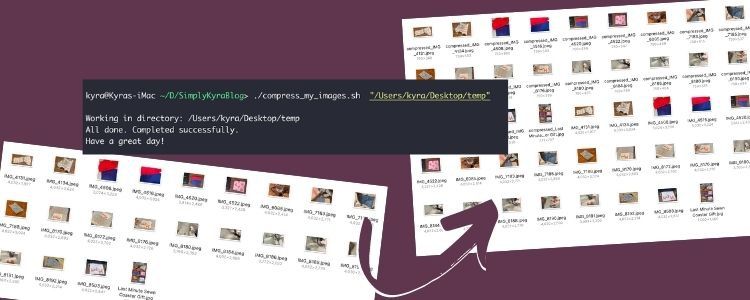
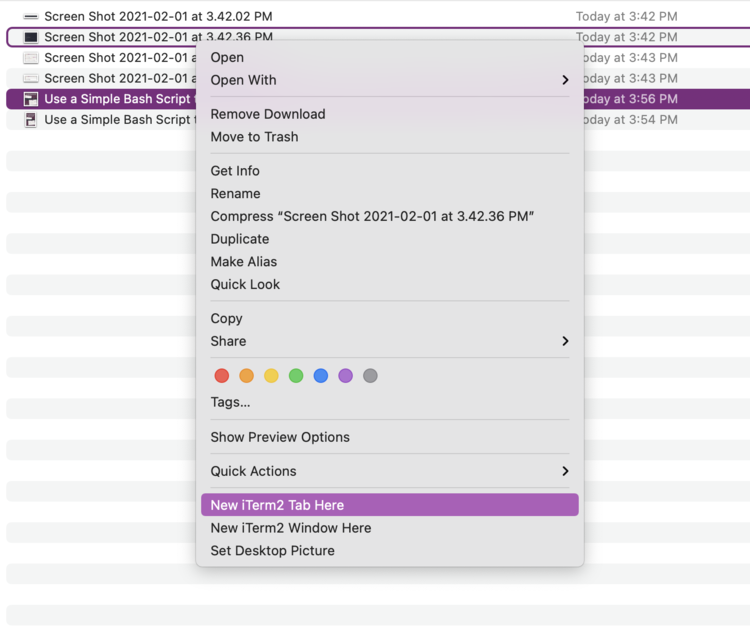
I always start my blogging process by getting all of my related blog post images into a single directory before removing any duplicates, cropping any needed images, and creating both a Pinterest and an Instagram geared image through Canva. Because of this process all of my images, that I want to compress for my blog, are all located in a single already opened folder so I start this process by right-clicking on a single image and going near the bottom of the popped up menu to open my terminal with the current pathway already set in for me. This way I can quickly type in pwd to get my needed input, the full pathway of my images, for the bash script. As an aside I use iTerm2 for my terminal with fish already installed so my terminal may look different than yours.

pwd. This gives me the full pathway, on the next line, which I can easily highlight and copy. If you want to skip that step you could always pipe the results directly to your clipboard with: pwd | pbcopy.Once I have the full pathway I need copied to my clipboard I navigate to where my bash script is being stored. I then run the script by typing in ./ followed by the script’s filename and the pathway which I paste in surrounded by double quotes. I chose to encapsulate the pathway in quotes because some of my folders have spaces in them so I need the quotes so the script interprets it as a single pathway instead of multiple arguments. Once I press Enter the script takes off doing it’s thing. If you kept the directory open and visible while you run the script you might be able to see the output directory being made and the files temporarily stored in it before the script finishes with a simple message to the user.

In case you want to see the command in larger and easily copied font:
./compress_my_images.sh "/Users/kyra/Documents/Blog Ideas/2 - Current Working Ideas/Batch Script Resize Images"

Working in directory: /Users/kyra/Documents/Blog Ideas/2 - Current Working Ideas/Batch Script Resize Images
All done.
Completed successfully. Have a great day!
compressed_ it’s simple to see which files are the newly created ones outputted from the script.And with that the command is executed and the images are done being resized, compressed, renamed, and are now ready to be uploaded to the blog post.
Detailed View of the Bash Script
I figured I’d go over the bash script in detail showing you each part piece by piece in case you’re interested in how it works. This way it’s also easier for you to understand what I did so you could simply alter it for your own purposes. If you want a less verbose version you can check out the version I uploaded to GitHub or scroll to the bottom of this post where I dropped the whole thing in it’s entirety for easier access.
I’ll start by showing you one or a few lines of code, copied from the script including comments, and then below each one I’ll explain it. Let’s start with the first line and go from there:
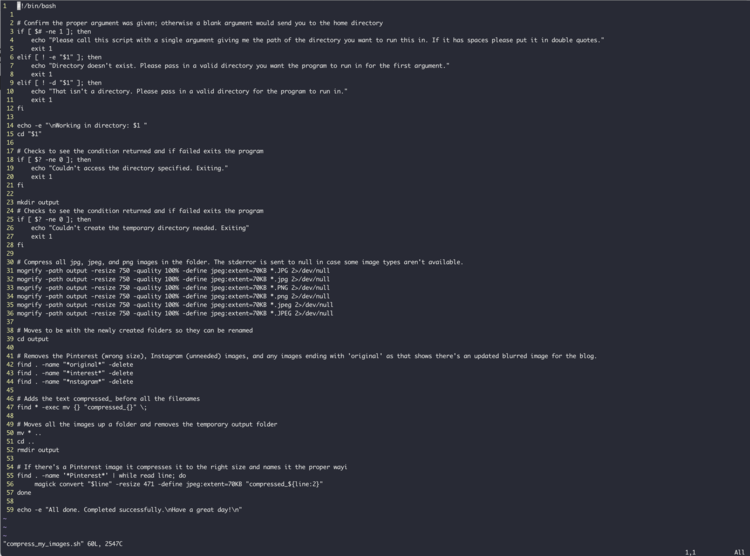
#!/bin/bashEvery Unix or Linux based operating system needs a script to start with the shebang #! characters followed by the interpreter it needs to execute the rest of the script. So in this case I used the shebang, or bang line, and followed it up with the /bin/bash as Bash, the interpreter I need to use, is installed in my /bin directory. If you want to explore this more you can check out the Shebang wiki on the Linux Shell Scripting Tutorial page or read the three minute Bash Shebang article on Linuxize.
Next I check to confirm the proper argument was given by running through three different if statements. Instead of running three individual if statements I instead combine them together by using the if, elif (if not the previous one then try this one), and fi (ends the if statement) commands. I’ll go through them one by one:
# Confirm the proper argument was given; otherwise a blank argument would send you to the home directory
if [ $# -ne 1 ]; then
echo "Please call this script with a single argument giving me the path of the directory you want to run this in. If it has spaces please put it in double quotes."
exit 1
This first if statement takes the number of arguments that was passed into the script, using $#, and makes sure that only one argument was passed in. It compares the number of arguments using -ne, or not equal to, 1 so the script goes into the if statement if there were more or less arguments than expected. Inside the if statement it prints out a message to the user, using echo, and exits the program so there’s nothing else ran.
elif [ ! -e "$1" ]; then
    echo "Directory doesn't exist. Please pass in a valid directory you want the program to run in for the first argument."
    exit 1
This above statement only runs if there was only one argument passed in, as it passed the first if statement, so we know we can use $1 to access the first argument variable which in our case should be the path of the directory you want it to run in. The if statement then follows with ! -e "$1" which checks if that directory exists. Like before if this error occurs the script goes into the if statement, prints out a message, and exits the program.
elif [ ! -d "$1" ]; then
    echo "That isn't a directory. Please pass in a valid directory for the program to run in."
    exit 1 fi
This if statement looks similar to the statement before with only one minor change. Instead of the -e between the ! and "$1" it now has a -d to check if the pathway is a valid directory or not. Again if it isn’t valid it goes into the if statement, outputs a message using echo, and exits the program.
echo -e "\nWorking in directory: $1 "I then used the argument that was passed in to output a message to the user to show them which directory I was about to work in. This means if something weird happens they can look back at the output and confirm whether the wrong pathway was passed in or not. The echo command outputs what’s between the quotes to the terminal. I wanted to start the message with a carriage return or, also called, a new line character, \n, which is essentially when you press Enter on the keyboard. By default echo can’t use an escape sequence, the backslash \, so you need to add the -e so it interprets the newline character properly. If you want to learn more here’s a StackExchange Unix & Linux question about the difference between echo and echo -e.
cd "$1"Now that those checks passed and the message was sent out to the command line using standard output, stdout, it’s time to start. Here I used cd to change my directory to the one passed in through the argument. I know the directory exists from the previous checks in the if statements.
# Checks to see the condition returned and if failed exits the program
if [ $? -ne 0 ]; then
    echo "Couldn't access the directory specified. Exiting."
    exit 1
fi
After the last command I used $? within an if statement to check on the exit status of my previous command, the cd, so I’d know for sure if it succeeded, equaled 0, or failed. This check is in place in case the directory exists but the script doesn’t have access to it for some reason and the cd command fails. Traditionally, a failed command here would return 1 but I decided to generalize it so a fail, and subsequent entrance into the if statement, would be anything not equal to zero so I wrote it like this $? -ne 0 where -ne means not equal. I chose this as some statements may fail and return more than just 1. An example of this is ls, which lists the contents of a directory, as it returns 0 with success, 1 with minor problems, and 2 with serious trouble. If the script wasn’t able to move into the passed in directory then the contents of the if statement would run a message to the user and exit the program so nothing else could happen.
mkdir outputI next make a new directory, called output, using the mkdir command. I do this as the ImageMagick® mogrify commands, used below, expects the output directory to exist and be accessible. This directory will be deleted, using rmdir, at the end of the script.
# Checks to see the condition returned and if failed exits the program
if [ $? -ne 0 ]; then
    echo "Couldn't create the temporary directory needed. Exiting"
    exit 1
fi
Once again I check the exit status of the previous command, using $?, to see if it doesn’t equal, -ne, zero. If it doesn’t equal zero then we know the mkdir command failed, so a directory named output wasn’t created, and we enter into the if statement where a message is outputted, using echo, to the user and the script exits. If the directory was made successfully then $? would equal zero, we wouldn’t enter the body of the if statement, and the script would continue running.
# Compress all jpg, jpeg, and png images in the folder. The stderror is sent to null in case some image types aren't available.
mogrify -path output -resize 750 -quality 100% -define jpeg:extent=70KB *.JPG 2>/dev/null
mogrify -path output -resize 750 -quality 100% -define jpeg:extent=70KB *.jpg 2>/dev/null
mogrify -path output -resize 750 -quality 100% -define jpeg:extent=70KB *.PNG 2>/dev/null
mogrify -path output -resize 750 -quality 100% -define jpeg:extent=70KB *.png 2>/dev/null
mogrify -path output -resize 750 -quality 100% -define jpeg:extent=70KB *.jpeg 2>/dev/null
mogrify -path output -resize 750 -quality 100% -define jpeg:extent=70KB *.JPEG 2>/dev/null
I kept the block of mogrify commands in one section here as each command is essentially the same thing. The only difference between each line is that it targets a different file extension. I noticed the filename comparison was case sensitive so in addition to running the command against three different file types (JPG, PNG, and JPEG) I also ran it against the capitalized version and the lowercase one (so PNG and png) as I’ve noticed some of my image files being one way while others are the other way. Specifically, for the JPG although the rest are the same, I use:
mogrify: The program being run which you need to install before running this script. I installed mine through the terminal using Homebrew.-path output: This sets the relative path of where the outputted files should be saved. Specifically, this is setting the relative path tooutputso the program knows the current directory contains another directory namedoutput, which we just created, that it can save the new files to.-resize 750: This is saying that it needs to resize the images to750 pixelswide. The program, by default, keeps the image’s aspect ratio the same so the height of the image is resized relative to the width.-quality 100%: This is saying to keep the quality at100%. Looking back right now I don’t think this is needed as the next command plays around with the image’s quality but I haven’t tested it out so I’ll keep it in for now.-define jpeg:extent=70KB: This is the line I had trouble finding and shared about in my previous post about ImageMagick®. It usesdefineto set thejpeg:extentparameter so the maximum size, in kilobytes, of all of the resulting image files would be capped at70 KBeach.*.JPG: This is how the program knows which files, by matching, it should take in as input. In this case the asterisk,*, matches anything. It’s then followed by.JPGwith no other asterisk at the end so it’s essentially saying to match any file in the current directory that ends with.JPG. This is why I used multiplemogrifycommands as I wanted to resize and compress many different image file types without potentially attempting to resize and compress a non-image file.2>/dev/null: If there were no inputted files, so in this case no files ending with.JPG, then the command would send an error, usingstderror, to the user. Since I don’t need there to be an image of each file type I ran the command against I don’t care if it fails or succeeds so I don’t need to see this error message. I chose to keep the message hidden from the user by adding this text,2>/dev/null, to the end of eachmogrifycommand so the error is written to/dev/null, essentially a blackhole, rather thanstderrorand the user. This means if there are only two of the six file types above in the directory then there will be four messages sent to this blackhole rather than the user. If you want to learn the Step by step breakdown of /dev/null you can check out this article on Medium by Jorge Yau.
If you want to look into this command more you can check out my previous post which goes over it and the process I took to get to this final statement.
# Moves to be with the newly created folders so they can be renamed
cd output
I now use the command cd to move into the output directory with all of the images that were just resized and compressed.
# Removes the Pinterest (wrong size) and Instagram (unneeded) images
find . -name "*interest*" -delete
find . -name "*nstagram*" -delete
I figured it was easier to apply the mogrify command, above, against the images’ file extensions rather than their file names. As such I now delete any image in the output directory that I don’t need so in this case any that are destined for Instagram or Pinterest. I’ll explain the above command for the first line, Instagram, but the second, for Pinterest, works the same:
find: Program that searches a directory tree, specified directory and all of it’s sub-directories within, for the files based on the following parameters (the rest of the line). Here’s a link for it’s man page with more information..: This is where you specific the path for which directory, and sub-directories, you want to search in. Since the script already entered theoutputdirectory, where I want to search, I used.to specify the current working directory.-name "*interest*": I’m using the-nameparameter to specify a file name match. In this case I want to match withPinterestbut I removed thePat the beginning so it easily matches whether Pinterest is capitalized or not. I added the asterisk,*, to the beginning and end of the word to show it could match anything on either side of the wordinterestthus, for example,interest.png,gobblygookinterest, andherePinterestAndThere.pngwould all match. Looking back if I wanted to ignore the capitalization I could’ve also used the flag-inameto ignore the case.-delete: This takes all the files that matched the previous conditions and deletes them. Be sure yourfindcommand works great before adding this flag.
# Adds the text compressed_ before all the filenames
find * -exec mv {} "compressed_{}" \;
Like above this is another find command but other than the find itself it’s completely different. The find * says to find all of the files in the current, output, directory. The -exec parameter then executes the following command (mv {} "compressed_{}") on all of those files. Specifically, this last command does:
mv: This stands for move. Essentially it takes the file in the next parameter and moves it to the next parameter. In this case, seen below, I don’t specify a directory for either parameter and instead change the name so essentially themovecommand keeps the files within the same directory,output, while renaming them.{}: Combined with thefindcommand the empty curly brackets,{}, are filled in with each matching file. That means each of my newly compressed and resized images in theoutputdirectory take turns, if you will, having their name replace these curly brackets. Thismvcommand is executed on each of the matching files."compressed_{}": This is the new filename I want to use for each image. As the curly brackets are filled in with each of the original filenames, found by thefindcommand, each file is renamed to include the textcompressed_at it’s front.
# Moves all the images up a folder and removes the temporary output folder
mv * ..
I’m again using the move, mv, command. This time the asterisk, *, means grab everything in the current directory, output, and bring it up one directory, .., thus taking all the newly renamed files out of the output directory and putting them in with the original files.
cd ..Now the script move up a directory by changing the directory, cd, and adding the two periods, .., to show going up one level.
rmdir outputNow the script removes the now emptied and unneeded temporary output directory by using the command rmdir, which stands for remove directory.
# If there's a Pinterest image it compresses it to the right size and names it the proper way.
find . -name '*Pinterest*' | while read line; do
    magick convert "$line" -resize 471 -define jpeg:extent=70KB "compressed_${line:2}"
done
I removed the resized and compressed Pinterest image above as I need this image to be resized to a different width than all the other images. To resize and compress it now I use the find command to search through the current directory, ., and find the file containing the text Pinterest. Just realized now that I left the capital P at the beginning so if it might be spelled pinterest I should’ve instead used -iname to ignore the case or used '*interest*'. This should only match to the original Pinterest file as the compressed one was deleted. Anyway the next symbol pipes, |, what was returned in the previous section to the next bit. Then I start a while loop to loop over each Pinterest containing file, in case there’s multiples (although in my case it will just go through the loop once) that the find command found. The done at the bottom shows the while loop is done and you should either go up to the beginning with the next matching file or, if you’re done looping through everything, continue on to the next block of code.
Within the loop is a single line. This is an ImageMagick® command that is run on a single image unlike the mogrify command above. I wrote about it in my previous post; but, specifically, here this takes the image matched from the find command, specified by "$line", resizes it to 471 pixels wide keeping the height relative, uses the -define jpeg:extent=70KB so the program plays with the quality of the images so it compressed to just under 70 KB (kilobytes), and then renames the compressed image so the filename starts with compressed_.
echo -e "All done. Completed successfully.\nHave a great day!\n"Now that the images have all been resized and compressed properly I output a message letting the user know that the complete bash script ran before the program ends. Again, I needed to include -e after echo so it reads the newline character, \n, in the center and end of my text. And that’s it you’re done.
The Entire Bash Script
If you want to copy the script from GitHub I’ve created a project and committed this script to it here. I've also created a copy under GitHub Gist and embedded it here so you can see all of it without having to leave this post.
Whether you’re a old hat at playing within the command line or are completely new to this I hope it was able to help you. Let me know if you ended up using this code in the comments below. And if so did you use it as is or did you customize it to fit your own needs? How did it help? Anyway hope your day is going great and your week is well.
If you’re interested in getting any of my future blog updates I currently come out with a new one every Wednesday and share them to my Facebook page and Instagram account. You’re also more than welcome to join my email list located right under the search bar or underneath this post.
Did this save you time?