
Check Out Some Really Delicious Canadian Desserts Just In Time For Christmas

As the Canadian Thanksgiving rolled around this year I kept debating making Nanaimo bars as our custard powder is best before November and I wanted to use more of it before then. One thing led to another and I ended up making four or so batches of Canadian-themed treats with Ada’s help. Looking back I’m not quite sure whether this is going to become a Canadian Thanksgiving tradition or not but I figured with both the American Thanksgiving and Christmas holidays coming up I needed to share the links in case you’re also looking for some really yummy treats.
Thanksgiving History
First a quick aside. Although both the Canadian and American Thanksgiving holidays are named the same they aren’t exactly alike.
The American Thanksgiving is believed to be modeled on the 1621 harvest feast shared by the English colonists (Pilgrims) of Plymouth and the Wampanoag people; according to this Britannica article. It was then proclaimed to be a national holiday upon enactment of the Constitution in 1787 but in 1798 was left to the declaration of each State and wasn’t fully adopted nationally until October 3rd, 1863 during the Civil War when “Lincoln proclaimed a national day of thanksgiving to be celebrated on Thursday, November 26.” As time went on the holiday became bigger with football (specifically the Yale and Princeton game in 1876), costumed revelers in the late 1800s, and then finally the parade which first started in Philadelphia with the Gimbel’s department store in 1920 and then, since 1924, the annual New York City Macy’s parade with huge balloons ever since 1927. All this information was found in the linked Britannica article.
In contrast the Canadian Thanskgiving is believed to have been first celebrated on the 6th of November in 1879 when Sir Martin Frobisher and his crew celebrated landing in, what is now, Nunavut. This is apparently widely contested as the first true Thanksgiving so we might go on to the next celebration held by the inhabitants of New France in 1606 who started a series of rotating Thanksgiving feasts to help prevent the scurvy epidemic and lift their spirits. Either way it seemed to be more a combination of traditions from both the “Indigenous peoples in North America [who] have a history of holding communal feasts in celebration of the fall harvest” and the European settlers’ harvest celebrations that included the cornucopia or horn of plenty. Either way the first national Thanksgiving was first celebrated in the province of Canada in 1859 as a religious holiday while the first national civic version of the holiday, after the Confederation, was on April 5th, 1872. Unlike the United States the holiday frequently moved each year as it was determined annually by Parliament. Sometimes Thanksgiving coincided with the American holiday yet the Canadian Thanksgiving could also occur as late as December 6th. Back in 1921 Thanksgiving was finally given a stable date on the Monday in the week of November 11th, coinciding with Armistice Day introduced in 1919, but with the introduction of Remembrance Day in 1931 (November 11th) it was again moved around each year until, on the 31st of January in 1957, Parliament set Thanksgiving on the second Monday in October. That said Thanksgiving isn’t an official statutory holiday in all provinces. From the time of conception the Canadian holiday remained a smaller deal compared to the larger United States version but, in Canada, we did adopt their typical feast when it was introduced to Nova Scotia in the 1750s. All these facts were taken from the Thanksgiving Day article of the Canadian Encyclopedia.
Other than the Britannica and Canadian Encyclopedia articles you could also read more about the difference between the two in these CNN, Culture Trip, Insider, The Old Farmer’s Almanac, and Inside Vancouver articles too.
Desserts
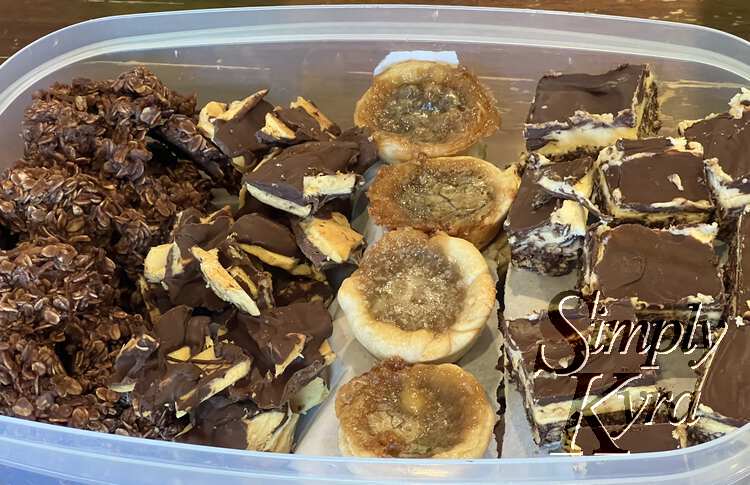
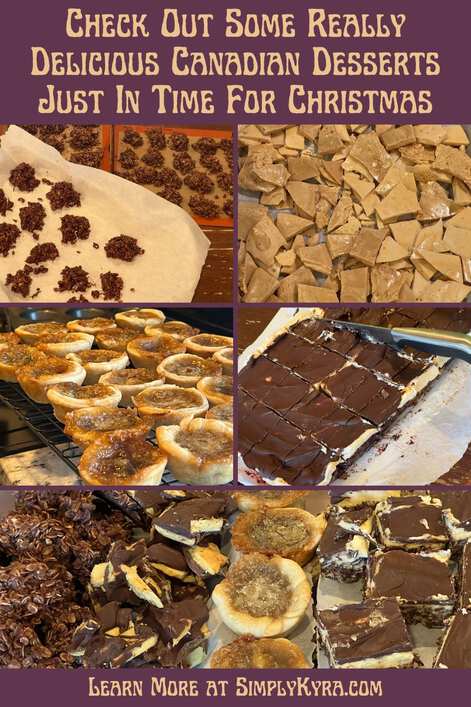
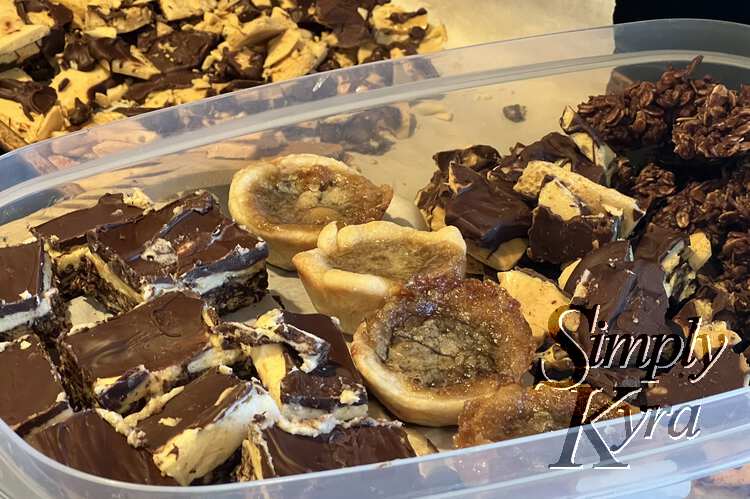
Anyway onto the desserts! Several years ago I suddenly started really craving Nanaimo bars, a dessert I hadn’t had since leaving Canada, as I had just realized how long it had been since I’d had any. After looking around online I realized I needed to purchase custard powder and ended up buying Bird’s Custard Powder (Wikipedia link) through Amazon. I absolutely loved the recipe I made especially as I was able to customize it by replacing the traditional walnuts with almonds. It was perfect, fixed my craving, and the girls’ loved them. That said, they’re really rich so I didn’t make them too often and, just this summer, noticed that the best before date on the custard container was for this November. As such I kept thinking of making more, and putting it off, over the last several months as I didn’t want to waste the powder. As the Canadian Thanksgiving approached, this last October, one thing led to another and I ended up making Nanaimo bars along with several other Canadian-remembered treats including sponge toffee, chocolate haystacks, and butter tarts. All in all I spent the Thanksgiving Monday baking, mostly with Ada as Zoey didn’t want to join, a cornucopia of Canadian treats. And so, without further ado, this is what I made:
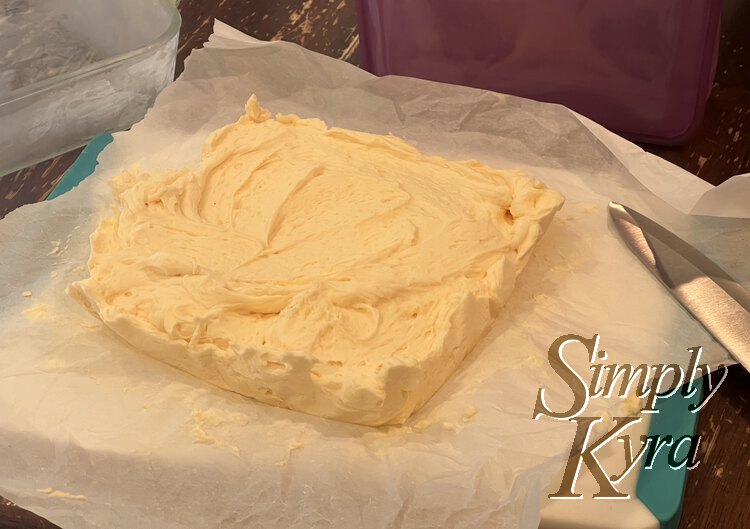
Nanaimo Bars
With all this talk of Nanaimo Bars (pronounced nuh-NYE-mo) I realized I needed to start with this recipe over all the others. Nanaimo bars are something I grew up loving whenever they were served but I was also leery of them as the walnuts in the bottom layer made my mouth itch and I had to decide if eating them was worth the later discomfort. As such they became the pinnacle dessert on potluck tables.
Although their history is mired in mystery Nanaimo bars have become famous over the years. In the NY Times Nanaimo Bar article it mentions Mrs. Paré, the author of the well-known Canadian cookbook Company’s Coming, having included Nanaimo bars from the very first book in the series 150 Delicious Squares in 1981. Apparently she left the bars out of one of her cookbooks once and was repeatedly asked for it by name so many times that she never excluded them again. The Nanaimo bars are still popular and have even gone as far as becoming a donut flavor at the Tim Hortons restaurant chain back in 2017 celebrating the nation’s sesquicentennial (150 year anniversary). If you want to learn more about Nanaimo bars you can continue to check out the NY Times article or this in depth Nanaimo bar comparison article through BC Food History.
I can’t remember what recipe I originally used but this time around I made the Just So Tasty version and loved it. I also made a few minor adjustments. Instead of using an 8×8 or 9×9 inch pan I doubled the recipe and went with my 9×13 inch glass casserole dish instead. Also as I don’t like walnuts and had sliced almonds on hand I did a one-to-one substitution with them for the bottom layer. Other than that I kept it, overall, the same.
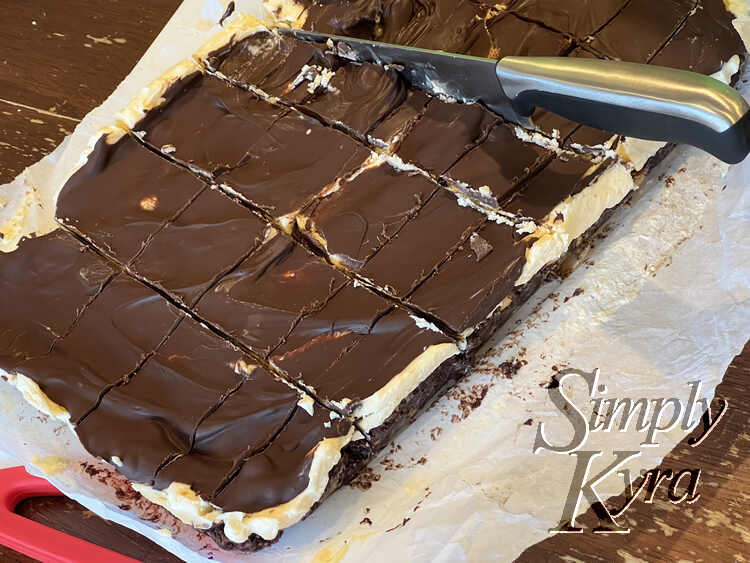
These were incredible; although extremely rich. As we made so much we shared some, kept other in the fridge, and froze still more. I later decided to try one of these when they were still frozen and they still tasted amazing! So either way mmmm.
Okay I guess I made one more adjustment this time around. My husband really loves the center layer and I was trying to use up more of the custard powder so I decided to make a larger amount of the middle layer as I had enough ingredients to do so. That said I didn’t have enough other ingredients to increase the bottom layer so I decided to put the excess custard layer in a new casserole dish, put it in the fridge to harden, cut it up, and threw it in a Stasher bag stored in the freezer for later. At the time I wondered if I should melt chocolate so each custard square could be dipped into it and come out like a mini chocolate bar. That said I haven’t tried that… yet.
While writing this I realized we hadn’t tried the frozen custard yet so while the kids were in school Matt and I each tried a square fresh from the freezer. While it was hard to eat, as it was rock hard from being frozen, I still thought it tasted good but not great while Matt absolutely loved it. Either way as a full Nanaimo bar or with just the middle layer on it’s own it’s rich and tastes yummy.
Chocolate Haystacks
These are my absolute favorite cookie from my childhood. We actually made them in our school’s home economics class in middle school as they’re extremely simple as they only need a stove and not an oven. I always returned to that school recipe once I moved out and made them frequently while always doubling or even quadrupling them as the recipe was a bit too small for my taste. I did soon learn that I’d rather make two doubled batches rather than a single quadrupled one as sometimes the increased batch wouldn’t harden properly. Over time I lost the recipe and stopped thinking about them BUT I then spotted them on the Nanaimo bar website and realized I needed to make these too. The best part of this particular recipe? The fact that she has you put them in the fridge to harden which would’ve sped up and decreased so much stress from all those past cookie making times.
I tried to look up the history of this cookie and at first could only find a variation from the United States that had no coconut and included peanut butter. This version comes under several names including Preacher Cookie (quick to whip up when you saw the preacher coming on his horse), cow patty, poodgie, and no-bake cookies. In case you’re interested, as I may be in the future, these results included Cook’n, Bite from the Past, The Revivalist, and Kitchen Divas (which also mentions caramel and optionally coconut). I then added coconut to my search and apparently this moved me from the American recipes to Canadian ones as Canadian was included in many titles in the search results but still I saw no ground-breaking historical sources although Carol Fenster Cooks mentioned her grandmother always making them and calling them Canadian Cookies. Although I specifically searched for history of chocolate haystack cookies oatmeal coconut none of them seemed to call them haystacks like I remembered and when I searched for history of chocolate haystack cookies each result was different than I remembered. This made me so happy that I had come across Just So Tasty’s Haystack Cookies as I don’t know how I would’ve searched for them if I had thought of them on my own.
Other than doubling the recipe, as I wanted a lot, I didn’t change the Haystack Cookie recipe at all. That said I did feel like I was missing something but I can’t remember what it may have been. Anyway, to make it you basically mix your oats and coconut in a bowl, then mix the sugar, cocoa powder, butter, and milk in a pot, bring it all to a boil, dump the hot ingredients into the dry ingredients, mix, and plop them onto a parchment or Silpat lined cookie sheet in vague cookie shapes to dry. They’re so easy and by putting them into the fridge I didn’t need to worry about whether they’d harden or not… although I remember them being tasty even when they didn’t keep their shape.
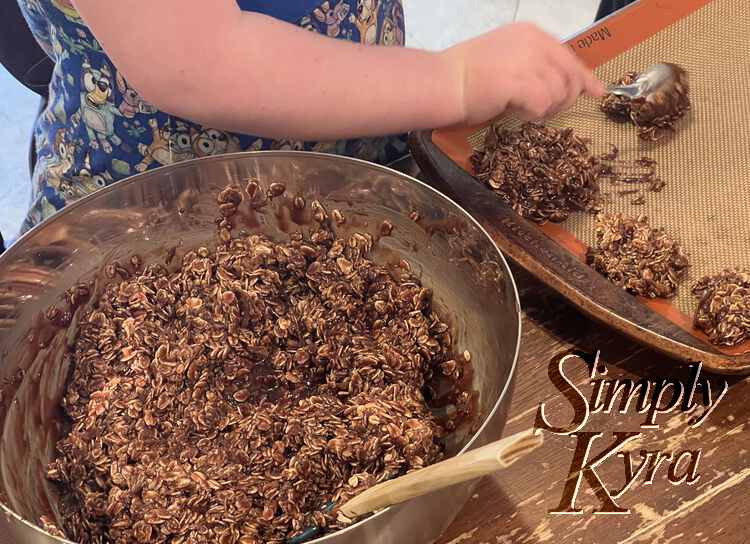
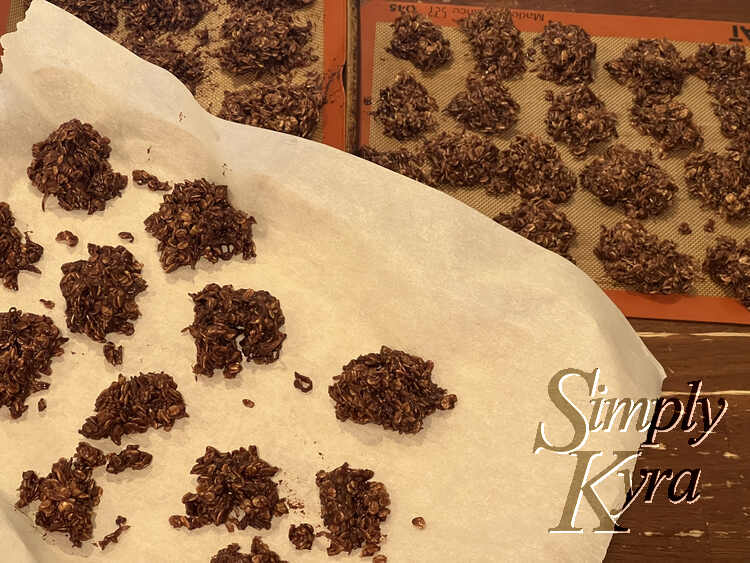
As I made so many cookies I was able to keep some in the fridge to eat right away and throw the excess in the freezer which led to me, when I really wanted one, trying a frozen cookie. It somehow tasted even better and I ate the last of them, over time, directly from the freezer.
If you’re looking to change this cookie the most popular recipes seem to have peanut butter instead of coconut. I haven’t tried that as I love my coconut a bit too much to give it up. I also vaguely remember something called spider cookies that had similar steps with some dried noodle added for crunch. I tried to hunt it down for you and kept finding recipes that also called for butterscotch chips which I don’t remember at all. That said, if you’re interested I found a haystack cookie recipe from Gonna Want Seconds that uses chow mein noodles, chocolate chips, and butterscotch chips.
Honeycomb
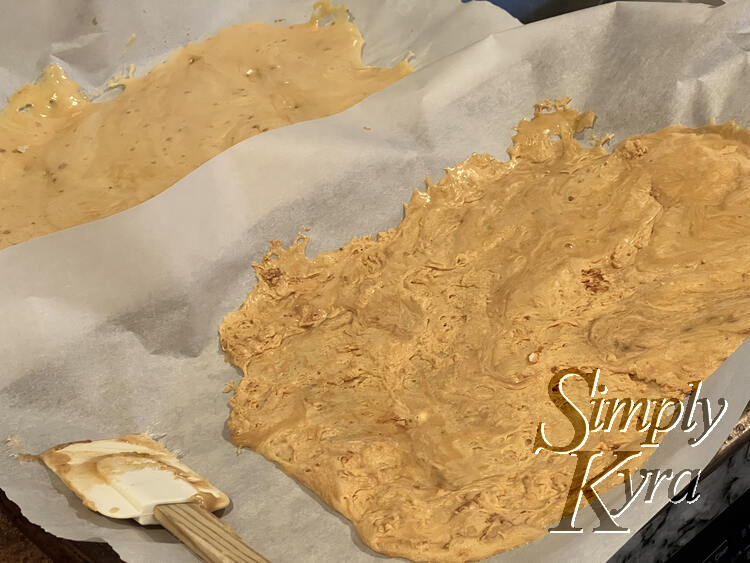
There’s a chocolate bar, named Crunchie (Wikipedia link), that I haven’t found since moving to the United States. It’s basically a chocolate coated rectangular piece of sponge toffee with small bubbles inside and tastes incredible. Although I’ve been missing many of the Canadian chocolate bars since moving this one seemed easily re-creatable when I saw Bigger Bolder Baking’s honeycomb video on Instagram. I immediately started picturing recreating this Crunchie bar for ourselves by break the finished honeycomb candy into smaller pieces and dipping each one into liquid chocolate before putting it aside to harden. In the end I simplified this process by breaking the cooled pieces, spreading it out, pouring liquid chocolate overtop, putting it into the fridge so it could harden, breaking it up again, and packaging it up for the fridge and freezer.
When I was first started writing this post I had difficulty as I kept calling this treat sponge toffee rather than honeycomb like the Bigger Bolder Baking site did. While looking into the history of this candy I discovered that the only difference between the sponge toffee I know from the chocolate bar and the more common honeycomb candy, believed to be invented in the 1940s, is a secret ingredient “that reacts with the baking soda and sugar to create the iconic sponge-like texture that is both hard and crunchy, yet soft and sweet when allowed to melt in one’s mouth”. (according to Stefanelli’s Candies) Looking farther I saw that the Guardian gave an in depth background on sugar alongside their recipe with no pictures but much detail. In contrast The Nibble Blog shared many names honeycomb candy is also known by along with a recipe for chocolate sponge candy that I’d be interested in trying.
Anyway, I decided to try making honeycomb candy and after reading over Bigger Bolder Baking’s Homemade Honeycomb Candy recipe several times I jumped in. The first time around I used honey and ended up boiling my mixture too long so some of the candy tasted horribly burnt.
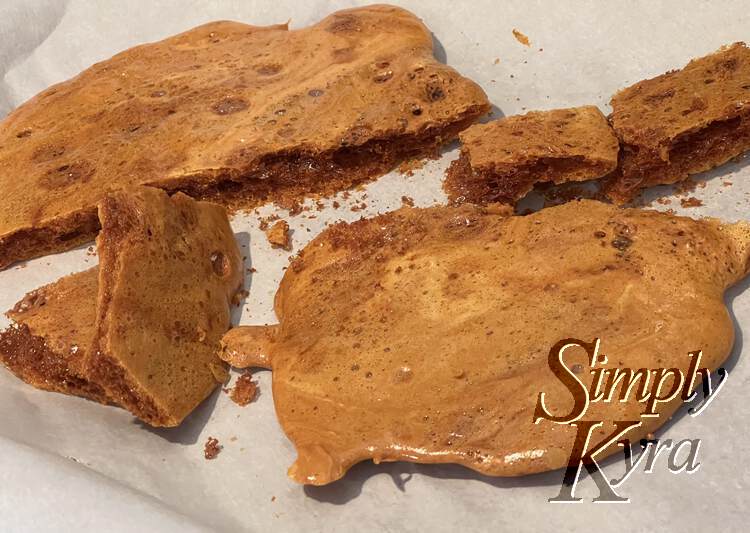
As a quick aside my favorite part of this was the fact that it was so easy to clean. It didn’t appear that way as the honeycomb candy remnants hardened like rock but if you pour enough hot water on it, and rub it a bit, it will all dissolve as it’s essentially just sugar.
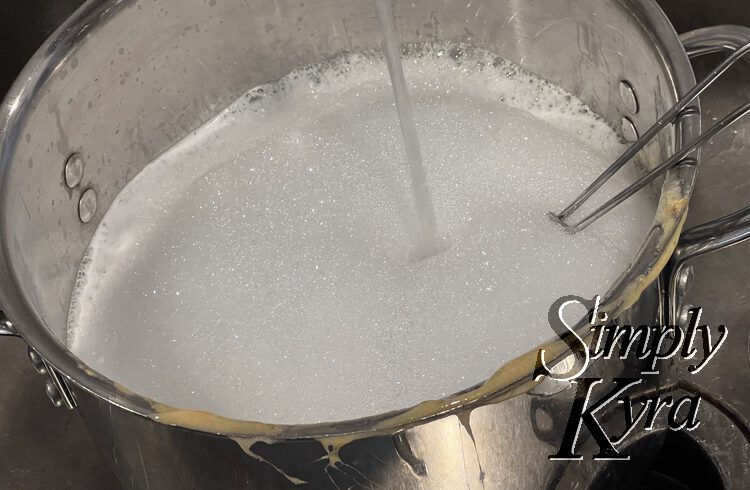
As I was doing a grocery order anyway I added two types of corn syrup to my cart and tried to make the recipe twice more so I could use the light and the dark syrups separately. The honeycomb candy turned out both times so I ended up with a doubled batch which I broke up and mixed so I could easily coat it in chocolate.
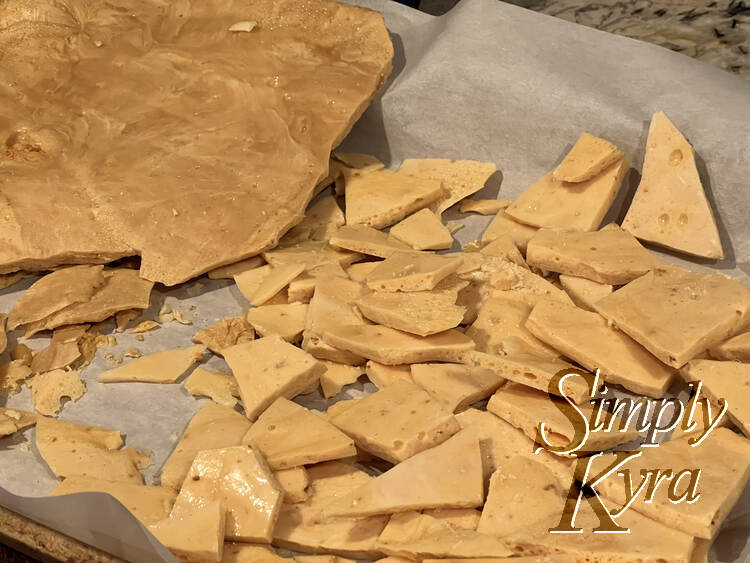
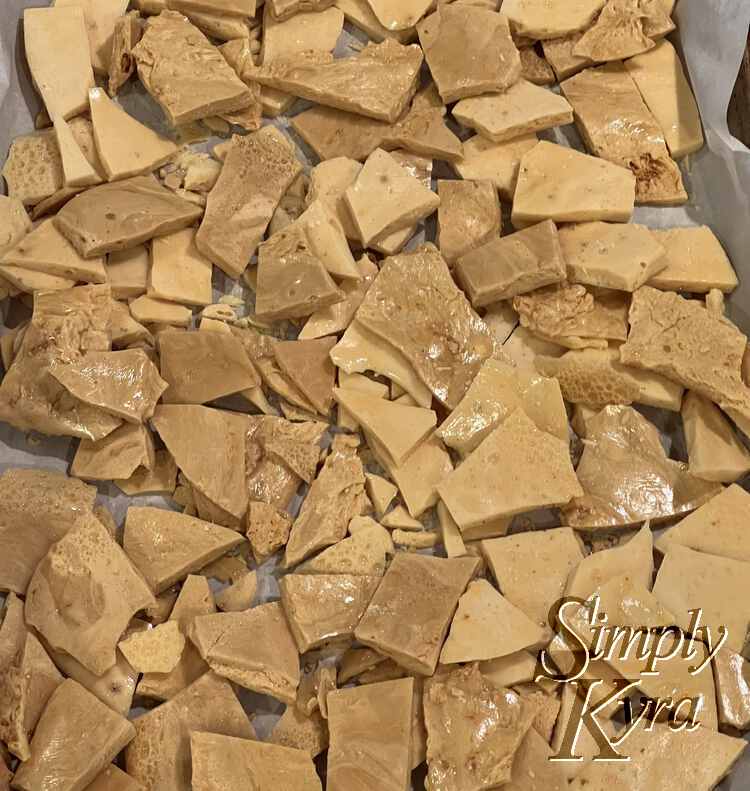
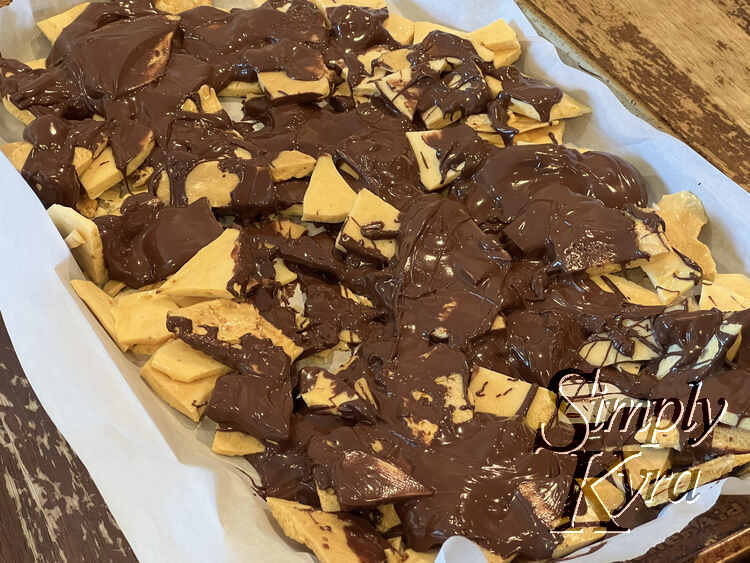
I planned to wait until I made the top layer of the Nanaimo bars so I could make a larger batch and use the excess to coat the honeycomb. This step, although put off, was quick and simple as I only needed to pour it overtop and toss in the fridge. That said I found some sections had too much chocolate and others had too little so I could see taking longer on this step and coating the honeycomb equally. Or even maybe leaving the honeycomb whole, spreading the chocolate overtop, and then breaking it up. In this case the chocolate was just semi-sweet chocolate chips melted down with a bit of oil in a makeshift double broiler (glass bowl on top of a small pot of water).

Butter Tarts
When researching the difference between the Canadian and American Thanksgiving I came across butter tart which I had somehow forgotten over the years other than the occasional potluck I mostly had these when my nanny (grandma) brought them over at Christmastime. That said, although I like to eat butter tarts I don’t absolutely love them and debated whether or not I should add them to my Thanksgiving baking as my dessert list was getting rather long. While debating this I happened to mention them to my husband and thus immediately added them for him. I’m so glad I did as Matt and Ada really loved the butter tarts, or baby pies, and this was the one dessert I didn’t need to freeze.
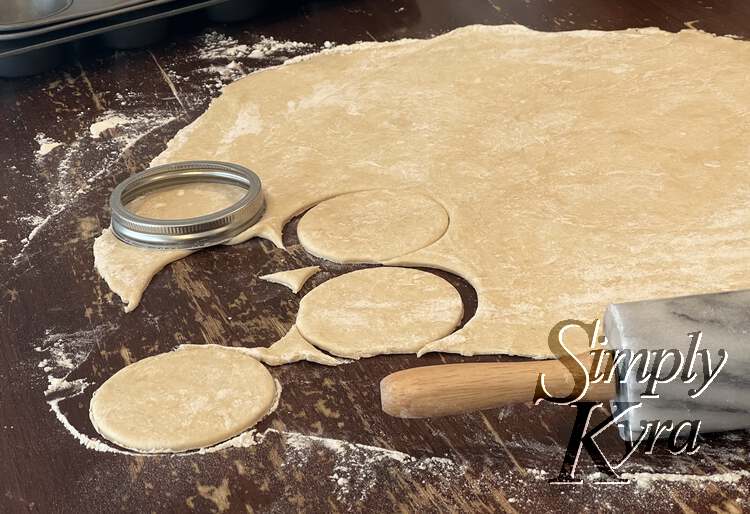
To make these I looked up recipes online and decided to go with the Butter Tarts from Little Sweet Baker. I’m so glad I did as the recipe was simple to follow and tasted just how I remembered them. The recipe has you make the pastry dough for two dozen tarts and then recommends you freeze half as the included filling recipe only fills a dozen tarts. I instead made the tarts from the entire pastry dough, ending up with just over two dozen, and then doubled the filling. I did make a slight alteration which probably led to the extra three tarts. I couldn’t find a circle cookie cutter that was four inches in diameter so I instead used the wide mouth canning jar lid that was only 3 and a half inches wide.
Anyway when you make these tarts you add the optional extras to the empty tarts crusts and then pour the boiling filling overtop before baking. The recipe recommends using “chopped pecans, walnuts, raisins or chocolate chips” for this but as Matt and I remembered only raisins we went with that. Actually, when buying raisins there were two different types so Ada and I used a combination of both hued raisins.
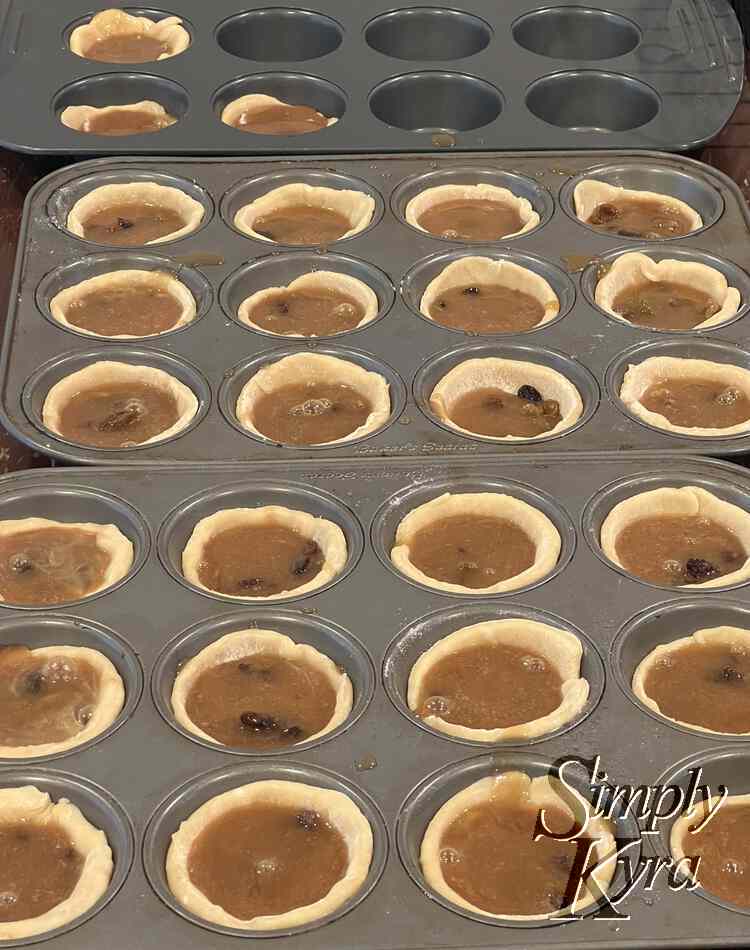
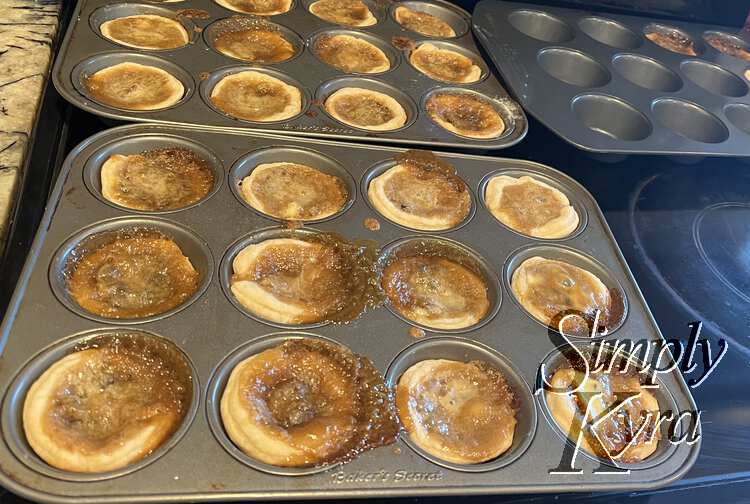
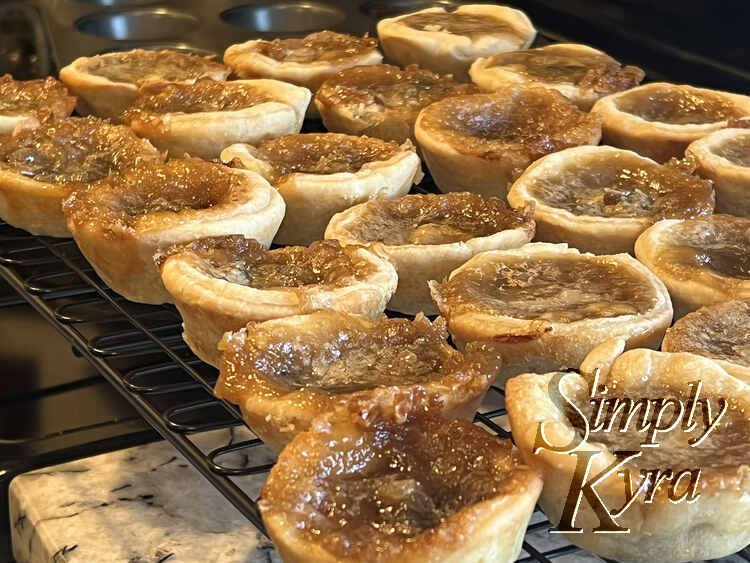
These were loved and although I had over two dozen I placed the excess in a Stasher bag in the fridge so they were ready for anyone to munch on. Just a heads up I had the odd filling get stuck to the tart above so next time I plan to place a parchment scrap between the layers to better separate them.
My Process That Day
In case you’re also choosing to make the desserts back to back in one day I figured I’d share my order of operations. Granted, just to warn you, some items were pushed back as I was waiting for a grocery order for corn syrup (honeycomb), coconut (chocolate haystacks), and raisins (butter tarts) which pushed off the chocolate topping for the Nanaimo bars as I wanted to use a larger batch to coat the honeycomb. Looking back, if I had all the ingredients ready, I’d still use this order but I wouldn’t necessarily take as long of a break in the middle. Either way it worked out.
I had originally planned to start my baking after lunch so I could focus on coding in the morning. Then I had extra time before the kids woke up and figured I may as well make the crust for the butter tarts as it needed to chill in the fridge before being rolled out. Then, after the kids had eaten, I found I couldn’t concentrate so I decided to start right away. I’m glad I did as I wasn’t finished until 4 p.m. although I did have to wait for more groceries in the middle. Once I decided to get started Ada and I worked on the bottom layer of the Nanaimo bars and let the 9 by 13 inch casserole dish cool in the freezer. We then made the center layer of the Nanaimo bars and tossed the pan into the fridge to cool along with the extra pan of just the center that we later cut and froze. I knew I needed to make the honeycomb candy before the top layer of the Nanaimo bars so I then attempted to make it with honey and burnt it. I quickly added corn syrup to my grocery delivery and thus put off the top layer of the Nanaimo bars for hours as I needed to make edible honeycomb first. I then found myself stuck waiting for the groceries to arrive so I rolled out the tart dough, made the circles, and pushed each one into a cupcake liner before putting it back in the fridge as we then paused to have lunch and wash dishes. Once the groceries arrived Ada and I started out by making the chocolate haystacks as I really wanted them plus I could have her plate the cookies while I went on to make, alone, the two batches of honeycomb using both types of corn syrup. We then let the cookies harden and honeycomb cool while we went on to make the butter tart filling and poured it equally into the pre-made Ada-filled tarts from earlier. We then put them into the pre-heated oven to bake the only recipe that needed the oven that day. While they were baking I broke up the honeycomb into pieces, confirmed the two types tasted the same, and then Ada and I made a large batch of melted chocolate to finish the Nanaimo bars and pour over the honeycomb. We then took the tarts out to cool, scored the Nanaimo bars, cracked the chocolate coated honeycomb, dished all desserts, and I washed the dishes again.
It was a busy day but we ended up with a large container of desserts to share with our friends who we had over the next day, froze half of most, shared with some other friends, and enjoyed the remainders. The butter tarts were the only dessert we didn’t freeze but over the next month we discovered, once we ran out of the desserts in the fridge, that the chocolate coated honeycomb, chocolate haystacks, and Nanaimo bars all tasted just as good, or better, frozen rather than refrigerated.
And with that our Canadian Thanksgiving baking was complete. We all enjoyed the desserts that Ada and I made. Previous years we hadn’t celebrated the Canadian Thanksgiving for many small reasons including the fact that we weren’t on holiday and it seems hard to get a turkey more than a month before the American Thanksgiving. I don’t know if it was coming across a few recipes this year, my custard powder’s best before date, that the kids got it off, that Matt randomly took it off, or just the Covid situation in general but I’m so glad we chose to make the desserts as I could see this becoming a yearly tradition whether we make one recipe or more each time. If you make these I’d love to hear how it goes in the comments below along with whether these were an old favorite or if it was your first time trying. I hope you’re doing well and having a great week.
If you’re interested in getting any of my future blog updates I currently come out with a new one every Wednesday and share them to my Facebook page and Instagram account. You’re also more than welcome to join my email list located right under the search bar or underneath this post.