
How to Debug and Solve an App Sandbox Related Issue Within the Xcode IDE

Recently I started playing around with coding an Apple MacOS application using the Swift programming language and the Xcode IDE (integrated development environment). While attempting to gain SSH access to my reMarkable2 I slowly came to the realization that my application was incapable of using the network because of Apple’s App Sandbox. It took a bit of time to debug, discover, and hunt down a solution so I wanted to share what I did in the hopes of helping others that may come across something similar.

At this time I am running Xcode version 12.5 (12E262)
While trying to figure out why my SSH connection wasn’t working my husband, Matt, had the bright idea to have me create a new project, within Xcode, using the command line option so it would be more streamlined. This way I could copy over just the SSH related code from my current project so I could easily run it without needing to wait for other parts of my code or be required to manually click a button or something before the SSH section of my code executes. Ideally, quicker turnaround would make for simpler debugging. After copying over the relevant code sections I built the stripped down code and was surprised to see that the SSH connection successfully connected on the first attempt. That was rather surprising as I hadn’t changed anything in those code snippets so I wasn’t sure what exactly was different between the two cases. Thankfully, after a bit more searching online, we discovered that Apple sandboxes the macOS applications by default and I was able to open up just enough access to create an outgoing SSH connection in my main project.
Just what is sandboxing?
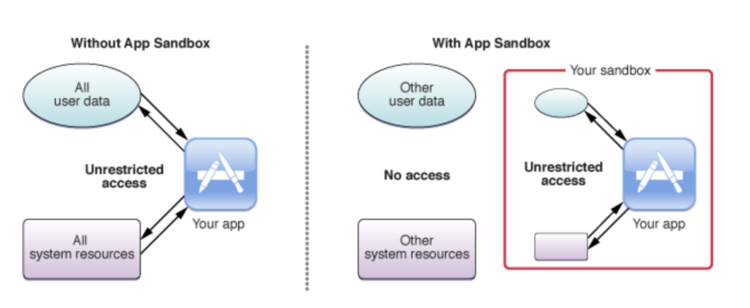
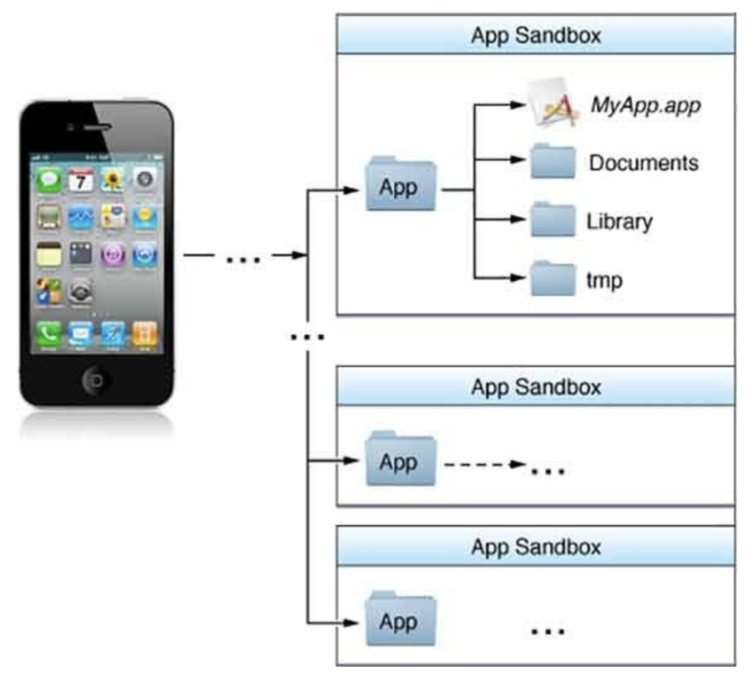
Essentially, Apple confines the applications, Apps, that run on its system within their own App Sandbox. Through their documentation archive, which seems to be targeted toward Mac computers, I found a really good description of what their App Sandbox is:
App Sandbox is an access control technology provided in macOS, enforced at the kernel level. It is designed to contain damage to the system and the user’s data if an app becomes compromised. Apps distributed through the Mac App Store must adopt App Sandbox. Apps signed and distributed outside of the Mac App Store with Developer ID can (and in most cases should) use App Sandbox as well.
Complex systems will always have vulnerabilities, and software complexity only increases over time. No matter how carefully you adopt secure coding practices and guard against bugs, attackers only need to get through your defenses once to succeed. While App Sandbox doesn’t prevent attacks against your app, it does minimize the harm a successful one can cause.Documentation Archive: App Sandbox Design Guide: About App Sandbox (first two paragraphs)
Having your application contained within the sandbox means that you only have access to the data and system resources that you have permission to use. It limits what you, or someone using your application, can access without the device’s owner’s expressed permission. It also enables and requires you, the coder, to describe specifically how you want your application to interact with the sandbox system so your application can get the access it needs to do the job without having having too much unneeded and potentially compromised interaction.
Now that we know what sandboxing is how can you discover whether your code is affected by it?
Steps I took to discover and confirm this.
There are two ways, that I currently know of, that can be used to confirm that sandboxing is the only thing stopping your code from working properly.
Creating a “Command Line Tool” project.
This is the slightly more complicated way but I figured I’d share it first as this is how I discovered the issue. I had created a new Xcode project, under macOS, labelled Command Line Tool. I created it so I could quickly fire off the SSH related code without having a GUI pop up and require me to press a button or something before that code section could be executed. No extra stuff in the way and quicker feedback meant, I thought, that I could more quickly debug the malfunctioning code section. Surprisingly, my code worked right off the bat because the Command Line Tool project isn’t contained within a sandbox like the other applications.

SSH related code snippets over so I could test it more quickly.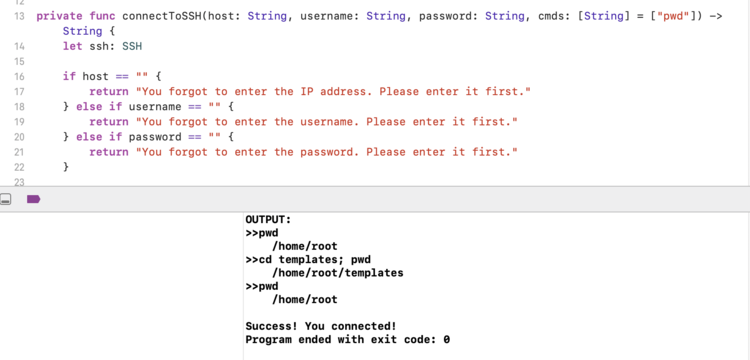
If you aren’t sure whether sandboxing is an issue or not then you may benefit from this way as it also streamlines the process to get to your problematic code section and, as the rest of the code wasn’t moved over, may remove any affecting code that wasn’t taken into account. That said if you’d rather quickly confirm that your application’s sandbox isn’t getting in the way you could do the following simpler method instead.
Did you turn it off… and then back on again?
Apple doesn’t recommend turning off the App Sandbox and requires it to be on if you want your app to be included in its App Store. That said if you just want to confirm if the App Sandbox is indeed blocking your code from executing properly you could simply turn the entire thing off. To do this you go into your project’s entitlements file and, under Entitlements File, turn off the App Sandbox by changing the YES value to a NO.
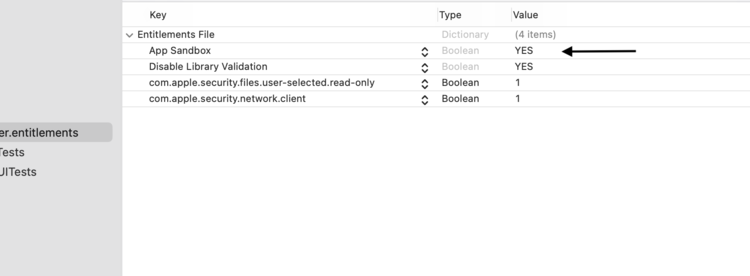
YES) or off (NO) by changing the one App Sandbox value.Of course, once you prove whether your code works with the App Sandbox turned off your next goal is to determine just what part of the sandbox is blocking your code. That way you can turn the entire App Sandbox back on and then determine which entitlement needs to be added to allow your code to execute properly.
How I solved it.
I found my solution through Apple’s Documentation Archive under App Sandbox Design Guide in their App Sandbox Quick Start page. Before that main point they go over how you can create an Xcode project using a web view, and thus containing a network connection, that won’t work unless you specifically allow it. Once you build and run the application the second section goes over confirming that the app is indeed sandboxed. The third section, under Resolve an App Sandbox Violation, is what specifically helped me to solve my issue. Most of their help in that section can be essentially boiled down to:
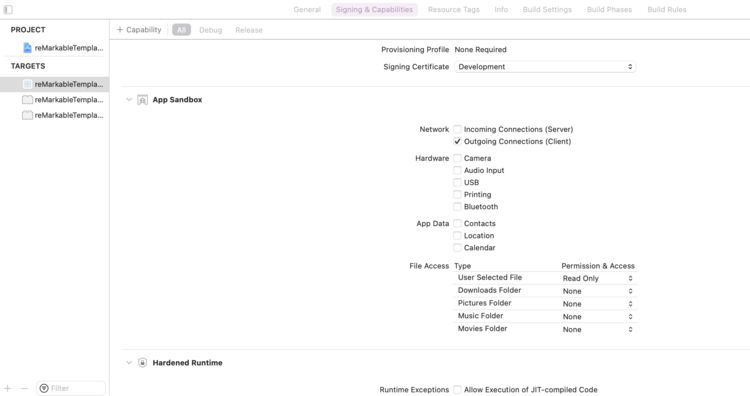
In the Capabilities tab of the target editor, within the App Sandbox section, select the entitlement that corresponds to Outgoing Connections (Client). Doing so applies aTRUEvalue for the needed entitlement to the Xcode project by modifying the.entitlementsproperty list file.App Sandbox Quick Start: Resolve an App Sandbox Violation
I then hunted down which target in my project showed the proper values so I could simply turn on my project’s outgoing network connection. With one simple value checked off my SSH code properly connects.
While writing this post, I found the Xcode Overview which goes over Working with Targets and figured I’d share here in case you want more information on how to get to this section.
And with that my application was easily able to make outgoing connections to my reMarkable2 device through the glory of SSH connections.
I hope this helps you out whether you’re having difficulty forming an SSH connection like I did or you’re having difficulties with something else the App Sandbox may be blocking you on. I’d love to hear from you, in the comments below, if this did in fact help you out and whether you had the same issue as me or something else.
With that I bid you goodbye and hope you’re having a good day.
If you’re interested in getting any of my future blog updates I currently come out with a new one every Wednesday and share them to my Facebook page and Instagram account. You’re also more than welcome to join my email list located right under the search bar or underneath this post.
Did this save you time?