
Quickly and Easily Upload Template Images to Your reMarkable

Last week I posted how I came up with a bash script that easily uploads multiple PNG images at once to my reMarkable2 while also creating the needed JSON code snippet to paste into my device’s templates.json file. I knew going over the entire script while also explaining my directory (folder) layout would make my post much too long so I split it up. Thus last week’s post went over the JSON-related information which included the directory layout, issues I came up with, and the JSON snippet creation itself. This week I’m starting by going over how I convert my PDF files to PNGs so I can easily turn them into templates and then I go over the script itself that allows me to upload multiple images at once to my reMarkable2. I uploaded that script, in it’s entirety, to GitHub if you want to see both parts together in one place.
Before using this script I recommend you get comfortable uploading a PNG to your reMarkable and editing the JSON file yourself. This way you can better understand what I did, more easily edit the script to fit your specific case(s), and troubleshoot any issues that may pop up. Before working on this script I first learned how to connect to my reMarkable2 via ssh through my terminal, changed my reMarkable2’s default sleep screen image, and then manually uploaded my custom PNG template.
I wanted to start out by showing you how I convert my PDF files, on my reMarkable2, to a single PNG image file, from each page, before going on to explain my categories. I will then show you how I run my script, edit my JSON file, and confirm that it all works. I follow that up by going over the first 53 lines of my script, line by line, so you can better understand what I did and why. At the bottom you’ll see the first part of my script so you can go through it without the earlier interruptions to explain the code. If you want to see the JSON snippet creation process you can check out my earlier post. If you’d rather see both the image upload and the JSON snippet together in one bash script I’ve uploaded it, in it’s entirety, to my GitHub repository with the script itself here.
Converting a PDF to PNG
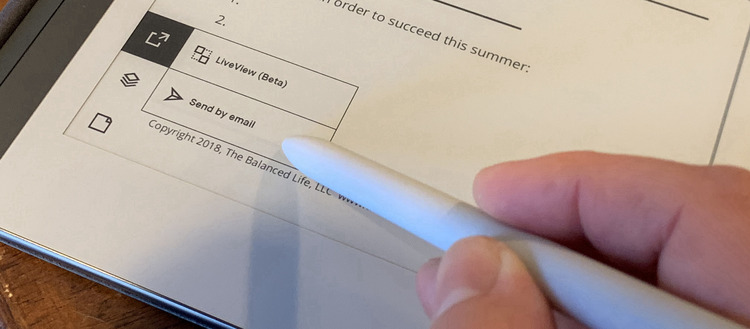
The reMarkable allows you to work with both notebooks or PDFs. The notebooks are amazing as you can use a different, or the same, template for each page in the book while also adding or removing pages as you see fit. In contrast, a PDF offers an easy way to upload and use a predefined document, but you can only write over it and not alter it in any way. As such I find myself frequently wanting to turn my PDF files into templates. This is really simple to do via the reMarkable. I open up the PDF I want to turn into template images and in the leftmost menu I select the share button near the button and then choose Send by email. I then fill in my email at the top of the page, ignore the message and filename, set the pages I want to export, and set the export format to PNG. My reMarkable2 then emails those selects pages, as PNG files, to me.
PDF file that I want to turn into a template, select share from the leftmost menu, and then Send by email.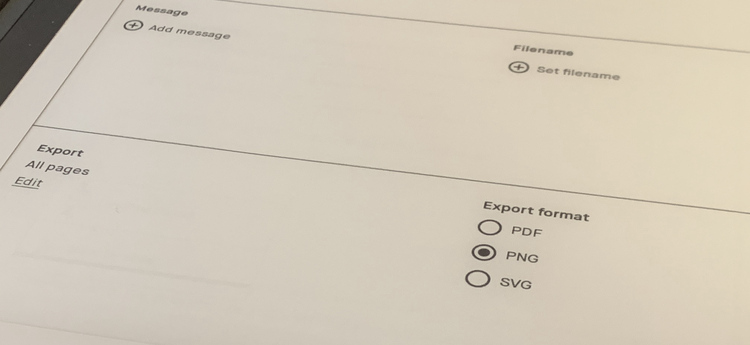
PNG and select which pages I want to export. In this case I figured it was quickest to export all of them and I could always weed it down later by deleting unneed images.Categories Explained
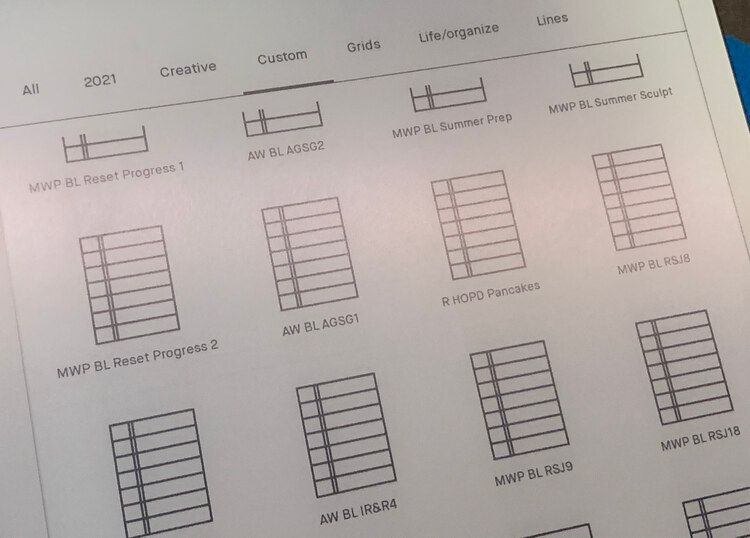
In the previous post I explained how I tried to use descriptive names for my categories just to realize that I had limited room for them and anything that didn’t fit in a single row on my reMarkable2 screen wasn’t shown. As such I decided to group most of my templates into a single category I called Custom. I made one exception when I created a minor second category, 2021, to group all of my year specific templates together. So far I’m only using the 2021 category for my monthly Pilates calendars so I can create a single workout calendar notebook. I know at the end of the year I can easily export that notebook, and any other 2021 specific ones, as a PDF so I don’t need to save the templates anymore. At that point I can remove those and delete the associated JSON code by searching for 2021 in the templates.json file. Plus since my script doesn’t overwrite anything that’s already on my reMarkable2 I can create a 2021 directory on my computer with the new month’s calendar in it and use my script to add that PNG image to the all the previous ones I’ve uploaded. Next year I’ll start a 2022 directory, delete the 2021 one, and no extra space will be taken on that category header area.
The Script
As I mentioned in the previous post, where I went over generating the JSON snippet, I chose to lay out my PNG files in a specific way to better generate the correlating JSON information for the reMarkable’s templates.json file. This layout matters the most for the JSON creation as it dictates the template and category names; however, since the reMarkable needs to be able to find these file for the templates it also matters for the upload. If the JSON doesn’t represent where the images have been stored then they won’t load properly for you and you’ll need to update the templates.json file to accurately show where they are.
Running the Script
Before running the bash script I make sure it’s placed correctly. I put it into a folder, from now on we’ll call it it’s home directory, that contains other directories (sub-directories) containing the PNG files I want to upload to my reMarkable2. I then open a terminal by right-clicking on the script and choosing New iTerm2 Tab Here. Once the terminal is opened I simply run the program as there are no arguments needed:
./Upload_PNG_and_Directories_To_reMarkable.sh
If you want to make this easier on you in the long run you can spend a little bit more time now and set the script to run from any directory by putting it in your bin directory and adding it to your PATH variable. Here is a link to a question on Unix & Linux Stack Exchange that explains how to do this.
SSH Into the reMarkable
I next quickly ssh into my reMarkable2 and navigate to the /usr/share/remarkable/templates/ directory. I then use the ls command to list what files are in the directory so I can confirm that the newly added directories, showing my new categories, are there. I can then navigate into the directories, using cd to change directory, and use ls again to see the new PNG files. If I had uploaded images in a custom category that I had already created then the directory would’ve already been on my reMarkable2 and the new images would be in the old directory as it would’ve merged instead of creating a new directory. Thus if I navigated into that directory I’d see my new images along with the old ones. For example the first time I ran the script I uploaded images in two different new categories so in my case I saw two newly created directories, 2021 and Custom, when I used ls. The next time I uploaded a single PNG image within a 2021 directory so I saw no change until I checked the inside of 2021 and saw the new image.
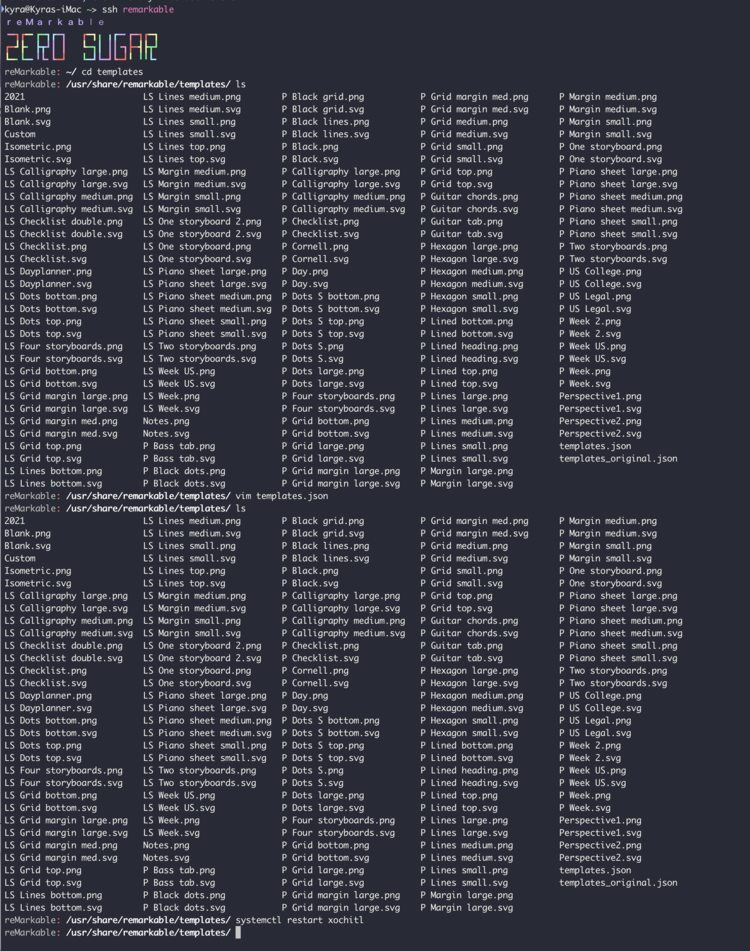
templates.json file that I edit in the next section.Add the JSON Snippet
Once the program had been successfully run, I knew that the newly created JSON snippet had been added to my clipboard in addition to the output file the script had created. I don’t need to actually look at the file as I only created it in case I need to verify it later on or if I lose my clipboard’s contents.
Once I’m sshed into my reMarkable2, as I did above to confirm the upload, I open my templates.json file using vim and paste my code near the bottom of the file. I make sure the code is pasted below the the final template section and above the final two end brackets so the brackets themselves don’t get mismatched. In vim you need to hit i, for insert, before you can edit or paste the code. I then save and exit vim by first pressing esc, to exit edit mode, and then type :wq, to save (w) and quit (q), before finally pressing enter to submit. The last step is restarting the reMarkable2 program, so it can register the changes, by typing in:
systemctl restart xochitland pressing enter. With my reMarkable2 restarted I can finally check if it really and truly worked.
templates.json file I navigated to the bottom, right under the last entry, and pasted my code in. This meant the brackets didn’t get mismatched as I pasted it before the last two closing brackets.
ctrl and r before typing the little bit you do remember. This brings up matching commands you’ve previously run.Check if It worked
After restarting my reMarkable2 I verify everything worked. To do this I open one of my notebooks, optionally create or navigate to an empty page, go into the layers menu area, and then tap on template so I can see my new templates. If this worked out then the new window that opens up would now show my new categories, mixed in with the old, along the top of the page. I could then see my new templates listed somewhere under the All category or under their own category header. To confirm it’s fully working I then click on one of those new templates and, hopefully, now see it properly displayed on my notebook page.
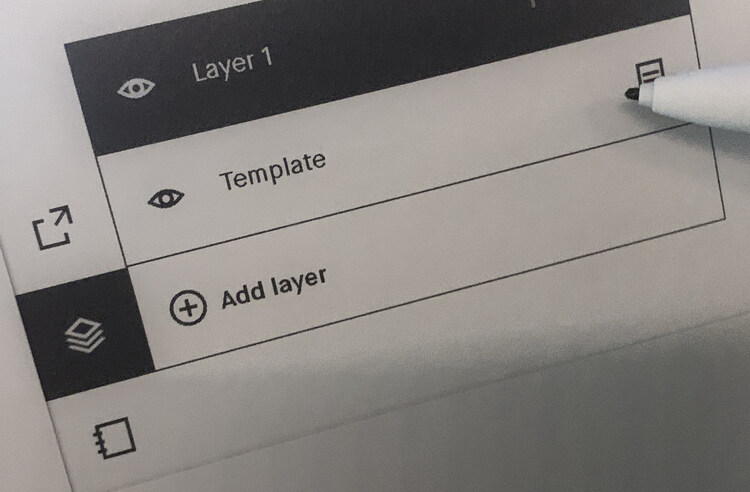
Template option so I can see all the available templates.
2021 and Custom) at the top of my reMarkable2 along with all the newly added templates within them.My Script Line By Line
And without any further ado here’s the code with each line, or section, explained:
#!/bin/bashIn Unix or Linux based operating system, scripts should start with the shebang #! characters followed by the interpreter it needs to execute the rest of the script. So in this case I used the shebang, or bang line, and followed it up with the /bin/bash as Bash, the interpreter I need to use, is installed in my /bin directory. If you want to explore this more you can check out the Shebang wiki on the Linux Shell Scripting Tutorial page or read the three minute Bash Shebang article on Linuxize.
##### Variables Used #####I only have two variables declared at the top of my script.
# How do you connect to your reMarkable? I configured SSH so I connect
# with "ssh remarkable". Another way might be with "ssh root@IPaddress".
# Here I left off the "ssh" so it's just "remarkable". In the second case
# it would be "root@IPaddress"
declare sshReMarkable="remarkable"
When connecting to my device I configured SSH with a simple hostname and use public keys so I’m not forced to remember the username, IP address, or password specific to my reMarkable2. As such I connect by typing ssh remarkable rather than ssh username@IPaddress followed by the password like the first time. If you haven’t set that up and are interested I went over it in my first reMarkable-related post here. Since everyone may connect differently, or use a different hostname, I created this variable at the top of the script so it would be easy to find. That means if you connect with ssh thisIsAMuchBetterName than you can change this sshReMarkable variable to "thisIsAMuchBetterName" instead.
# Name of the temporary tarball that's created
declare archiveName="archivedTemplates.tgz"
During the process I create a tarball, a compressed file, containing the images and directories we’re going to upload to the reMarkable device. If you want more information about this you can check out this explanation about tar, including examples, from GeeksforGeeks. This file is deleted after I’m done with it so it doesn’t matter too much what the file is called. That said, since I use the file’s name in multiple places I knew I needed to use a variable that would need to be declared somewhere, so I moved the declaration up in case you want easy access to change it’s name.
##### Error Checking #####With those two variables declared it was time to confirm things were as expected.
# Checks if there's any directories in the current directory
declare currDirectories=$(find . -maxdepth 1 -mindepth 1 -type d)
I then use the find command to find all directories (-type d) within my current directory (.) with a maximum and minimum depth of 1. This means that it finds any directory within my current directory but not including any sub-directories (also called nested directories or folder within a folder). The resulting directories are then saved in the variable currDirectories so I can access it when I need to.
# If there aren't any directories that would be a problem so it issues
# a message and exits the program
if [ -z "$currDirectories" ]; then
  echo "Any PNG files to be uploaded needs to be within a directory. This directory shows which category the image belongs to. As there are no directories within your current directory the script is exiting now."
  exit 1
fi
If there aren’t any directories found, in the previous section, then there’s an issue since any PNG that’s going to be uploaded (whether it’s only one or multiple images) needs a category assigned and, as such, needs to be in a directory so the script knows what that category is. The -z parameter used in the if statement returns true if the currDirectories value is null or has a length of zero. Thus if there are no directories the if statement will be entered, text explaining this issue will be send to the terminal for the user by using the echo command, and the script will exit with an error code of 1.
# Saves any nested directories.
declare nestedDirectories=$(find . -mindepth 2 -type d)
Here I use the find command to find all directories (-type d) within my current directory (.) that are sub-directories (nested within a directory) so I set the minDepth to 2. I chose two as I don’t want any of the needed directory, with a depth of one, to show up and I didn’t set a maximum depth, using maxDepth, like before as I’m limiting all nested directories regardless of how deep. That said you’d need at least one directory nested at level two to be able to nest at level three, and so on, so if you’re just checking whether it’s nested or not you could technically set a maxDepth of two too.
# If those nested directories exist a warning is issued and the user choose
# whether the script should continue or exit.
if [ -n "$nestedDirectories" ]; then
I then use the results of that previous find, using the nestedDirectories value, in my if statement with -n which will return true if the value is not empty (the opposite of using -z before). Thus if there are any nested directories this if statement will return true and the script will execute any commands found within. I figured I’d break up the contents of the if statement so the inner part is as follows:
echo "This script assumes that all images are within a single directory. It found the following nested directories:"
echo "$nestedDirectories"
echo "Should it proceed and you do any needed cleanup after (in the reMarkable template directory and the generated JSON snippet) or do you want to stop?"
I start out by printing what happened in my script to the user by using echo and encircling what I want outputted with quotes. I also printed out the contents of nestedDirectories so the user would know which director(y/ies) the script has an issue with. The last line here asks whether the user wants the script to continue even though they may have to clean up the files and directories uploaded to their reMarkable and the resulting JSON snippet to everything to work. In this case I recommend saying no but just in case there’s ever a reason to continue I wanted to put in the logic to continue on with a yes.
read -p 'Press y to continue. Anything else to stop the script: ' respThis is a read command that takes in information from the terminal. I include -p so it prints out the prompt, the text within the single quotes, before taking in the information from the user running this script. I made the prompt simple so when looking at the response I’ll know that y means yes continue and anything else means stop. The last word in this line, resp, is the variable that will hold the response from the user.
echo "$resp"I used echo to output that response back to the user.
if [ "$resp" != "y" ]; then
    exit 1
I then check whether the response is yes or no. In this case yes means I want the script to continue to run so I only want to enter the if statement, which exits the script, if the response, resp, is not equal to y. If it’s equal to y the if statement is not entered, the script doesn’t end, and the lines following this section will get executed.
    fi
fi
I then end the inner if statement ("$resp" != "y") and then the outer if statement (-n "$nestedDirectories").
##### Upload the PNG files to the reMarkable #####With that the housekeeping tasks associated with the variables and error checking are now done and the actual script can truly start.
# Creates, informs, and executes a command to compress the directories and
# their image files.
declare compressCommand="find . -maxdepth 1 -mindepth 1 -type d -exec tar cfz $archiveName {} +"
Here I’m using the find command again to find all of the directories (-type d) in the current directory (.) like when I created currDirectories while error checking above. The results are then used to execute, with the -exec parameter, the tar command that creates the archived file, name saved in the archivedName variable at the top, from the results of the previous find command ({}). If you want more information about tar, that creates a compressed archive, you can check out freeCodeComps’ article The Tar Command in Linux: Tar CVF and Tar XVF Explained with Example Commands. Just a quick FYI this command isn’t actually executed here. Instead the string that holds the command is created and saved to compressCommand. Two lines below here this command, using the string, will be executed using the eval command.
echo "Compressing the directories and files within using this command: $compressCommand"I then output the command in case the user needs a record of it later on as well as letting them know what is currently happening.
$compressCommandI then execute the command so the tarball is created based on my requirements.
# Uploads the created tarball to the reMarkable's templates directory.
scp $archiveName $sshReMarkable:/usr/share/remarkable/templates/
I next run the scp command that uploads the newly created tarball, named from archiveName, directly to the templates directory on the reMarkable. Since everyone connects to their reMarkable device differently I used the sshReMarkable variable, defined at the top of the script, to hold the text showing how I connect. In my case, if I were to connect right now, I’d type in ssh remarkable so my sshReMarkable string variable is set to remarkable. In this case the text would be:
scp archivedTemplates.tgz remarkable:/usr/share/remarkable/templates/
# Creating a command that will ssh into the reMarkable, navigate to the
# templates folder, extract the tarball, and remove it. In case it doesn't
# perform correctly I output the command to you before executing it.
declare executeSSHcommands="ssh $sshReMarkable \"cd /usr/share/remarkable/templates/ && tar -xf $archiveName && rm $archiveName\""
I next want to ssh into the reMarkable, change directory (cd) to the templates folder, extract the tarball I just uploaded, and remove the tarball as I don’t need it anymore once the directories and images have been extracted. I can’t do all of these commands separately as once I ssh, to gain access to the reMarkable, the reMarkable will take over my terminal and the script won’t continue until I exit. Then the next commands won’t work since I’m not connected to it anymore. As such I needed to ssh in and immediately send the rest of the commands I want executed so I send them all combined in a single command encircled with quotes. To make it one command I combined them together using the && symbol (meaning and) and rather than executing it right away I instead save it as a string, executeSSHcommands, for now as I want to output it to the user, for the user’s records, before executing it. Specifically, each command, on it’s own with the variables replaced, are:
ssh remarkable: This is how I connect to my reMarkable2. For more information check out my first reMarkable post here.cd /usr/share/remarkable/templates/: I then use thecdcommand to change my current directory to the reMarkable’stemplatesdirectory. I’ve previously created a symbolic link to the directory making it much simpler to get there but I used the full path here in case you haven’t set up your own symbolic link or named it something different. If you want to check out how to set it up I posted about it here, midway down, under Simplify the Process With a Symbolic Link.tar -xf archivedTemplates.tgz: Next I extract the tarball using the parametersxto unpack it andfto indicate that the next parameter,archivedTemplates.tgz, is the name of the archive to unpack. By default it doesn’t overwrite my directories which means if I already had a directory, for example, one calledCustomwith templates in it and the tarball also contains a directory namedCustomwith new images then the new images will be added to the already existingCustomdirectory without removing any of the old images.rm archivedTemplates.tgz: Finally, now that the archive has been extracted, I remove the uploaded tarball as we no longer need it. It was used to more quickly upload all the files and has served it’s purpose.
echo "About to execute $executeSSHcommands"
eval "$executeSSHcommands"
Once the command is created I use echo to output it to the user. Finally, I evaluate, using eval, the value of that string which runs the ssh remarkable connection and then executes the three commands that I put together. I did try to remove the eval command so the string itself is executed but I ran into an error so I brought it back. I found several examples explaining eval on Linux Hint in case you’re interested in learning more.
# Removes the tarball within the current directory as it's no longer needed.
rm $archiveName
Since I used scp, which copies, to upload the tarball to the reMarkable it still exists on my computer. I now do the final piece of housekeeping, for this section of the script, and remove, using rm, the file from my computer.
In the main script, uploaded to GitHub, this is then followed by another section that creates a corresponding JSON snippet that you can add to your reMarkable’s templates.json file so your reMarkable can recognize the newly uploaded templates. If this script doesn’t work for you my earlier post were I manually upload a PNG image and edit the JSON file to include it may help you troubleshoot any issues.
The Code
I wanted to include all of the code in one place so you can more easily copy it, at once, or view it without any of the explanations being in the way so I embedded a GitHub Gist for you. This post only went over lines 1-53 of the script below. If you want to go over the rest in detail check out part two of this post here.
Update: I’ve since come out with a video that combines several posts together including connecting via SSH, uploading the templates manually, and my bash script. You can find it here.
I hope this helps you out. Like I said before I uploaded the bash script, in it’s entirety, to GitHub which includes the above script along with the JSON related script found in my previous post. If you have any questions feel free to ask in the comments below and I’ll see if I can help. I hope your week is going well.
If you’re interested in getting any of my future blog updates I currently come out with a new one every Wednesday and share them to my Facebook page and Instagram account. You’re also more than welcome to join my email list located right under the search bar or underneath this post.