

How I Make My Own Yogurt For My Simple Breakfast

Back at the end of the year I purchased The Balanced Life’s Reset program and discovered my new go to breakfast consisting of plain whole yogurt, fruit, and a low-sugar granola. It was so simple to make and I’ve been eating it every morning since; although, I’ve been frequently changing it by buying different packaged granola and pairing it with different fruits. I especially love how I am able to portion out two or three days worth of breakfasts at a time, by combining the fruit and yogurt into individual containers, and each morning I can simply grab a container from the fridge, mix it up, and add the granola on top… in bits so it doesn’t spill over the side. With COVID-19 hitting our area back in March and bringing with it the shelter-in-place order, less frequent shopping trips, and limiting the grocery items available I came to the decision to try to make my own yogurt and, later on, decided to attempt my own granola. I still prefer store-bought granola over my own, but I feel like I’ve gotten pretty good at making my own yogurt now and I wanted to share it with you in case it would also interest you. Yogurt is so simple to make… and this is coming from someone that has tried and failed, multiple times, to get a sourdough starter going.

With the shelter-in-place order enacted I found I started running out of yogurt for my breakfast before we could come close to running out of milk; which was my normal indicator for when we really needed to go grocery shopping. Then when I did go out to the stores I, sometimes, wasn’t able to get my plain whole yogurt and either had to use a more sugar-y option or find a different breakfast until I could try again on the next trip. I wanted to be sure I had enough yogurt for breakfast and maybe even go grocery shopping less frequently so I decided, for fun, to look into making my own yogurt. It turned out to be not that hard and I’m now using about a gallon of milk every one or two weeks to make it myself. The downside… I’ve been running out of milk way more often now so I still end up grocery shopping way more frequently than I did back in March and April.
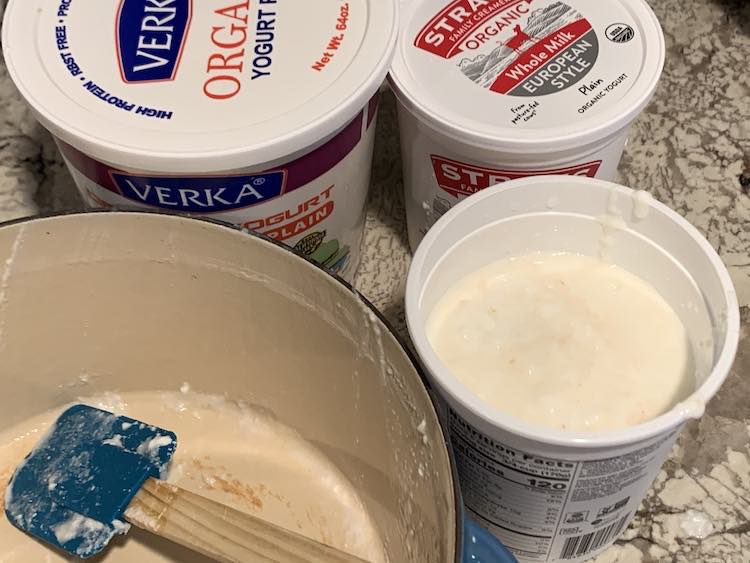
To make my own yogurt I kept referring back to a single post by The Kitchn titled How To Make Yogurt at Home. They made it seem so simple and since I already had a Dutch oven and an instant read thermometer I was all ready to go without having to buy any supplies… so I couldn’t put it off any longer. My first batch of yogurt was created from eight cups of whole milk (two quarts) and a half cup of store-bought yogurt containing active cultures. Over time I switched out my yogurt starter to homemade yogurt, flavored Greek yogurt, and, finally, I found powdered cultures from Cultures For Health. To store the finished yogurt I started out by simply cleaning my older yogurt containers, from the store, and using those. I had saved them mainly to create frozen toy filled ice for the girls to melt outside so it was simple enough to steal them back. After awhile I noticed the plastic lids cracking from constant use so I replaced the containers with 32 ounce glass canning jars. Below I’ll go over specifically how I make my yogurt and then follow that with two other yogurt resources I’ve found.
How I Make My Yogurt
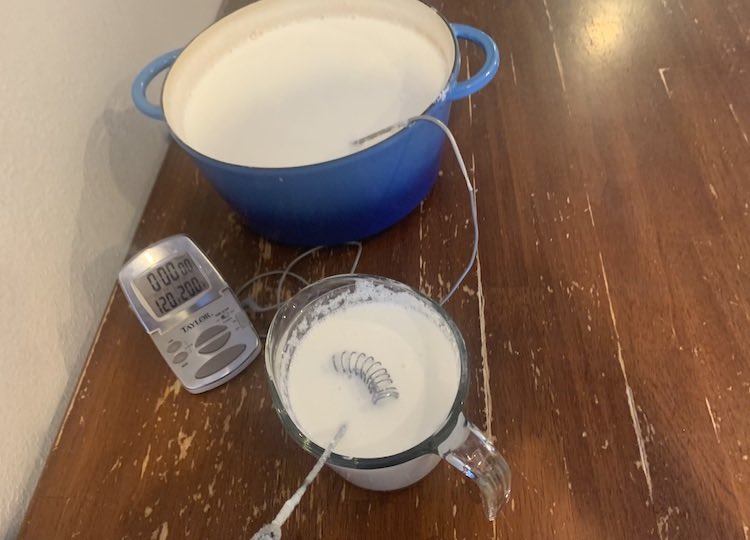
To make your own yogurt you need to start by changing up the protein structure of the milk which sounds difficult but it’s essentially just heating up the milk until right below boiling. To attempt not to scorch the milk I’ve taken to heating it on medium and using my whisk to stir it every so often. To make sure the milk doesn’t get too hot I use my instant read thermometer and set a temperature alert to 200°F so the milk doesn’t have the opportunity to boil before I take it off the heat.

Once the milk hits 200°F I move the Dutch oven off of the stove top so the milk can start cooling down. I normally place it on a potholder on the kitchen table and turn on the ceiling fan in the hopes that there’s a cool cross-breeze from the window that can speed up the cooling process. I’ve also read you can put the hot milk in a sink full of ice water but since I’m normally starting my yogurt during suppertime the sink is normally occupied with me washing dishes at this point. You will want to cool the milk until it’s warm to the touch so I continue to use my thermometer and occasionally stir the yogurt to break up any skin that may be forming on the top. In this case I can’t use the temperature alert as it would just go off immediately as the milk is now cooling. The Kitchn article says to cool the milk so it’s between 112°F to 115°F but I’ve heard elsewhere between 115°F and 120°F and, as I’m not patient, I go onto the next step as soon as it hits 120°F.

At this point the milk is cool enough to not kill the yogurt culture yet still warm enough to help the culture thrive in the milk. You can use a variety of different yogurt cultures at this point but whichever one you choose don’t just dump it into the Dutch oven; instead, remove one to two cups of the warm milk and stir the culture into this.
Before we go on I wanted to go over yogurt cultures. When I first started I used a half to a full cup of store-bought yogurt that contained active cultures. You need to make sure the yogurt says active cultures otherwise there’s nothing in it that’s going to be able to turn your milk into yogurt. As I became successful I stopped buying yogurt and so I started using the last of my homemade yogurt as the starter instead. I was concerned, while doing this, that the yogurt wouldn’t set as the Kitchn mentioned that “[i]f after a few batches, you notice some odd flavors in your yogurt or that it’s not culturing quite as quickly, that means that either some outside bacteria has taken up residence in your yogurt or that this strain is becoming weak. As long as this batch still tastes good to you, it will be safe to eat, but go back to using some store-bought commercial yogurt in your next batch.” I was also worried I might run out of homemade yogurt before making a fresh batch and be left without a starter. Once, when I was worried about the culture level in my yogurt getting week I chose to use a store-bought cup of rhubarb-flavored Greek yogurt as my yogurt starter. It turned out okay but all the visible flavoring ended up sinking to the bottom, which made me think I had badly scalded it for a second, yet the yogurt was too diluted to taste much rhubarb. I didn’t want to buy a large container of yogurt just to make more yogurt so I started looking into other more long-term solutions and found Cultures For Health where I bought yogurt starter and didn’t have to worry anymore.

Anyway, once you remove a cup or two of the warm milk from the Dutch oven you add your culture, in this case a quarter tsp of yogurt culture per each gallon or two of milk, and mix it in. Once the culture is fully mixed in you can then add this milk back into the Dutch oven and stir, again, to mix it in. At this point it’s time to incubate the milk so it has enough time and warmth to turn itself into yogurt.
Typically the bacteria, in the yogurt starter or culture, are thermophilic, meaning they like heat, so you need to keep the milk warm so the bacteria can turn it into yogurt. To keep my milk warm I preheat the oven to 200°F and wrap the Dutch oven in a towel before turning the oven off and putting the wrapped Dutch oven into it so it can sit, warm, overnight. There are other methods you can use to keep it warm and I just looked up The Spruce Eats post called Multiple Ways to Incubate Homemade Yogurt if you’re interested in them. That said the warmer it is the faster the yogurt will set; unless it gets too hot and then the bacteria will die off.


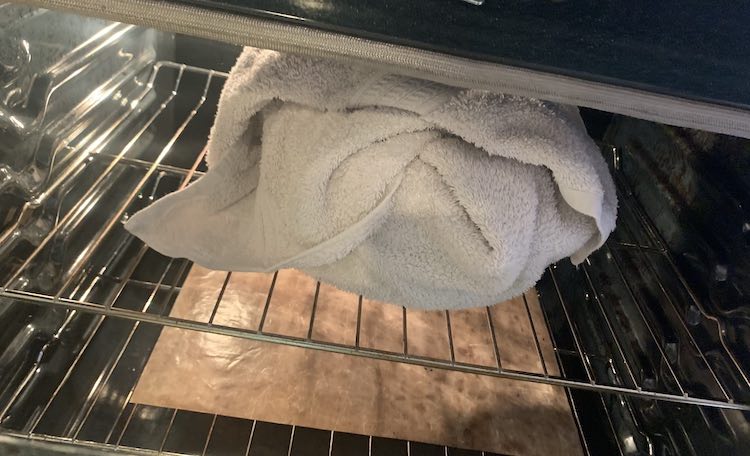
Instead of counting the hours and worrying about whether it’s too soon to check if the yogurt is set or not I make my yogurt around suppertime and check it in the morning so it’s left for about twelve hours. I pull it out of the oven, unwrap the towel, take off the lid, and voila yogurt is ready!


At this point the yogurt is still warm so I move it into containers and throw it into the fridge to make the bacteria hibernate and the yogurt firmer. And that’s all there is to making yogurt!
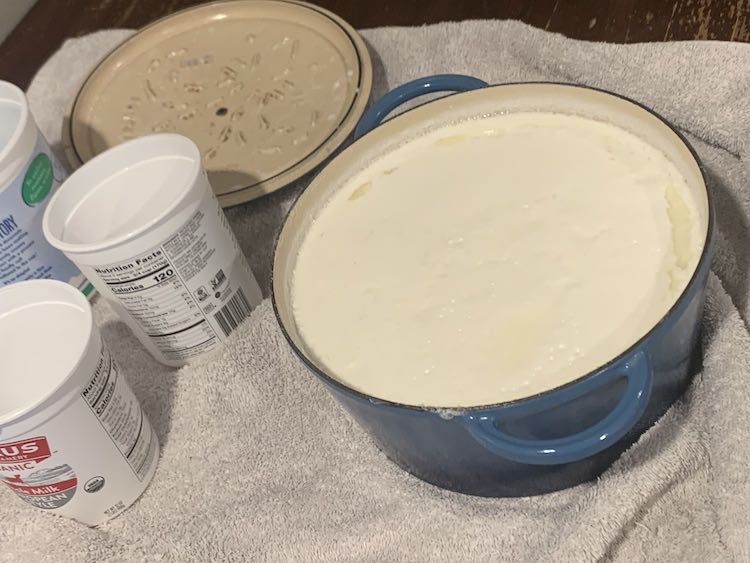

After a while the lids of the yogurt containers, that I kept reusing, started splitting along the rim. I finally went out and bought a dozen 32 ounce canning jars so now when I use a gallon of milk to make my yogurt I end up with four full canning jars full of yogurt at the end. I love how simple it is to make my yogurt and how handy it is to have the yogurt sitting around.
That said I wanted to add in how I’ve heard about thickening your yogurt if you prefer it to be less runny. I haven’t tried this yet but I have read that to do so you can either add something to it, like dry milk powder or gelatin, or you can strain the whey out of it. To strain it both the Homemade Yogurt and Kefir book by Gianaclis Caldwell and The Kitchn mention using a cheese cloth. For fun I looked online and found, through The Easy Way To Strain Yogurt Without Cheesecloth on Salad In A Jar, that you could also use coffee filters, a fine-mesh strainer, or a Kleynhuis yogurt pouch. I can see purchasing one of those solutions if I ever want to take my yogurt a step further by thickening it up.


Other Resources I Came Across
Matt, my husband, found Robert Mosolgo’s post How I Make Yogurt trending on Hacker News several months ago and shared it with me. I love how in depth he goes into making yogurt and I can see incorporating some of his steps into my process over the next couple years; although, I love my simple process right now. He mentions using a makeshift double boiler to heat his milk so it doesn’t burn (a problem I still have as I scald the bottom of my pot), speeds up the milk’s cooling by placing it in a sink of ice water (I normally do the supper dishes as mine cools), bottles the yogurt right after adding the culture (simpler process at the end than mine), and finally uses a cooler to keep it close to temperature while it sets. Since the Kitchn post had mentioned letting the yogurt set for four hours or overnight I felt much better leaving my yogurt for longer after reading that Robert leaves his for eight to sixteen hours and that was after he used to leave it for around twenty-four hours.
Before looking up the Kitchn article I was able to read over Gianaclis Caldwell’s book Homemade Yogurt & Kefir. This book goes over both diary and plant-based yogurts along with cultured butter, creams, cheeses, soups, drinks, and desserts. Before starting my yogurt-making journey, I must admit, this book kind of scared me but it still got me really excited about yogurt and I loved the idea of adding simple flavorings, as needed, to my homemade yogurt. Seeing this book on NetGalley, requesting it, and being accepted for an advanced copy made me truly excited to make my own yogurt and thus made me look around and find different ways to make yogurt online and led me to the simplistic Kitchn post. Now, after having made yogurt for the last couple months, the book doesn’t seem that scary and I can see expanding my yogurt to add different flavorings and try many of the mouthwatering recipes contained within these pages.

Have you tried to make you own yogurt? If so how did it go? Are you considering making your own yogurt now? I hope this post helped and I’d love to hear from you in the comments below. I hope your day is going great.
If you’re interested in getting any of my future blog updates I currently come out with a new one every Wednesday and share them to my Facebook page and Instagram account. You’re also more than welcome to join my email list located right under the search bar or underneath this post.
Did this save you time?