
Ornament Storage

With Christmas now over we’re starting to think about when we’re going to put all of our Christmas decorations away. We’re probably going to wait a week or two at least but mainly we’re wondering they still fit in our current boxes and if we should change it up. I wanted to post how we’ve put away our ornaments over the last several years in case you’re looking for a new way to protect your small decorations.

Pinterest Plastic Cup Storage
The first solution I wanted to post about didn’t work as well as I wanted it to. I still decided to share in case it’s your perfect solution.
Before Ada was born most of our Christmas tree ornaments were packaged Christmas tree balls that we stored in the packages they came in and then those containers were put into a bin to store the rest of the year. Any other unique (not-fitting) ornaments we had were wrapped and put into a container together and then also put in the bin. I didn’t like how much room it took to store the ornaments since each store-bought set of them were shaped differently so there was unused space in the bin and it was Tetris-like to get it all in. It wasn’t truly an issue though as we didn’t use a lot of Christmas stuff and had enough space not to worry about it’s storage footprint.
When Ada’s first Christmas came around and we started collecting all those extra ornaments I wanted a better way to store them. After looking around online and in stores I decided to buy two large bins from Walmart and create our own storage solution. I can’t remember exactly what website I used after Christmas 2014 but here are some similar ideas I just looked up if you want a more in depth look at it’s construction: Life Hacker, Living Well Mom, One Good Thing, and Martha Stewart.
After buying the bins I started taking apart a large box from, I think, Ada’s high chair and attempted to cut it with scissors and an X-Acto knife to fit the bin’s shape. I also bought a pack of clear plastic cups and after getting the cardboard to fit I next hot glued the cups to the cardboard. The cups had a dual purpose of both holding up the next layer of cardboard, if needed, and offer a secure place to put our ornaments. This box creation took place over a full Ada nap time… and then continued after getting her since I had everything spread all over the living room. Cutting the cardboard took longer as expected as I had to keep trimming it down and testing the fit repetitively. The bins I bought curved out at the sides so you couldn’t just copy the previous piece of cardboard since it’s size depended on at what point it was placed in the bin. The curved sides also meant you almost didn’t need the cups for the cardboard to sit at a specific spot… although they did offer security so the cardboard wouldn’t bow in the future.
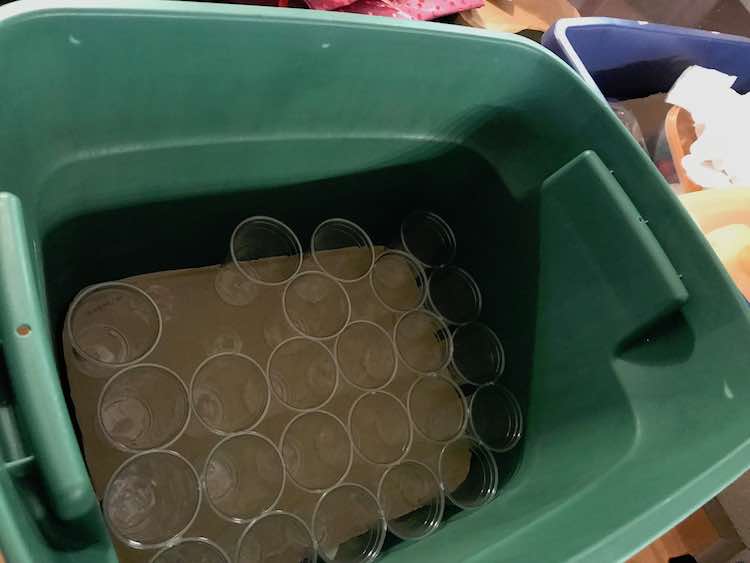
Why didn’t this work? When I finished filling the bin with the cardboard and cup layers and finally went to put the Christmas tree ornaments away I realized that most of our odd-shaped ornaments were too large or tall for the cup (too tall meant you couldn’t put the next cardboard layer overtop). This only solved the issue for the smaller ornaments although if the ornaments were small enough they might still get tossed around within the cup and would still need to be wrapped… like when they were wrapped together in my previous container solution. When I went to put the breakable spherical ornaments in my new solution instead of the container they came in I realized that the larger ones didn’t fit and the smaller ones were hard to get out of the round-based cups. I ended up keeping the spherical ornaments in their store-bought containers, used the newly created trays for the few ornaments that fit, and wrapped the larger ornaments like the year before. Any space at the top of the bin was used for the lighter and larger items while I ended up leaving the second bin empty for the Christmas lights and the rest. This only ended up a success since the bins still offered better storage than before. The cups were then downsized to one layer one or two years later so we’d have more room in the bins and then last year I got rid of them.
I still wanted to share in case this is your perfect solution. I could see it having worked better if I had bought wider cups. Maybe make each layer a different sized cup so one layer might be tall and skinny and another layer might be more short and squat. Since I used hot glue to attach the cups over time some of the cups did pop off. Every now and then I also found it easier to pull a cup off the cardboard to get a stuck rounded ornament out. The best part about a DIY solution like this is that you can easily reattach the cups or use that space between the cups for a larger ornament. If you choose to make this I found it best to leave a small space free from cups at one edge of the cardboard so you can cut a little circle to more easily pull up the layer. Though if you don’t add it you could always pull on the cups to get it out.
Store-bought Ornament Container
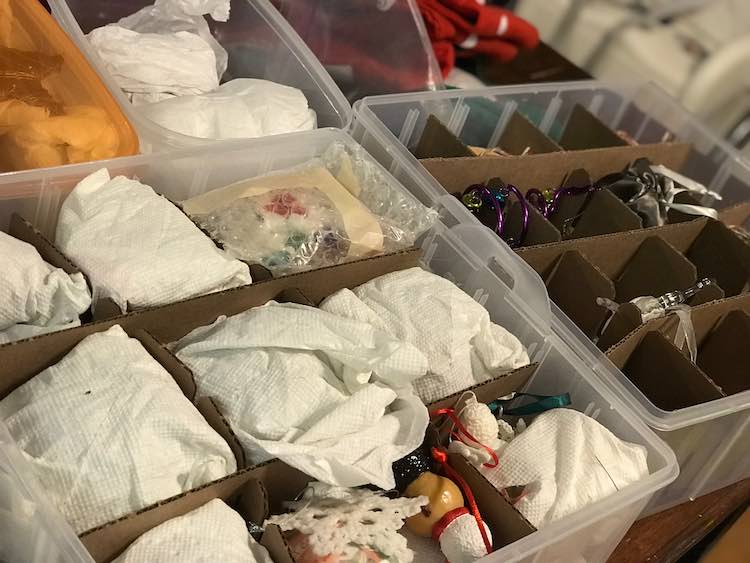
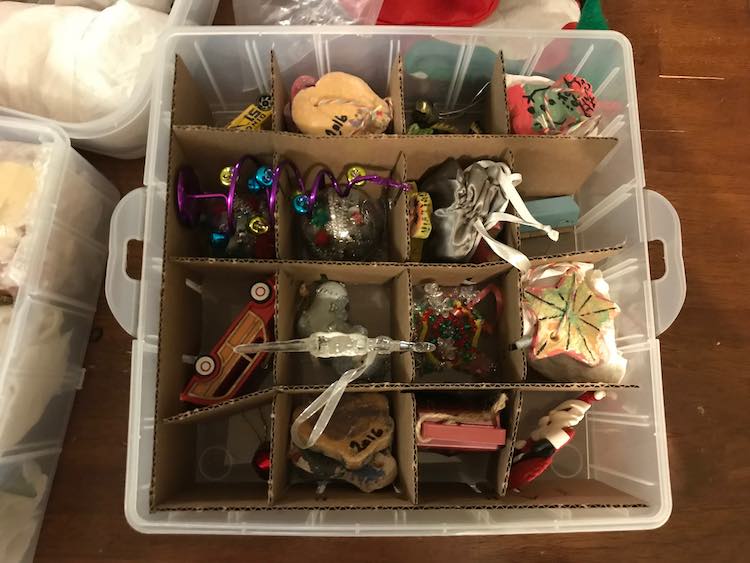
Last year at either Walmart or Target I found a better solution for our ornaments. The box I found comes with two separate containers that stack with cardboard separators that are perfect for organizing our ornaments. The smaller and more breakable ornaments are still wrapped in paper towel, but are mainly in one place. Any ornaments that don’t fit get wrapped and put into a regular lidded container from the Dollar Tree. These containers then go into our larger bins and without the cups we can fit more in the bins than before.
The container itself comes in three pieces that fit together. The top part consists of a lid with handle that clips onto the middle layer. The other two parts are the containers that stack up to be clipped together. This month I happened to see a similar one at JOANNs Fabrics and a three tiered container at Michaels Arts and Crafts so, if you’re looking, they may be everywhere.

I just wanted to share this in case you’re starting to wonder how to package your ornaments. I find it an ever evolving process that has ebbed and flowed with the years. This year the kids have been playing with the lower ornaments on the tree so a couple of them have already chipped or been broken. With the ornaments that Ada and Zoey want to make this year we’ll see if they still fit this year.
I’d love to see your ornament packing away solutions! We could always use more ideas in the future. Please share in the comments below, on my Facebook page, or through Instagram. I hope you had a great holiday and are having a wonderful day!