
Christmas Handprint, Footprint, and Fingerprint Door Hanging Sign

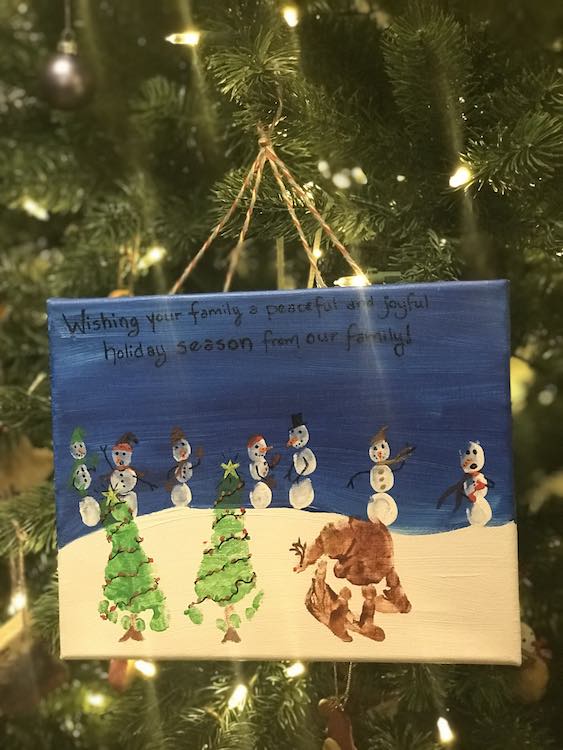

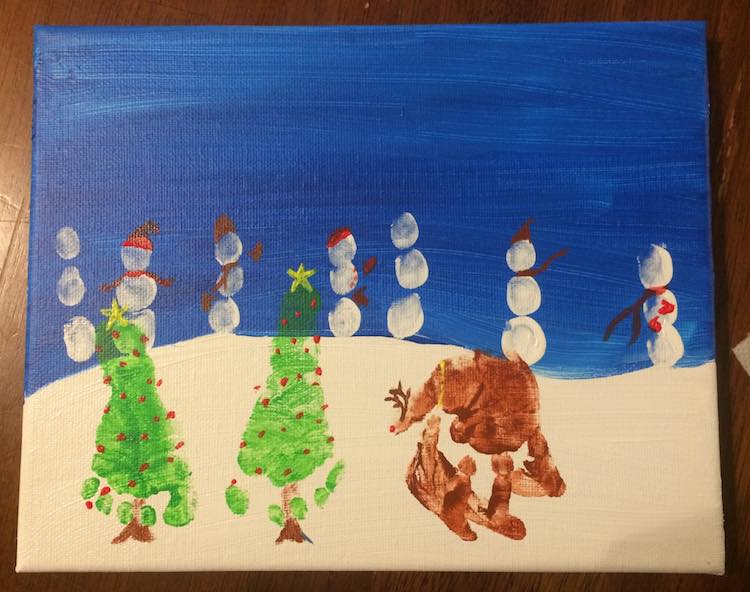
I couldn’t wait to show you my Christmas door sign. I made it last year and was super excited to pull it out of our Christmas boxes. For the Christmas sign I wanted to include a variety of characters and prints. As Ada’s hands and feet were getting bigger I decided to make her the snowman queen and have her make all the snowmen fingerprints with me. I planned to have Zoey’s feet make the Christmas trees, same orientation and different color from our Halloween Ghost sign, and use her hands to make reindeer. To tie my idea together I decided to make a less abstract background this time so I painted it.
Materials
Overall you need
- Canvas, light wood board, or anything that’s light enough to be hangable
- Acrylic paints
- background was blue and white
- green for the Christmas trees
- brown for the reindeer
- snowmen were white
- miscellaneous colors for the details
- Oil-based paint pen: text and details on the characters
- (optional) Glow paint
- (optional) Mod Podge
- Ribbon or string to hang the canvas with
- Hot glue gun
- Hot glue sticks
- Command Hook: to hang it if you haven’t set anything up
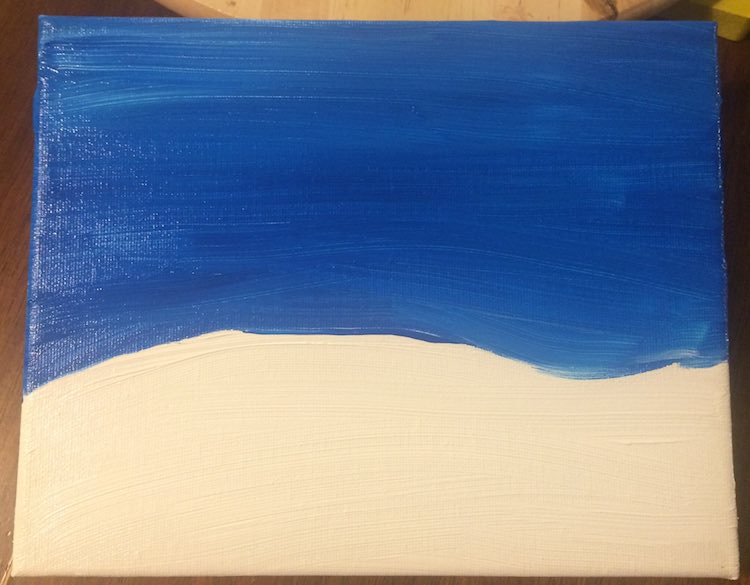
The first step of this was to create your background. I decided to go less abstract this time and painted the background of the scene outside where it would be reasonable to find snowmen, decorated trees, and an occasional reindeer. I kept it simple so the characters would pop better. I made the sky blue and the ground white with snow. You could choose to make the separation between the colors flat or curvy as if it was hilly.
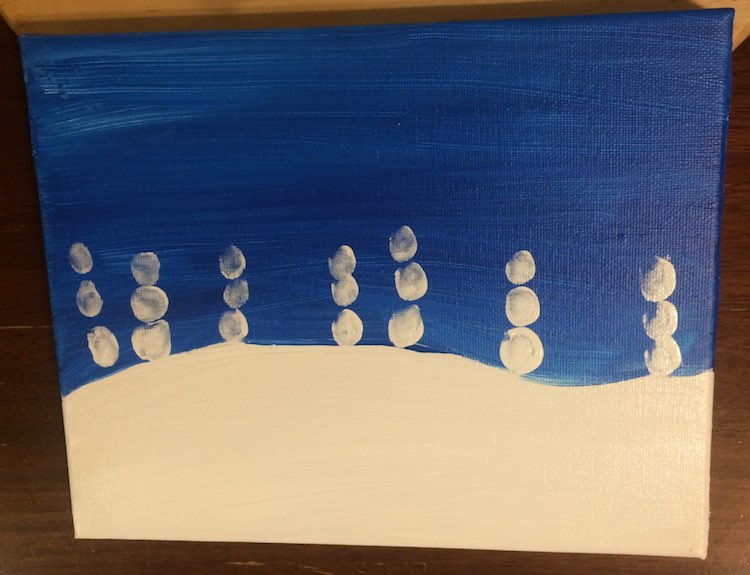
I decided to place the snowmen in the background along the top of the hill and the trees and reindeer in the foreground so I made the snowmen first. Just remember anything further forward will cover up anything behind it so place your prints in order from back to front if you think there may be overlap. When making the snowmen I tried to keep the fingerprints touching so they wouldn’t appear to be floating but that couldn’t always happen. At first I planned to use different fingers for the different size snowballs in the snowmen but as Ada was only a few months past two I ended up using her thumb for all the snowballs and attempted to press harder on the bottom snowballs and lighter on the top ones.
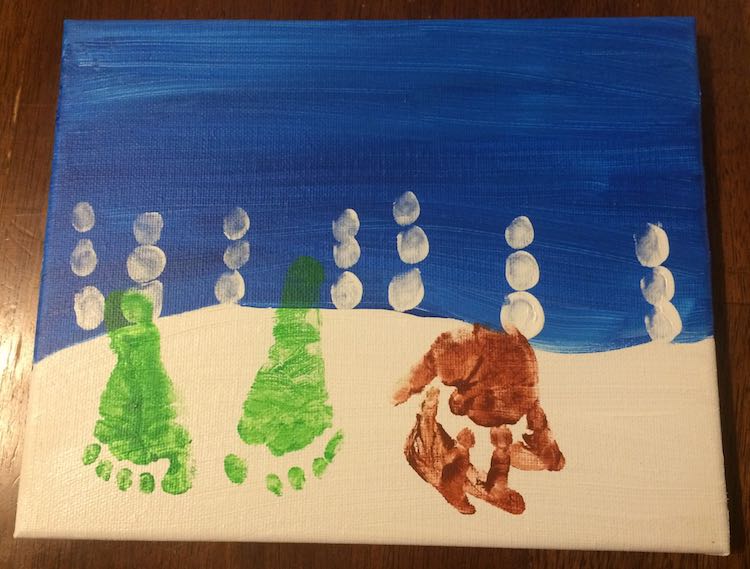
Next I went on to add the foreground. For the Christmas tree I used green and to get the tree shape you stamp your child’s footprint upside down. For the reindeer I used brown and you stamp their hand upside down so the thumb is the head looking down (grazing) and the fingers are the legs. Zoey didn’t cooperate with the handprint so I decided the reindeer was running (action photo!) and made only one. Depending on the thickness of your print and the opacity of the paint there may be some transparency issues. Over the white snow this didn’t matter but my Christmas trees became harder to see when in front of the sky. If this might be an issue you could always plan to use a lighter sky and/or a darker or thicker color for the paints.
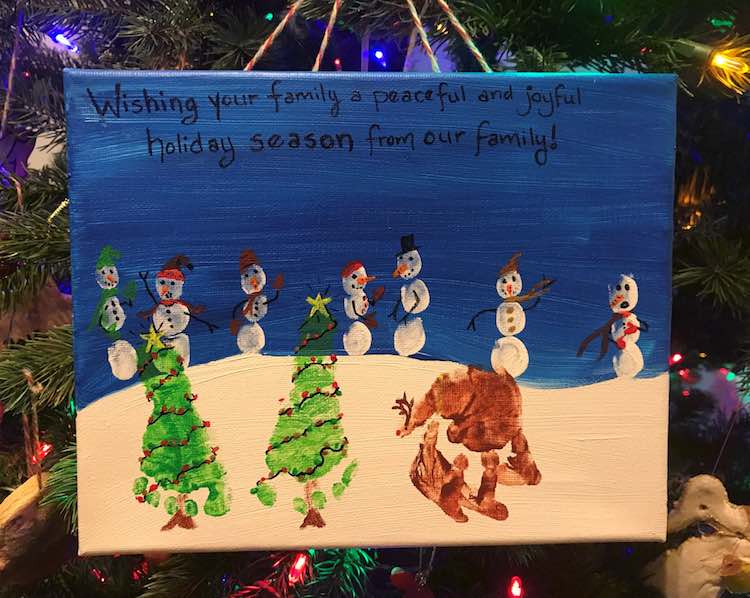
Once your prints have dried and the kids are busy or asleep you can have fun adding the details. I decided ahead of time to use my black oil-based paint pen for the string of lights, the reindeer eyes, the snowmen’s face, and the snowmen’s buttons. I then started adding the details with various acrylic paints. I chose a color and painted everything that needed that color, washed off my brush, and then went onto the next paint color. For the reindeer I added brown antlers and a red nose. The Christmas trees were topped with a yellow star on the top, given height with a brown trunk between the toes, and adorned with red, green, and gold Christmas lights. For the Christmas lights I added them at a diagonal so after they dry and I add the black string it would look like it was strung with corded Christmas lights. The snowmen were given individuality with a variety of styles involving toques, top hats, scarves, and mittens. Don’t forget the orange carrot nose on their faces.
And finally when the paint dried again I added the text to the top: “Wishing your family a peaceful and joyful holiday season from our family”. You could even keep it simple with a “Merry Christmas”. My favorite part of this was adding the details to the snowmen and seeing what personalities emerged with their facial expressions and arm placement. The addition of the hat alone could change which direction they were facing or the tilt of their heads.
In previous door signs I’ve outline the main text with glow paint. If your sign is hanging in a dark area you could always add the glow paint to the letters.
And the painting is done. If you want to hang it from a command hook, like I did from our front door, you’re going to want to add something to hang it with. I used two lengths of festive yarn cut to size, folded them in half, tied a knot with a loop, and then glued them to the back of the sign.

If you want more details on placing the command hook on the door, making the foot or hand prints, or just another perspective you can check out my Thanksgiving Turkey Handprint Door Sign or my Halloween Ghosts Footprint Door Sign. I hope this helps you make a wintery sign. Feel free to share what you created through the comments below, on my Facebook page, or through Instagram.